Samsung HG46NC890XF Installation Guide Ver.1.0 (English) - Page 8
Component In / Av In, Component In, Video 1, Av In1 [y/video], Av In1 [y/video], Vol-ctrl, Variable
 |
View all Samsung HG46NC890XF manuals
Add to My Manuals
Save this manual to your list of manuals |
Page 8 highlights
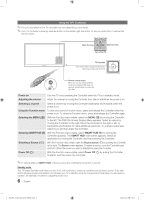
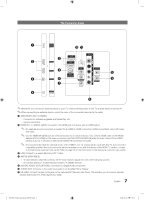
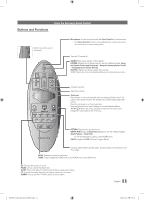
8 COMPONENT IN / AV IN -- Use to connect to Component video / audio devices such as DVD players and AV (Composite) devices such as VCRs. -- Connect audio cables to "R-AUDIO-L" on your TV and the other ends to corresponding audio out jacks on A/V or Component devices. -- The COMPONENT IN jack is also used as the VIDEO 1 jack. -- Connect component video cables (not supplied) to the component jacks ("PR", "PB", "Y") on the rear of your TV and the other ends to corresponding component video out jacks on a DVD player. Match the colors on the jacks and cables. -- If you want to connect both a Set-Top Box and a DVD player, you should connect the Set-Top Box to the DVD and connect the DVD to the component jacks ("PR", "PB", "Y") on your TV. -- The PR, PB and Y jacks on your component devices (DVD) are sometimes labeled Y, B-Y and R-Y or Y, Cb and Cr. -- For AV devices, connect RCA audio cables (not supplied) to "R - AUDIO - L" on the rear of the TV set and the other ends to corresponding audio out jacks on an external device. -- When your are connecting a composite (AV) device to AV IN1 [Y/Video], connect the video cable (Yellow) to the AV IN1 [Y/VIDEO] jack (Green/Yellow) . 9 VOL-CTRL: Used to control the volume of the Bathroom speaker. Connect the Bathroom Wall Box and the VOLCTRL port. 0 VARIABLE AUDIO OUT: Used for the audio output to the Bathroom speaker. Connect the Bathroom Wall Box and the Variable port (RCA). ! DATA -- Used to support data communication between the TV and the SBB or STB. -- Connects using RJ-12 TV type plugs. @ DVI AUDIO IN: Connects to the audio out jack of an external DVI device using a 1/8th inch stereo phone jack cable. Some DVI devices may not or should not need this connection audio. 8 English [HC890_ZA]Install_Guide_00ENG.indd 8 2014-04-02 1:39:13
-
 1
1 -
2
-
 3
3 -
 4
4 -
 5
5 -
 6
6 -
 7
7 -
 8
8 -
 9
9 -
 10
10 -
 11
11 -
 12
12 -
 13
13 -
14
-
15
-
16
-
17
-
18
-
19
-
20
-
21
-
22
-
23
-
24
-
25
-
26
-
27
-
28
-
29
-
30
-
31
-
32
-
33
-
34
-
35
-
36
-
37
-
38
-
39
-
40
-
41
-
42
-
43
-
44
-
45
-
46
-
47
-
48
-
49
-
50
-
51
-
52
-
53
-
54
 |
 |