Samsung HP-P5091 User Manual (user Manual) (ver.1.0) (English)
Samsung HP-P5091 Manual
 |
View all Samsung HP-P5091 manuals
Add to My Manuals
Save this manual to your list of manuals |
Samsung HP-P5091 manual content summary:
- Samsung HP-P5091 | User Manual (user Manual) (ver.1.0) (English) - Page 1
with WIRELESS HOME AV CENTER Owner's Instructions HP-P5091 - Samsung HP-P5091 | User Manual (user Manual) (ver.1.0) (English) - Page 2
used for viewing. Uneven PDP aging as a result of format selection and use, as well as burned-in images, are not covered by your Samsung limited warranty. Notes on the WIRELESS HOME AV CENTER Installation The wireless signal is transmitted/received from the front of the WIRELESS HOME AV CENTER - Samsung HP-P5091 | User Manual (user Manual) (ver.1.0) (English) - Page 3
hooking up a PC to this PDP) on the plasma display panel for more than several minutes as it can cause screen image retention. This image retention is also known as "screen burn". To avoid such image retention, refer to page 48 of this manual to reduce the degree of brightness and contrast - Samsung HP-P5091 | User Manual (user Manual) (ver.1.0) (English) - Page 4
Plasma Base ....28 Wall Installation Instructions 29 Operation Turning the the Color Tone 50 DNIe (Digital Guide 74 Using the EPG (Electronic Program Guide) ......75 Appendix Troubleshooting 78 Care and Maintenance 81 Specifications 82 Note • The information contained in this User's Manual - Samsung HP-P5091 | User Manual (user Manual) (ver.1.0) (English) - Page 5
PLASMA DISPLAY PANEL with WIRELESS HOME AV CENTER General Information Your New Plasma Display Panel 6 WIRELESS AV RECEIVER 8 Your WIRELESS HOME AV CENTER 9 Remote Control Buttons 11 - Samsung HP-P5091 | User Manual (user Manual) (ver.1.0) (English) - Page 6
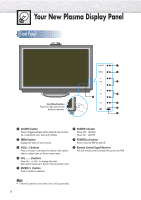
Your New Plasma Display Panel Front Panel Front Panel buttons Touch the right side of each button to operate. 8 7 ΠSOURCE button Press to toggle between all the external - Samsung HP-P5091 | User Manual (user Manual) (ver.1.0) (English) - Page 7
Rear Panel Œ ONLY FOR SERVICE For Service only ´ WIRELESS SIGNAL INPUT Connect to the WIRELESS AV RECEIVER's cables, attach one of these ferrite cores to the cable near the connector. For instructions refer to page 23. Checking Accessories Note • External speakers(PSN5042) and stand(SMN5040) - Samsung HP-P5091 | User Manual (user Manual) (ver.1.0) (English) - Page 8
WIRELESS AV RECEIVER 1. ONLY FOR SERVICE For Service only 2. AV SIGNAL JACK Connect to the WIRELESS SIGNAL INPUT Port on the rear of the PDP. 8 - Samsung HP-P5091 | User Manual (user Manual) (ver.1.0) (English) - Page 9
. ∏ ENTER Press to activate a selection when using the on-screen menus. " ARROW (UP/DOWN/LEFT/RIGHT) Push these buttons to navigate the on-screen Guide and menu system. Used for CH / and VOL +/-. Note • Before use, remove the protective plastic sheet attached to the front panel of the WIRELESS HOME - Samsung HP-P5091 | User Manual (user Manual) (ver.1.0) (English) - Page 10
• Audio bitstreams except Dolby Digital are not supported. These streams include MPEG-1, MPEG-2 and DTS. • Other devices except DVD player are not supported. These devices include game devices and digital settop or A/V receiver with an optical digital audio input. Ô ONLY FOR SERVICE For Service only. - Samsung HP-P5091 | User Manual (user Manual) (ver.1.0) (English) - Page 11
sound. Ø VOL / buttons Adjusts volume. ∏ GUIDE button Displays the on-screen Program Guide. " MENU button Displays the on-screen menus Selects a target device to be controlled by the Samsung remote control (i.e., VCR, Cable Box, DVD player, Samsung Set-Top Box, or other devices). Ú POWER OFF - Samsung HP-P5091 | User Manual (user Manual) (ver.1.0) (English) - Page 12
. ≠ DNIe button Activates DNIe (Digital Natural Image engine). - SLEEP button Selects a preset time interval for automatic shutoff. - SET button Sets up the Samsung remote control to work with other devices (VCR, Cable Box and DVD). Refer to page 46. ÷ S.MODE button Selects the sound mode. ® P.MODE - Samsung HP-P5091 | User Manual (user Manual) (ver.1.0) (English) - Page 13
PLASMA DISPLAY PANEL with WIRELESS HOME AV CENTER Connections Connecting the PDP to the WIRELESS HOME AV CENTER 14 Connecting VHF and UHF to a second TV 22 Connecting Speakers 23 Installing the Speakers 24 How to assemble and attach the Stand-Base 28 Wall Installation Instructions 29 - Samsung HP-P5091 | User Manual (user Manual) (ver.1.0) (English) - Page 14
Connecting the PDP to the WIRELESS HOME AV CENTER Connecting the PDP to the WIRELESS HOME AV CENTER 1 Make sure your PDP, A/V receiver and WIRELESS HOME AV CENTER are turned off and unplugged. 2 Install the WIRELESS HOME AV RECEIVER onto the bracket located at the top of the PDP's rear panel, in the - Samsung HP-P5091 | User Manual (user Manual) (ver.1.0) (English) - Page 15
Connecting VHF and UHF Antennas Antennas with 75-ohm Round Leads If your antenna looks like this: it has 75-ohm round leads. 1 Plug the antenna lead into the AIR terminal on the WIRELESS HOME AV CENTER. Use the antenna cable included in the product package. 15 - Samsung HP-P5091 | User Manual (user Manual) (ver.1.0) (English) - Page 16
Connecting Cable TV You can connect different cable systems to your WIRELESS HOME AV CENTER, including cable without a Cable box, and cable with a Cable box that descrambles some or all channels. Cable without a Cable Box 1 Plug the incoming cable into the cable terminal on the WIRELESS HOME AV - Samsung HP-P5091 | User Manual (user Manual) (ver.1.0) (English) - Page 17
Connecting a VCR Connecting a VCR to the Video or S-Video/Audio jack WIRELESS HOME AV CENTER VCR Audio cable S-Video cable Video cable How to Connect Connect the Video/Audio cables between the VIDEO or S-VIDEO / L - AUDIO - R jacks to the WIRELESS HOME AV CENTER and VIDEO or S-VIDEO / L - AUDIO - Samsung HP-P5091 | User Manual (user Manual) (ver.1.0) (English) - Page 18
to select "VIDEO(AV1 or AV2)" or "S-VIDEO". 3. Turn on your camcorder and set it to video mode. (For details, refer to your camcorder owner's instructions.) 4. Set the IN/OUT switch on your camcorder to OUT. 5. Insert the tape into the camcorder and press the Play button. 18 - Samsung HP-P5091 | User Manual (user Manual) (ver.1.0) (English) - Page 19
Audio cables. 4. Turn on your DVD player, insert a DVD disc and press the Play button. • For an explanation of component video, see your DVD owner's instructions. 19 - Samsung HP-P5091 | User Manual (user Manual) (ver.1.0) (English) - Page 20
AV CENTER. 2. Press the SOURCE button to select "COMPONENT". 3. Turn on your DTV receiver. • For an explanation of component video, see your DTV receiver owner's instructions. 20 - Samsung HP-P5091 | User Manual (user Manual) (ver.1.0) (English) - Page 21
is shown below. For more information, see your audio system owner's manual. WIRELESS HOME AV CENTER Digital Audio System or Coaxial cable Optical 3 If your system has both coaxial and optical digital audio inputs, SAMSUNG recommends you use the optical digital output on the WIRELESS HOME AV - Samsung HP-P5091 | User Manual (user Manual) (ver.1.0) (English) - Page 22
Connecting to a second TV WIRELESS HOME AV CENTER TV Audio cable Video cable How to Connect Connect the Video/Audio cables between TV out / L - AUDIO - R jacks on the WIRELESS HOME AV CENTER to VIDEO / L - AUDIO - R input jacks on the second TV. Notes • Please be sure to match the color coded - Samsung HP-P5091 | User Manual (user Manual) (ver.1.0) (English) - Page 23
Connecting Speakers External speakers are sold separately. Check with your dealer. Speakkeerr Cable ✱ External speakers MUST have a power handling capability of 12 watts minimum (impedance 8 ohm). How to Connect Connect the speaker audio cable to the external speaker output jack on the PDP matching - Samsung HP-P5091 | User Manual (user Manual) (ver.1.0) (English) - Page 24
Installing the Speakers This speaker installation guide is for the PSN5042 speakers. Parts Speakers Speaker Dust Cover Middle Cabinet (Wall Mount Only) 1EA 1EA 2EA Speaker Cable Screws 2EA Screw 2EA! Screw - Samsung HP-P5091 | User Manual (user Manual) (ver.1.0) (English) - Page 25
into the square grooves located on either side of the PDP's bottom rear, then push the speaker guide bracket towards the center (as the arrow illustrates). Secure the speaker guide bracket with provided screws @. (Always use the proper screws, as indicated.) Screw② 3 Secure the speaker dust cover - Samsung HP-P5091 | User Manual (user Manual) (ver.1.0) (English) - Page 26
bracket into the square grooves located on either side of the PDP's bottom rear, then push the speaker guide bracket towards the center (as the arrow illustrates). Secure the speaker guide bracket with provided screws @. Secure the middle cabinet to the center of the PDP with a screw !. (Always use - Samsung HP-P5091 | User Manual (user Manual) (ver.1.0) (English) - Page 27
3 Secure the speaker dust cover by setting it into the grooves located on the front side of the speakers. 4 Connect the speakers to the PDP using the speaker cables. The connection terminals are on the rear side of both the PDP and the speakers. (Match the color coded terminals and cables.) BLACK - Samsung HP-P5091 | User Manual (user Manual) (ver.1.0) (English) - Page 28
How to assemble and attach the Stand-Base This guide is for the SMN5040 stand. 1 Firmly secure the pegs to the both sides of the stand base using 8 screws provided. 2 Using the 4 screws for securing - Samsung HP-P5091 | User Manual (user Manual) (ver.1.0) (English) - Page 29
only recommended parts and components. ➤ This wall mount bracket installation guide is for the following model : HP-P5091 Parts (Wall attachment panel is sold separately. Check with your dealer.) Wall Mount Bracket ASSY-HINGE 1EA Support Bars 2EA LEFT :1EA RIGHT :1EA Screws Insulation Holder - Samsung HP-P5091 | User Manual (user Manual) (ver.1.0) (English) - Page 30
-HINGE (LEFT) Separate ASSY-HINGE into left and right. Wall Mount Bracket ASSY-HINGE (RIGHT) 2 After installing the wall mount bracket, assemble the support bars and hinges (as illustrated) using screws provided. (12 screws(@) are provided. For safety reasons, make sure all 12 screws are firmly - Samsung HP-P5091 | User Manual (user Manual) (ver.1.0) (English) - Page 31
. 3 Tighten the screws of the Insulation holders to the back of the PDP. Note • A 5 inch(12.7 cm) gap is needed between the back of the Plasma TV and the wall. 4 Put the 4 insulation holders on the PDP in the grooves of the wall mount bracket and pull down on the PDP - Samsung HP-P5091 | User Manual (user Manual) (ver.1.0) (English) - Page 32
the PDP to adjust the angle (not the sides of the PDP). 1 Secure the PDP to the wall mount bracket. (Please refer to the following instructions.) 2 Set the angle by pulling the upper end of the PDP attached to bracket in the direction of the arrow. 3 The angle can be adjusted - Samsung HP-P5091 | User Manual (user Manual) (ver.1.0) (English) - Page 33
PLASMA DISPLAY PANEL with WIRELESS HOME AV CENTER Operation Turning the PDP On and Off 34 Memorizing the Channels 35 Using the On-Screen Help 40 - Samsung HP-P5091 | User Manual (user Manual) (ver.1.0) (English) - Page 34
main menu appears on the screen. The Guide menu is selected. TV Guide Mini Guide Full Guide Remind List Default Guide Mini Guide √ Move Enter Return 2 Press the caption information. Air 10 SD Mono No title 8:15 PM Fri Nov 09 No Detail Information DTV Air 13-1 TV #1 10:44 AM Wed Sep - Samsung HP-P5091 | User Manual (user Manual) (ver.1.0) (English) - Page 35
digits. There are three steps for memorizing channels: selecting a broadcast source, memorizing the channels (automatic) and adding and deleting channels (manual). Selecting the Video Signal-source Before your television can begin memorizing the available channels, you must specify the type of - Samsung HP-P5091 | User Manual (user Manual) (ver.1.0) (English) - Page 36
Storing Channels in Memory (Automatic Method) 1 First, select the correct antenna (Air and Cable). See steps on previous page. Press the MENU button. Press the ▲ or ▼ button to select "Channel", then press the ENTER button. TV Channel Select Antenna : Air √ Auto Program √ Add/Delete √ - Samsung HP-P5091 | User Manual (user Manual) (ver.1.0) (English) - Page 37
Adding and Deleting Channels (Manual Method) 1 Use the number buttons to directly select the channel that will be added or deleted. Ex) Channel "11" Air 11 Mono 2 Press the ADD/ - Samsung HP-P5091 | User Manual (user Manual) (ver.1.0) (English) - Page 38
Changing Channels Using the Channel Buttons Press the CH or CH button to change channels. When you press the CH or CH button, the PDP changes channels in sequence. You will see all the channels that the PDP has memorized. (The PDP must have memorized at least three channels.) You will not see - Samsung HP-P5091 | User Manual (user Manual) (ver.1.0) (English) - Page 39
Adjusting the Volume Using the Volume Buttons Press the VOL or VOL volume. button to increase or decrease the Using Mute Using the MUTE Button At any time, you can temporarily cut off the sound using the MUTE button. 1 Press the MUTE button and the sound cuts off. 2 The word "Mute" will appear - Samsung HP-P5091 | User Manual (user Manual) (ver.1.0) (English) - Page 40
Using the On-Screen Help To turn the on-screen help on : 1 Press the MENU button. Press the ▲ or ▼ button to select "Preference", then press the ENTER button. 2 Press the ▲ or ▼ button to select "Function Help", then press the ENTER button. The on-screen help appears. 3 Press the ▲ or ▼ button to - Samsung HP-P5091 | User Manual (user Manual) (ver.1.0) (English) - Page 41
Setting your Favorite Channels Use this function to set your Favorite Channels from channels stored in Memory. 1 Press the MENU button. Press the ▲ or ▼ button to select "Preference", then press the ENTER button. 2 Press the ENTER button. The Favorite Channels option is displayed. 3 Press the ▲ or - Samsung HP-P5091 | User Manual (user Manual) (ver.1.0) (English) - Page 42
Fine Tuning Channels Use fine tuning to manually adjust a particular channel for optimal reception. 1 Press the MENU button. Press Tune Auto Fine Tuned 3 Reset Save Return Air 3* Adjust Fine Tune Manually Fine Tuned 3 Reset Save Return Air 3 Move Fine Tune Auto Fine Tuned 0 Reset - Samsung HP-P5091 | User Manual (user Manual) (ver.1.0) (English) - Page 43
Setting the Date and Time To set the date and time, you must select a channel with a digital signal. 1 Press the MENU button. Press the ▲ or ▼ button to select "Setup", then press the ENTER button. 2 Press the ▲ or ▼ button to select "Time", then press the ENTER button. TV Setup Menu Language : - Samsung HP-P5091 | User Manual (user Manual) (ver.1.0) (English) - Page 44
with the strongest signal. 4 When you have finished adjusting your antenna, use the MENU button to exit. TV Guide Mini Guide Full Guide Remind List Default Guide Mini Guide √ Move Enter Exit TV Channel Select Antenna : Air Auto Program √ Add/Delete √ Fine Tune √ Signal Strength - Samsung HP-P5091 | User Manual (user Manual) (ver.1.0) (English) - Page 45
Players, VCRs, Cable boxes. ● The remote control can only operate Set-Top Boxes made by Samsung. Setting Up the Remote to Operate Your VCR, Cable box or DVD player 1 Turn off your VCR (or Cable box, DVD player) listed on page 46 of this manual for your brand of VCR (or Cable box, DVD). Make sure you - Samsung HP-P5091 | User Manual (user Manual) (ver.1.0) (English) - Page 46
Shack/Realistic 006, 018, 020, 021, 024, 025, 029, 034, 048, 056 RCA 017, 019, 002, 021, 035, 041, 043, 057, 068 Brand Samsung Sansui Sanyo Scott Sears Sharp Shimom Signature Sony Sylvania Symphonic Tandy Tashika Tatung Teac Technics Teknika TMK Toshiba Totevision Unitech Vector Research Victor - Samsung HP-P5091 | User Manual (user Manual) (ver.1.0) (English) - Page 47
PLASMA DISPLAY PANEL with WIRELESS HOME AV CENTER Picture Control Customizing the Picture 48 Using Automatic Picture Settings 49 Selecting the Color Tone 50 DNIe (Digital Natural Image engine 51 Changing the Picture Size 52 - Samsung HP-P5091 | User Manual (user Manual) (ver.1.0) (English) - Page 48
see the items "Contrast", "Brightness", "Sharpness", "Color", and "Tint". Move Enter TV Picture Sound Function Contrast Brightness Sharpness Color Tint G 50 Custom Return 100 45 75 55 R 50 5 Press the ▲ or ▼ button to select the item you wish to change, then press the œ or √ button to change - Samsung HP-P5091 | User Manual (user Manual) (ver.1.0) (English) - Page 49
Using Automatic Picture Settings Your PDP has automatic picture settings that allow you to adjust the video display easily. 1 Press the MENU button. Press the ▲ or ▼ button to select "Setup", then press the ENTER button. ➤ Quick way to access the picture setting: Just press the "P.MODE" button on - Samsung HP-P5091 | User Manual (user Manual) (ver.1.0) (English) - Page 50
TV Picture Sound Mode Custom Color Tone DNIe Function Picture : DynaCmooicl 2 Cool 1 : ColoNroTromnea2l √ : On Warm 1 √ Warm 2 Move Enter Return 6 Press the MENU button to exit. 50 - Samsung HP-P5091 | User Manual (user Manual) (ver.1.0) (English) - Page 51
DNIe (Digital Natural Image engine) Samsung's new technology brings you more detailed images with contrast, white enhancement and 3D noise reduction. 1 Press the MENU button. Press the ▲ or ▼ button to select " - Samsung HP-P5091 | User Manual (user Manual) (ver.1.0) (English) - Page 52
Changing the Picture Size Picture Size selection depends on the type of video input (DVD, Antenna, etc.). Note • Quick way to access the Picture Size menu : press the "ASPECT" button on the remote control. 1 Press the MENU button. Press the ▲ or ▼ button to select "Setup", then press the ENTER - Samsung HP-P5091 | User Manual (user Manual) (ver.1.0) (English) - Page 53
16:9 (Wide) Sets the picture to 16:9 wide mode. Zoom1 The screen size when Wide screen is vertically enlarged. 16:9 4:3 (Normal) Sets the picture to 4:3 normal mode. Zoom1 Zoom2 The screen size when the Zoom1 screen is vertically enlarged. 4:3 Panorama Converts regular 4:3 aspect ratio screen to - Samsung HP-P5091 | User Manual (user Manual) (ver.1.0) (English) - Page 54
- Samsung HP-P5091 | User Manual (user Manual) (ver.1.0) (English) - Page 55
PLASMA DISPLAY PANEL with WIRELESS HOME AV CENTER Sound Control Using an Automatic Sound Settings 56 Choosing a Digital Sound Format (Dolby Digital or PCM 57 Choosing a - Samsung HP-P5091 | User Manual (user Manual) (ver.1.0) (English) - Page 56
Using an Automatic Sound Settings 1 Press the MENU button. Press the ▲ or ▼ button to select "Setup", then press the ENTER button. ➤ Quick way to access the Sound Mode menu : Just press the "S.MODE" button on the remote control. 2 Press the ▲ or ▼ button to select "Display Picture/ Sound Menu", - Samsung HP-P5091 | User Manual (user Manual) (ver.1.0) (English) - Page 57
Choosing a Digital Sound Format (Dolby Digital or PCM) Both analog and digital audio are available from the rear-panel connectors of the WIRELESS HOME AV CENTER. The digital sound inputs and outputs are labeled "DIGITAL AUDIO OUT (COAXIAL), DIGITAL AUDIO OUT (OPTICAL), and DIGITAL AUDIO IN (OPTICAL - Samsung HP-P5091 | User Manual (user Manual) (ver.1.0) (English) - Page 58
Choosing a Multi-Track Language The digital-TV transmission system is capable of simultaneous transmission of many audio tracks (for example, simultaneous translations of the program into foreign languages). The availability of these additional "multitracks" depends upon the program. To select a - Samsung HP-P5091 | User Manual (user Manual) (ver.1.0) (English) - Page 59
Choosing a Multi-Track Sound (MTS) Soundtrack Depending on the particular program being broadcast, you can listen to stereo, mono, or a Separate Audio Program. (SAP audio is usually a foreign-language translation. Sometimes SAP has unrelated information like news or weather.) 1 Press the MENU - Samsung HP-P5091 | User Manual (user Manual) (ver.1.0) (English) - Page 60
Adjusting the Sound Settings The sound settings can be adjusted to suit your personal preferences. 1 Press the MENU button. Press the ▲ or ▼ button to select "Setup", then press the ENTER button. 2 Press the ▲ or ▼ button to select "Display Picture/ Sound Menu", then press the ENTER button. 3 Press - Samsung HP-P5091 | User Manual (user Manual) (ver.1.0) (English) - Page 61
Setting the TruSurround XT TruSurround XT is a patented SRS technology that solves the problem of playing 5.1 multichannel content over two speakers. TruSurround delivers a compelling, virtual surround sound experience through any two-speaker playback system, including internal television speakers. - Samsung HP-P5091 | User Manual (user Manual) (ver.1.0) (English) - Page 62
Using the Dynamic Range Compression (DRC) When you switch channels, the volume may vary depending on the channel. The Dynamic Range Compression function can adjust the volume difference automatically. 1 Press the MENU button.Press the ▲ or ▼ button to select "Setup", then press the ENTER button. 2 - Samsung HP-P5091 | User Manual (user Manual) (ver.1.0) (English) - Page 63
PLASMA DISPLAY PANEL with WIRELESS HOME AV CENTER Function Description Selecting the Fan 64 Viewing Closed Captions 65 Setting Up Digital Captions 66 Using the V-Chip 68 Electronic Program Guide 74 Using the EPG (Electronic Program Guide 75 - Samsung HP-P5091 | User Manual (user Manual) (ver.1.0) (English) - Page 64
Selecting the Fan Operates or stops the TV's internal fan. Fans inside the TV are used to reduce the temperature of the top and the front of the TV. The fans can be set to "Off", however, the temperature of the top and the front of the TV may increase when you watch the TV for a long period of time - Samsung HP-P5091 | User Manual (user Manual) (ver.1.0) (English) - Page 65
program-related caption data, typically second language captions. CC4 : Special Non-Synchronous Use Captions. Similar to CC2. T3/T4 : Third and Fourth Text Services. These data channels should be used only if T1 and T2 data bandwidths not sufficient. 5 Press the MENU button to exit. Note • Closed - Samsung HP-P5091 | User Manual (user Manual) (ver.1.0) (English) - Page 66
the ENTER button. The "Caption Options" will be activated. ➤ Either the reading level or the language may change depending on the service option. Move Enter Return TV Caption Caption Caption Mode Caption Options ... : OfDfefault Service1 : Service2 Service3 Service4 Service5 Service6 † Move - Samsung HP-P5091 | User Manual (user Manual) (ver.1.0) (English) - Page 67
]. [Flashing] is set to flash more than once per second (a flash every 0.3 second is recommended). Return to Default: This option sets Service, Size, Style, Foreground, and Background to its default. Note • The availability of captions depends on the program being broadcast. TV Caption Options - Samsung HP-P5091 | User Manual (user Manual) (ver.1.0) (English) - Page 68
Using the V-Chip The V-Chip feature automatically locks out programs that are deemed inappropriate for children. The user must enter a PIN (personal ID number) before any of the V-Chip restrictions are set up or changed. Setting Up Your Personal ID Number (PIN) 1 Press the MENU button. Press the ▲ - Samsung HP-P5091 | User Manual (user Manual) (ver.1.0) (English) - Page 69
How to Enable/Disable the V-Chip 1 Press the MENU button. Press the ▲ or ▼ button to select "Preference", then press the ENTER button. 2 Press the ▲ or ▼ button to select "V-Chip", then press the ENTER button. The message "Enter PIN" will appear. Enter your 4 digit PIN number. TV Preference - Samsung HP-P5091 | User Manual (user Manual) (ver.1.0) (English) - Page 70
How to Set up Restrictions using the "TV Parental Guidelines" First, set up a personal identification number (PIN), and enable the V-Chip. (See previous section.) Parental restrictions can be set up using either of two methods: The TV guidelines or the MPAA rating. 1 Press the MENU button. Press - Samsung HP-P5091 | User Manual (user Manual) (ver.1.0) (English) - Page 71
5 At this point, one of the TV-Ratings is selected. Press the ENTER button. Depending on your existing TV setup, a symbol will be selected. (Blank = Unblocked, = Blocked) While " " is selected, press the ENTER button to block or unblock the category. To select a different TV-Rating, press the ▲ - Samsung HP-P5091 | User Manual (user Manual) (ver.1.0) (English) - Page 72
How to Set up Restrictions using the MPAA Ratings: G, PG, PG-13, R, NC-17, X, NR The MPAA rating system uses the Motion Picture Association of America (MPAA) system, and its main application is for movies. When the V-Chip lock is on, the TV will automatically block any programs that are coded with - Samsung HP-P5091 | User Manual (user Manual) (ver.1.0) (English) - Page 73
How to Reset the TV after the V-Chip Blocks a Channel ("Emergency Escape") If the TV is tuned to a restricted channel, the V-Chip will block it. The screen will go blank and the following message will appear: 1 Press the ENTER button. Channel Is Locked by XXX Use the NUMBER buttons to enter your - Samsung HP-P5091 | User Manual (user Manual) (ver.1.0) (English) - Page 74
(2 hours). Press the Yellow button on the remote control and repeatedly press ENTER until the appropriate time is displayed. F Exits from the Program Guide and returns to normal viewing mode. Press the Blue button on the remote control. G Displays the program times (arranged in 1 hour time blocks - Samsung HP-P5091 | User Manual (user Manual) (ver.1.0) (English) - Page 75
. • Obtain additional program details: Use the Menu Up/Down/Left/Right buttons to highlight the title of a program and press ENTER. • Exit from the Program Guide and return to normal viewing mode: Press the Blue button (SRS) or the EXIT button. Note • You can switch to the - Samsung HP-P5091 | User Manual (user Manual) (ver.1.0) (English) - Page 76
- Samsung HP-P5091 | User Manual (user Manual) (ver.1.0) (English) - Page 77
PLASMA DISPLAY PANEL with WIRELESS HOME AV CENTER Appendix Troubleshooting 78 Care and Maintenance 81 Specifications 82 - Samsung HP-P5091 | User Manual (user Manual) (ver.1.0) (English) - Page 78
problem, first try this list of possible problems and solutions. If none of these troubleshooting tips apply, then call your nearest service center. WIRELESS HOME AV CENTER Problem line of sight to the WIRELESS HOME AV CENTER. PDP Problem Poor picture. Your remote control does not operate the PDP. - Samsung HP-P5091 | User Manual (user Manual) (ver.1.0) (English) - Page 79
the same band. The message "Please check resolution, AV Center can't support 720p/1080i component signal." appears in the Component Mode. Cause: AV OFF and then turn them back ON. If the problem persists, contact the nearest service center. Solution: During watching, another wireless device that - Samsung HP-P5091 | User Manual (user Manual) (ver.1.0) (English) - Page 80
PDP (Continued) Problem There is no signal in a digital channel, and messages "Searching for the corresponding signals. Or External Input has been selected but there is no signal. The message "Not supported sound format" appears. Cause: Digital Audio rather than AC-3 (such as DTS, MPEG-1 or MPEG - Samsung HP-P5091 | User Manual (user Manual) (ver.1.0) (English) - Page 81
the video from displaying. Install the PDP and WIRELESS HOME AV CENTER in the same place as near to each other as possible. Consult the Service Center nearest you if the communication error continues. Liquids • Do not place liquids near or on the PDP with WIRELESS HOME AV CENTER. Cabinet • Never - Samsung HP-P5091 | User Manual (user Manual) (ver.1.0) (English) - Page 82
Control Voltage Power Consumption Number of Pixels Screen Size VIDEO / AUDIO input/output HP-P5091(PDP) 1257 (W) x 84 (D) x 740 (H) mm ; 49.49 outputs SIR-TW491 (WIRELESS HOME AV CENTER) DTV (ATSC - 8VSB) / NTSC AC 120 V, 50-60Hz 30 watts / In standby: 2 watts 430 (W) x 322 (D) x 67 (H) mm ; - Samsung HP-P5091 | User Manual (user Manual) (ver.1.0) (English) - Page 83
Memo 83 - Samsung HP-P5091 | User Manual (user Manual) (ver.1.0) (English) - Page 84
1-800-SAMSUNG (1-800-726-7864) Samsung Electronics America Service Division 400 Valley Road, Suite 201 Mount Arlington, NJ 07856 www.samsungusa.com Samsung Electronics Canada Inc. Samsung Customer Care 7037 Financial Drive Mississauga, Ontario L5N 6R3 www.samsung.ca BN68-00629A-00
-
 1
1 -
 2
2 -
 3
3 -
 4
4 -
 5
5 -
 6
6 -
 7
7 -
8
-
9
-
10
-
11
-
12
-
13
-
14
-
15
-
16
-
17
-
18
-
19
-
20
-
21
-
22
-
23
-
24
-
25
-
26
-
27
-
28
-
29
-
30
-
31
-
32
-
33
-
34
-
35
-
36
-
37
-
38
-
39
-
40
-
41
-
42
-
43
-
44
-
45
-
46
-
47
-
48
-
49
-
50
-
51
-
52
-
53
-
54
-
55
-
56
-
57
-
58
-
59
-
60
-
61
-
62
-
63
-
64
-
65
-
66
-
67
-
68
-
69
-
70
-
71
-
72
-
73
-
74
-
75
-
76
-
77
-
78
-
79
-
80
-
81
-
82
-
83
-
84
 |
 |

Owner’s Instructions
HP-P5091
with WIRELESS HOME AV CENTER