Samsung MM-DX7 User Manual (user Manual) (ver.1.0) (English)
Samsung MM-DX7 Manual
 |
View all Samsung MM-DX7 manuals
Add to My Manuals
Save this manual to your list of manuals |
Samsung MM-DX7 manual content summary:
- Samsung MM-DX7 | User Manual (user Manual) (ver.1.0) (English) - Page 1
THIS APPLIANCE IS MANUFACTURED BY: PERSONAL MICRO COMPONENT SYSTEM MM-DX7 Instruction Manual AH68-01954C V I D E O COMPACT COMPACT DIGITAL AUDIO DIGITAL VIDEO - Samsung MM-DX7 | User Manual (user Manual) (ver.1.0) (English) - Page 2
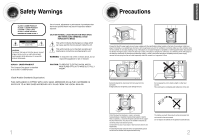
SHOCK, DO NOT REMOVE REAR COVER. NO USER SERVICEABLE PARTS INSIDE. REFER SERVICING TO QUALIFIED SERVICE PERSONNEL. CLASS 1 LASER PRODUCT This Compact Disc player unit. This symbol alerts you to important operating and maintenance instructions accompanying the unit. WARNING: To reduce the risk of fire - Samsung MM-DX7 | User Manual (user Manual) (ver.1.0) (English) - Page 3
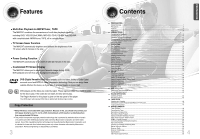
Function The MM-DX7 automatically brightens and darkens the brightness MM-DX7 automatically shuts itself off after 20 minutes in the stop . Customized TV Screen Display The MM-DX7 43 RADIO OPERATION Listening to Radio ...44 Recording a Radio Program ...52 Service ...58 Notes on Discs...60 - Samsung MM-DX7 | User Manual (user Manual) (ver.1.0) (English) - Page 4
(VIDEO IN) to the VIDEO OUT connector. AUX-Input Speaker Output Terminals Cable Clamp Voltage Selector(Option) Accessories Remote Control Video Cable AM Antenna User's Manual FM Antenna 6 PREPARATION - Samsung MM-DX7 | User Manual (user Manual) (ver.1.0) (English) - Page 5
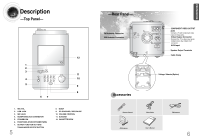
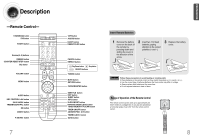
Description -Remote Control- TUNER(BAND) button DVD button POWER button Number(0~9) buttons REMAIN button COUNTER RESET/STEP button Skip button VOLUME button MENU button AUDIO button KEY CONTROL b &# button SILDE MODE button TREB/BASS/NT/PAL button EQ button DIGEST button P.SOUND button 7 TAPE - Samsung MM-DX7 | User Manual (user Manual) (ver.1.0) (English) - Page 6
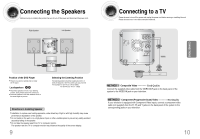
Connecting the Speakers Before moving or installing the product, be sure to turn off the power and disconnect the power cord. Right Speaker Left Speaker Connecting to a TV Please be sure to turn off the power and unplug the power cord before moving or installing this unit. Please choose one of - Samsung MM-DX7 | User Manual (user Manual) (ver.1.0) (English) - Page 7
Connecting to External Components Connecting to an External Analog Component Example: Analog signal components such as a VCR, Camcorder, and TV. Connecting the FM and AM(MW) Antennas If FM reception is poor, connect an outdoor FM antenna (not supplied). R L Audio Cable If the external analog - Samsung MM-DX7 | User Manual (user Manual) (ver.1.0) (English) - Page 8
is desirable for dealing with moving objects. Note • This function works only on TVs equipped with component video inputs (Y, Pr, Pb) that support Progressive Video. (It does not work on TVs with conventional component inputs, i.e., non-progressive scan TVs.) • Depending on the capabilities of - Samsung MM-DX7 | User Manual (user Manual) (ver.1.0) (English) - Page 9
Disc Playback 1 Load a disc. • Insert a disc that the disc's label facing up. 2 To eject the disc,press EJECT button MP3/WMA-CD Playback Data CDs (CD-ROM, CD-R, CD-RW) encoded in MP3/WMA format can be played. Load the MP3/WMA 1 disc. • The MP3/WMA menu screen will appear and playback will start. • - Samsung MM-DX7 | User Manual (user Manual) (ver.1.0) (English) - Page 10
subtitle file, it will be played automatically. • Up to 8 subtitle languages are supported. If the disc has more than one subtitle file If the disc has more must be stored on CD in the ISO 9660 format. VIDEO Compatibility SPEC DivX3.11 Up to the latest VERSION MPEGs containing DivX can be divided - Samsung MM-DX7 | User Manual (user Manual) (ver.1.0) (English) - Page 11
Displaying Disc Information You can view playback information on the disc on the TV screen. Press INFO button. • Each time the button is pressed, the display changes as follows: DVD VCD CD Display disappears MP3 DivX JPEG DVD RECEIVER SMART NAVI Something like you Back for good Love of my - Samsung MM-DX7 | User Manual (user Manual) (ver.1.0) (English) - Page 12
Skipping Scenes/Songs DVD VCD MP3 Briefly press button . • Each time the button is pressed briefly during playback, the previous or next chapter, track, or directory (file) will be played. • But, you cannot skip chapters consecutively. DVD VCD MP3 TITLE 01/05 CHAPTER 002/040 DVD RECEIVER - Samsung MM-DX7 | User Manual (user Manual) (ver.1.0) (English) - Page 13
Repeat Playback Repeat playback allows you to repeatedly play a chapter, title, track (song), or directory (MP3 file). DVD VCD CD MP3 JPEG Press REPEAT button. • Each time the button is pressed during playback, the repeat playback mode changes as follows: DVD VCD CD MP3 JPEG Repeat Playback - Samsung MM-DX7 | User Manual (user Manual) (ver.1.0) (English) - Page 14
Selecting Audio/Subtitle Language Audio Language Selection Function DVD 1 Press INFO button twice. 2 Press Cursor , buttons or numeric buttons to select the desired audio language. • Depending on the number of languages on a DVD disc, a different audio language (KOREAN, ENGLISH, JAPANESE, etc.) - Samsung MM-DX7 | User Manual (user Manual) (ver.1.0) (English) - Page 15
JPEG File Playback JPEG Images captured with a digital camera or camcorder, or JPEG files on a PC can be stored on a CD and then played back with this DVD player. Slide Mode 1 Load the JPEG disc. • Playback starts automatically. Each image is displayed for 5 seconds and then the next image is - Samsung MM-DX7 | User Manual (user Manual) (ver.1.0) (English) - Page 16
Cursor , buttons to move to 'DISC MENU' and then press ENTER button. • When you select the disc menu that is not supported by the disc, the "This menu is not supported" message appears on the screen. Using the Title Menu For DVDs containing multiple titles, you can view the title of each - Samsung MM-DX7 | User Manual (user Manual) (ver.1.0) (English) - Page 17
Setting the Language OSD language is set to English by default. 1Press MENU button in the stop mode. 2 Press Cursor button to move to 'Setup' and then press ENTER button. 3 Press ENTER button. Press Cursor , 4 button to select the desired item and then press ENTER button. Press Cursor , 5 - Samsung MM-DX7 | User Manual (user Manual) (ver.1.0) (English) - Page 18
Setting TV Screen type 1 Press MENU button in the stop mode. 2 Press Cursor button to move to 'Setup' and then press ENTER button. 3 Press Cursor button to move to 'TV DISPLAY' and then press ENTER button. Press Cursor , 4 button to select the desired item and then press ENTER button. • Once the - Samsung MM-DX7 | User Manual (user Manual) (ver.1.0) (English) - Page 19
Setting Parental Controls (Rating Level) Use this to restrict playback of adult or violent DVDs you do not want children to view. 1Press MENU button in the stop mode. 2 Press Cursor button to move to 'Setup' and then press ENTER button. Press Cursor 3 button to move to 'PARENTAL' and then press - Samsung MM-DX7 | User Manual (user Manual) (ver.1.0) (English) - Page 20
. 4 Press to select the desired 'USER', and then press ENTER. 5 Press MENU button to exit the setup screen. SETUP 37 Select this to set the Samsung Logo image as your wallpaper. Select this to set the desired image as your wallpaper. Press RETURN button to return to the previous level. Press - Samsung MM-DX7 | User Manual (user Manual) (ver.1.0) (English) - Page 21
Setting the DRC (Dynamic Range Compression) You can use this function to enjoy Dolby Digital sound when watching movies at low volume at night. 1 Press MENU button in the stop mode. 2 Press Cursor button to move to 'Audio' and then press ENTER button. AV SYNC Setup Video may look slower than the - Samsung MM-DX7 | User Manual (user Manual) (ver.1.0) (English) - Page 22
applied files are not played. Digital Rights Management: Technology and service that protect the profit and rights of copyright owners by disallowing the amount of operating time can vary. • If the external USB storage device supports only USB VER 1.1 and the access speed is slow, the recording may - Samsung MM-DX7 | User Manual (user Manual) (ver.1.0) (English) - Page 23
Dir : repeat play the folder . • REPEAT ALL : repeat play the entire directories. 43 Listening to Radio You can listen to the chosen band (FM, AM broadcast stations) by using either the automatic or manual tuning operation. Remote Control Unit 1 Press TUNER/ BAND button. 2 Tune in to the desired - Samsung MM-DX7 | User Manual (user Manual) (ver.1.0) (English) - Page 24
the TUNER(BAND) button and select the FM band. 2 TUNING Press to select "89.10". • Refer to Step 2 on page 44 to automatically or manually tune in to a station. MHz MHz 3 Press the TUNER MEMORY button. • "PRGM" flashes in the display. PRGM MHz TUNING 4 Press to select preset number - Samsung MM-DX7 | User Manual (user Manual) (ver.1.0) (English) - Page 25
the source to be played when the system switches on. 8 Press ENTER to confirm the timer. • TAPE (cassette) : Insert a cassette tape. • TUNER (radio) : a Press ENTER. b Select a preset station by pressing Tuning or . • CD (compact disc) : Load a compact disc. • USB :Connect the USB. Note • If the - Samsung MM-DX7 | User Manual (user Manual) (ver.1.0) (English) - Page 26
Cancelling the Timer After having set the timer, it will start automatically as shown by the TIMER indication on the display. If you no longer wish to use the timer, you must cancel it. To cancel the timer, press TIMER ON/OFF once. • is no longer displayed. Recording a Compact Disc You can record a - Samsung MM-DX7 | User Manual (user Manual) (ver.1.0) (English) - Page 27
. 51 1 Switch the system on by pressing POWER. 2 Insert a blank cassette in Deck. Select the 3 TUNER function by pressing TUNER/BAND. 4 Select the radio station that you wish to record by pressing /DOWN or UP/ button . 5 Press REC/PAUSE button. • REC is displayed and recording starts. 6 To - Samsung MM-DX7 | User Manual (user Manual) (ver.1.0) (English) - Page 28
EQ/Sound Mode/Treble/Bass Function Your micro component system is equipped with a preset equalizer that allows you to choose the most appropriate balance between treble and bass frequencies, according to the type of music you are listening to. The function of Power Sound amplifies bass and improves - Samsung MM-DX7 | User Manual (user Manual) (ver.1.0) (English) - Page 29
display. • All these functions are described in detail in this booklet. For instructions on how to use them, refer to the appropriate sections. COLOR Function You micro component system so that you can listen to music or radio programmers without disturbing other people in the room. The earphones - Samsung MM-DX7 | User Manual (user Manual) (ver.1.0) (English) - Page 30
unit does not function properly. If the problem you are experiencing is not listed below or if the instruction below does not help, turn off the unit, disconnect the power cord, and contact the nearest authorized dealer or Samsung Electronics Service Center. Symptom Check/Remedy I can not eject - Samsung MM-DX7 | User Manual (user Manual) (ver.1.0) (English) - Page 31
There is excessive wow and flutter • The audio heads are dirty. • The rollers or drive capstans are dirty. • The tape is worn. Can't receive radio broadcast. • The main unit is not working. (Example: The power goes out or strange noise is heard.) • The DVD player is not working normally. The - Samsung MM-DX7 | User Manual (user Manual) (ver.1.0) (English) - Page 32
MPEG-2) and high-density recording technology, a DVD disc comprises two 0.6 mm thick discs bonded together. An acronym for Pulse Code Modulation - another quality is roughly comparable to that of video tape. This player also supports video CDs with playback control (version 2.0). 5.1 (or 6) Channel - Samsung MM-DX7 | User Manual (user Manual) (ver.1.0) (English) - Page 33
USB Feature Supported Player Digital Camera Product Finepix-A340 Finepix-F810 -T5 VB YP-53 Company Creative Iriver Samsung Samsung Samsung Samsung Samsung Samsung Samsung Samsung Samsung Samsung Samsung Cowon Cowon Cowon Sharp Iriver Samsung Samsung USB External HDD Product MOMOBAY UX-2 Company
-
 1
1 -
 2
2 -
 3
3 -
 4
4 -
 5
5 -
 6
6 -
 7
7 -
8
-
9
-
10
-
11
-
12
-
13
-
14
-
15
-
16
-
17
-
18
-
19
-
20
-
21
-
22
-
23
-
24
-
25
-
26
-
27
-
28
-
29
-
30
-
31
-
32
-
33
 |
 |

PERSONAL MICRO
COMPONENT SYSTEM
MM-DX7
V I D E O
COMPACT
DIGITAL AUDIO
COMPACT
DIGITAL VIDEO
Instruction Manual
AH68-01954C
THIS APPLIANCE IS MANUFACTURED BY: