Samsung PN58C550 User Manual - Page 9
Connecting to an Antenna, Plug & Play Initial Setup, Plug & Play, Input, Store Demo, Home Use
 |
View all Samsung PN58C550 manuals
Add to My Manuals
Save this manual to your list of manuals |
Page 9 highlights
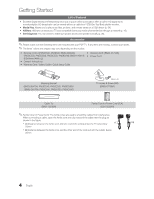
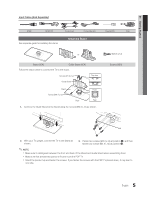
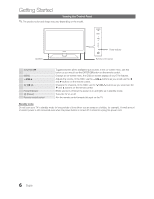
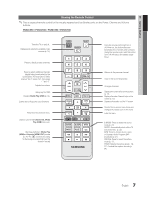
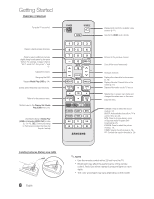
01 Getting Started Connecting to an Antenna When the TV is initially powered on, basic settings proceed automatically. ✎ Connecting the power cord and antenna. VHF/UHF Antenna Power Input Cable or ANT OUT Plug & Play (Initial Setup) When the TV is initially powered on, a sequence of on-screen prompts will assist in configuring basic settings. Press the POWER button. Plug & Play is available only when the Input source is set to TV. ✎ To return to the previous step, press the Red button. 1 Selecting a language Press the or button, then press the ENTER button. Select the desired OSD (On Screen Display) language. 2 Selecting Store Demo Press the or button, then press the ENTER button. or Home Use Select the Home Use mode. Store Demo Mode is for retail environments. To return the unit's settings from Store Demo to Home Use (standard): Press the volume button on the TV. When you see the volume OSD, press and hold MENU for 5 sec. POWER P 3 Selecting an antenna 4 Selecting a channel 5 Setting the Clock Mode 6 Viewing the HD Connection Guide. 7 Enjoy your TV. Press the or button, then press the ENTER button. Select Air, Cable or Auto. Press the or button, then press the ENTER button. Select the channel source to memorize. When setting the antenna source to Cable, a step appears allowing you to assign numerical values (channel frequencies) to the channels. For more information, refer to Channel Auto Program (p. 15). ✎ Press the ENTER button at any time to interrupt the memorization process. Set the Clock Mode automatically or manually. Auto: Allows you to select DST (Daylight Saving Time) mode and time zone Manual: Allows you to manually set the current date and time (p. 22). The connection method for the best HD screen quality is displayed. Press the ENTER button. If You Want to Reset This Feature... MENU Setup Plug & Play ENTER English
-
 1
1 -
2
-
3
-
 4
4 -
 5
5 -
 6
6 -
 7
7 -
 8
8 -
 9
9 -
 10
10 -
 11
11 -
 12
12 -
 13
13 -
 14
14 -
15
-
16
-
17
-
18
-
19
-
20
-
21
-
22
-
23
-
24
-
25
-
26
-
27
-
28
-
29
-
30
-
31
-
32
-
33
-
34
-
35
-
36
-
37
-
38
-
39
-
40
-
41
-
42
-
43
-
44
-
45
-
46
-
47
-
48
-
49
-
50
-
51
-
52
-
53
-
54
-
55
-
56
-
57
-
58
-
59
-
60
-
61
-
62
-
63
-
64
-
65
-
66
-
67
-
68
-
69
-
70
-
71
-
72
-
73
-
74
-
75
-
76
 |
 |
