Samsung RS2530BBP User Manual (ENGLISH) - Page 27
Check the amount of water supplied to the ice tray., To remove, To replace - energy
 |
View all Samsung RS2530BBP manuals
Add to My Manuals
Save this manual to your list of manuals |
Page 27 highlights
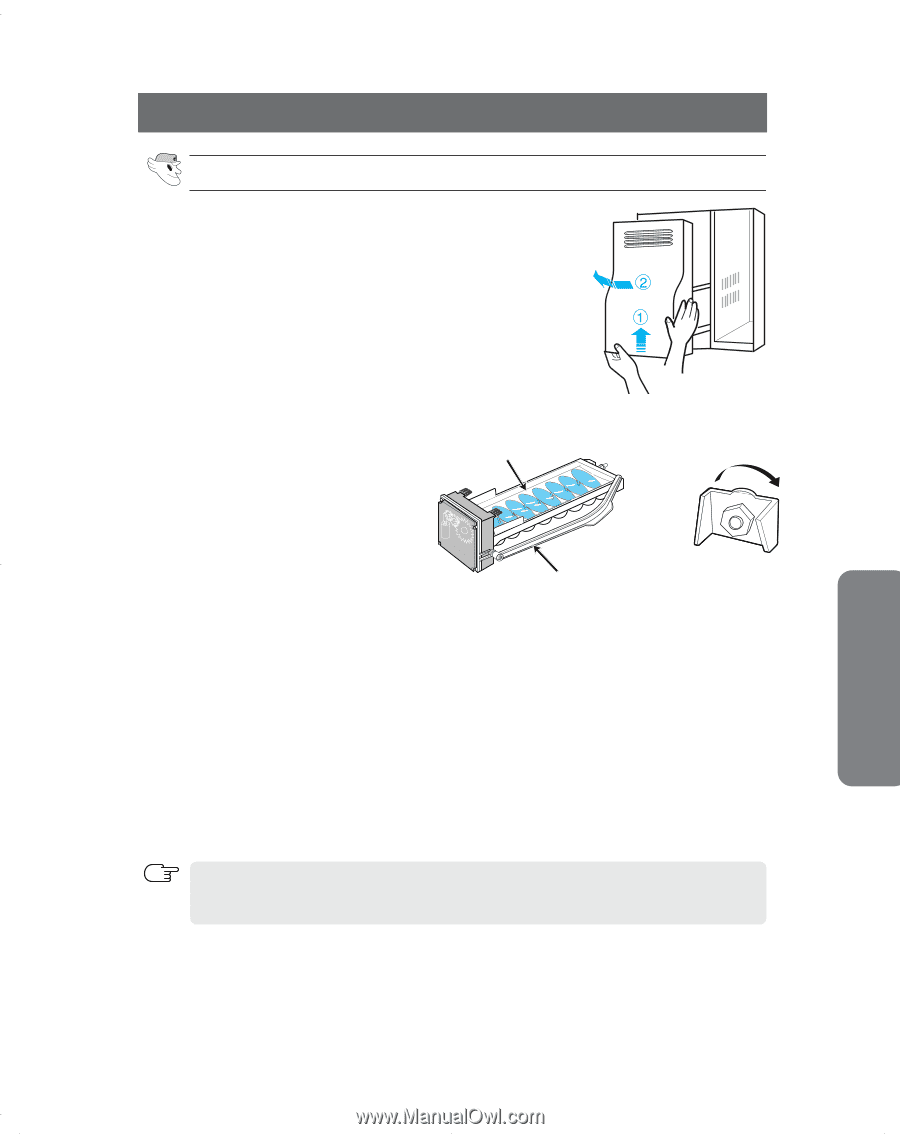
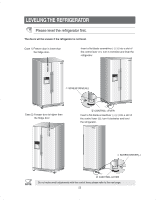
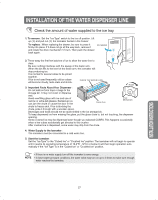
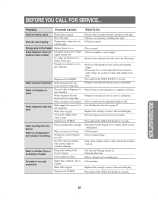
INSTALLATION OF THE WATER DISPENSER LINE Check the amount of water supplied to the ice tray. 1) To remove : Set the "Ice Type" switch to the Ice off position. Lift up (①) and pull out (➁) the icemaker bucket in the freezer. To replace : When replacing the drawer, be sure to press it firmly into place. If it does not go all the way back, remove it and rotate the drive mechanism 1/4 turn. Then push the drawer back again. ICE MAKER 2) Throw away the first few batches of ice to allow the water line to clear. Be sure nothing interferes with the sweep of the feeler arm. When the bin fills to the level of the feeler arm, the icemaker will stop producing ice. It is normal for several cubes to be joined together. If ice is not used frequently, old ice cubes will become cloudy, taste stale and shrink. CHECK THE WATER LEVEL Rotate 3) Important Facts About Your Dispenser : Do not add ice from trays or bags to the storage bin. It may not crush or dispense well. Avoid overfilling glass with ice and use of narrow or extra-tall glasses. Backed-up ice can jam the chute or cause the door in the Feeler Arm Drive Mechanism chute to freeze shut. If ice is blocking the chute, poke it through with a wooden spoon. Beverages and foods should not be quick-chilled in the ice storage bin. To keep dispensed ice from missing the glass, put the glass close to, but not touching, the dispenser opening. Some crushed ice may be dispensed even though you selected CUBES. This happens occasionally when a few cubes accidentally get directed to the crusher. After crushed ice is dispensed, some water may drip from the chute. 4) Water Supply to the Icemaker : The icemaker must be connected to a cold water line. 5) Start the Icemaker : Set the "Ice Type" to the "Cubed Ice" or "Crushed Ice" position. The icemaker will not begin to operate until it reachs its operating temperature of 10.4°F( -12°C) or below. It will then begin operation automatically if the "Ice Type" is in the "Cubed Ice" or "Crushed Ice" position. • If there is no water supply, turn off the icemaker to save energy. NOTE • In lower water pressure conditions, the water valve may turn on up to 3 times to make sure enough water reaches the icemaker. INSTALLATION INSTRUCTIONS 27
-
 1
1 -
2
-
3
-
4
-
5
-
6
-
7
-
8
-
9
-
10
-
11
-
12
-
13
-
14
-
15
-
16
-
17
-
18
-
19
-
20
-
21
-
 22
22 -
 23
23 -
 24
24 -
 25
25 -
 26
26 -
 27
27 -
 28
28 -
 29
29 -
 30
30 -
 31
31 -
 32
32
 |
 |