Samsung SC-D375 User Manual (ENGLISH) - Page 89
PictBridge, SC-D375H/D975 only, modèles SC-D375H/D975 uniquement
 |
View all Samsung SC-D375 manuals
Add to My Manuals
Save this manual to your list of manuals |
Page 89 highlights
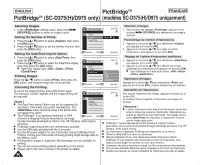
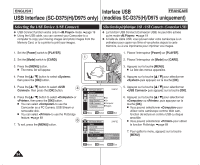
ENGLISH PictBridgeTM FRANÇAIS PictBridgeTM (SC-D375(H)/D975 only) (modèles SC-D375(H)/D975 uniquement) Printing Your Pictures - Using the PictBridgeTM Impression de vos images avec PictBridgeTM ✤ PictBridgeTM function works only in mode. ➥page 19 ✤ La fonction PictBridgeTM ne peut être activée qu'en mode . ✤ By connecting the Camcorder to printers with PictBridge support ➥page 19 (sold separately), you can send images from the Memory Card ✤ En connectant le caméscope à une imprimante compatible Pictbridge directly to the printer with a few simple operations. (vendue séparément), vous pouvez envoyer des images à partir de la ✤ With the PictBridge Support, you can control the printer directly through your Camcorder in order to print out stored pictures. For direct printing of your 4 stored pictures using the PictBridge function, you must connect your Camcorder to a PictBridge printer using a USB cable. M.Player Mode √System Clock Set Remote Connecting To a Printer Beep Sound USB Connect carte mémoire directement vers l'imprimante en faisant quelques opérations simples. ✤ Grâce à Pictbridge, vous pouvez commander l'imprimante 2/46 directement à partir de votre caméscope afin d'imprimer les images enregistrées. Pour imprimer directement vos √On √On √Computer images enregistrées en utilisant la fonction Pictbridge, connectez votre caméscope à une imprimante Pictbridge par l'intermédiaire d'un câble USB. 1. Turn your printer's power off. Language √English Connexion à une imprimante I Turn your Camcorder on by setting the [Power] switch to [PLAYER]. Move OK Select MENU Exit 1. Mettez votre imprimante hors tension. I Allumez votre caméscope en plaçant 2. Set the [Mode] switch to [CARD]. 3. Press the [MENU] button. 6 M.Player Mode 2/46 Back l'interrupteur [Power] sur [PLAYER]. 2. Placez l'interrupteur de [Mode] sur [CARD]. I The menu list will appear. Clock Set 3. Appuyez sur la touche [MENU]. 4. Press the button to select , then press the [OK] button. 5. Press the button to select , then press the [OK] button. 6. Press the button to select , then Remote Beep Sound USB Connect Language Computer Printer Move OK Select MENU Exit I La liste des menus apparaîtra. 4. Appuyez sur la touche pour sélectionner puis appuyez sur la touche [OK]. 5. Appuyez sur la touche pour sélectionner puis appuyez sur la touche [OK]. 6. Appuyez sur la touche pour sélectionner press the [OK] button. puis appuyez sur la touche [OK]. I : Connect to a computer. I : reliez à un ordinateur. I : Connect to a printer. (To use the I : reliez à une imprimante. (Pour PictBridge function, connect to a printer.) utiliser la fonction PictBridge, reliez à une 7. Connect your Camcorder to the printer using the provided USB cable. 8. Turn your printer power on. I The PictBridge menu screen appears automatically after a short period. I The cursor highlights . imprimante). 7. Connectez votre caméscope à l'imprimante en utilisant le câble USB fourni. 8. Mettez votre imprimante sous tension. I L'écran du menu PictBridge apparaît automatiquement après un bref instant. I Le curseur met en surbrillance . 89
-
 1
1 -
2
-
3
-
4
-
5
-
6
-
7
-
8
-
9
-
10
-
11
-
12
-
13
-
14
-
15
-
16
-
17
-
18
-
19
-
20
-
21
-
22
-
23
-
24
-
25
-
26
-
27
-
28
-
29
-
30
-
31
-
32
-
33
-
34
-
35
-
36
-
37
-
38
-
39
-
40
-
41
-
42
-
43
-
44
-
45
-
46
-
47
-
48
-
49
-
50
-
51
-
52
-
53
-
54
-
55
-
56
-
57
-
58
-
59
-
60
-
61
-
62
-
63
-
64
-
65
-
66
-
67
-
68
-
69
-
70
-
71
-
72
-
73
-
74
-
75
-
76
-
77
-
78
-
79
-
80
-
81
-
82
-
83
-
 84
84 -
 85
85 -
 86
86 -
 87
87 -
 88
88 -
 89
89 -
 90
90 -
 91
91 -
 92
92 -
 93
93 -
 94
94 -
95
-
96
-
97
-
98
-
99
-
100
-
101
-
102
-
103
-
104
-
105
-
106
-
107
-
108
-
109
-
110
 |
 |
