Samsung SCC-B5396 User Manual - Page 11
Installing on a pipe
 |
View all Samsung SCC-B5396 manuals
Add to My Manuals
Save this manual to your list of manuals |
Page 11 highlights
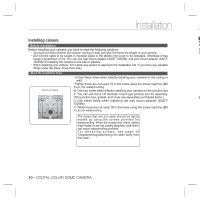
n Installation Installing on a pipe Before installation, you have to be familiar with the above cautions and fill in the holes that are not used for installation. To install your camera bottom on a pipe 1. After connecting the power and video cables, throw them inside the pipeline and screw the male thread pipe into the female pipe thread in your camera tightly to fix the Main body. (In this case, be sure to tape with Teflon tape before assembly for waterproofing. Be careful for the wiring cable not to be stuck in the connection area.) 3. Attach the Dome cover. (Screw the connection bolts tightly using the L-Wrench for waterproofing.) To change the SAMSUNG logo position, move the location of the connection rubber band as show below and rotate for assembly. (The rotation limit is 180 degree.) 2. Adjust the angle of the camera in search of a better view. 1) Separate the Dome cover using the L-Wrench provided. (To make loose the screws, rotate counterclockwise.) 2) Adjust the lens direction. For more information, see page 17 "Adjusting the camera direction." ENG English - 11
-
 1
1 -
2
-
3
-
4
-
5
-
 6
6 -
 7
7 -
 8
8 -
 9
9 -
 10
10 -
 11
11 -
 12
12 -
 13
13 -
 14
14 -
 15
15 -
 16
16 -
17
-
18
-
19
-
20
-
21
-
22
-
23
-
24
-
25
-
26
-
27
-
28
-
29
-
30
-
31
-
32
-
33
 |
 |
