Samsung SL-K7600LX User Guide - Page 329
Fax Settings, Print Settings, Box Settings
 |
View all Samsung SL-K7600LX manuals
Add to My Manuals
Save this manual to your list of manuals |
Page 329 highlights
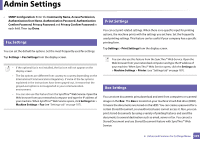
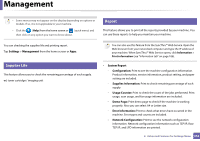
Admin Settings • SNMP Configuration: Enter the Community Name, Access Permission, Authentication User Name, Authentication Password, Authentication Confirm Password, Privacy Password and Privacy Confirm Password in each field. Then tap Done. 16 Fax Settings You can set the default fax options. Set the most frequently used fax settings. Tap Settings > Fax Settings from the display screen. • If the optional fax is not installed, the fax icon will not appear on the display screen. • The fax options are different from country to country depending on the International Communications Regulatory. If some of the fax options explained in the instructions have been grayed-out, it means that the grayed-out option is not supported in your communication environment. • You can also use this feature from the SyncThru™ Web Service. Open the Web browser from your networked computer and type the IP address of your machine. When SyncThru™ Web Service opens, click Settings tab > Machine Settings > Fax (see "Settings tab" on page 187). 17 Print Settings You can set print related settings. When there is no specific input for printing options, the machine prints with the settings you set here. Set the frequently used printing settings. This feature can be useful if your company has a specific printing form. Tap Settings > Print Settings from the display screen. You can also use this feature from the SyncThru™ Web Service. Open the Web browser from your networked computer and type the IP address of your machine. When SyncThru™ Web Service opens, click the Settings tab > Machine Settings > Printer. (see "Settings tab" on page 187). 18 Box Settings You can store documents print,download and sent from computers or scanned images in the Box. The Box is located on your machine's hard disk drive (HDD). It means the documents are stored on the HDD. You can create a password for a certain Stored Document, so unauthorized users cannot access it. Also, you can print stored documents by using a variety of printing features and send the documents to several destination such as email, server or fax. You can set a Stored Document and use Stored Document feature with SyncThru™ Web Service. 2. Advanced Features for Settings Menu 329
-
 1
1 -
2
-
3
-
4
-
5
-
6
-
7
-
8
-
9
-
10
-
11
-
12
-
13
-
14
-
15
-
16
-
17
-
18
-
19
-
20
-
21
-
22
-
23
-
24
-
25
-
26
-
27
-
28
-
29
-
30
-
31
-
32
-
33
-
34
-
35
-
36
-
37
-
38
-
39
-
40
-
41
-
42
-
43
-
44
-
45
-
46
-
47
-
48
-
49
-
50
-
51
-
52
-
53
-
54
-
55
-
56
-
57
-
58
-
59
-
60
-
61
-
62
-
63
-
64
-
65
-
66
-
67
-
68
-
69
-
70
-
71
-
72
-
73
-
74
-
75
-
76
-
77
-
78
-
79
-
80
-
81
-
82
-
83
-
84
-
85
-
86
-
87
-
88
-
89
-
90
-
91
-
92
-
93
-
94
-
95
-
96
-
97
-
98
-
99
-
100
-
101
-
102
-
103
-
104
-
105
-
106
-
107
-
108
-
109
-
110
-
111
-
112
-
113
-
114
-
115
-
116
-
117
-
118
-
119
-
120
-
121
-
122
-
123
-
124
-
125
-
126
-
127
-
128
-
129
-
130
-
131
-
132
-
133
-
134
-
135
-
136
-
137
-
138
-
139
-
140
-
141
-
142
-
143
-
144
-
145
-
146
-
147
-
148
-
149
-
150
-
151
-
152
-
153
-
154
-
155
-
156
-
157
-
158
-
159
-
160
-
161
-
162
-
163
-
164
-
165
-
166
-
167
-
168
-
169
-
170
-
171
-
172
-
173
-
174
-
175
-
176
-
177
-
178
-
179
-
180
-
181
-
182
-
183
-
184
-
185
-
186
-
187
-
188
-
189
-
190
-
191
-
192
-
193
-
194
-
195
-
196
-
197
-
198
-
199
-
200
-
201
-
202
-
203
-
204
-
205
-
206
-
207
-
208
-
209
-
210
-
211
-
212
-
213
-
214
-
215
-
216
-
217
-
218
-
219
-
220
-
221
-
222
-
223
-
224
-
225
-
226
-
227
-
228
-
229
-
230
-
231
-
232
-
233
-
234
-
235
-
236
-
237
-
238
-
239
-
240
-
241
-
242
-
243
-
244
-
245
-
246
-
247
-
248
-
249
-
250
-
251
-
252
-
253
-
254
-
255
-
256
-
257
-
258
-
259
-
260
-
261
-
262
-
263
-
264
-
265
-
266
-
267
-
268
-
269
-
270
-
271
-
272
-
273
-
274
-
275
-
276
-
277
-
278
-
279
-
280
-
281
-
282
-
283
-
284
-
285
-
286
-
287
-
288
-
289
-
290
-
291
-
292
-
293
-
294
-
295
-
296
-
297
-
298
-
299
-
300
-
301
-
302
-
303
-
304
-
305
-
306
-
307
-
308
-
309
-
310
-
311
-
312
-
313
-
314
-
315
-
316
-
317
-
318
-
319
-
320
-
321
-
322
-
323
-
 324
324 -
 325
325 -
 326
326 -
 327
327 -
 328
328 -
 329
329 -
 330
330 -
 331
331 -
 332
332 -
 333
333 -
 334
334 -
335
-
336
-
337
-
338
-
339
-
340
-
341
-
342
-
343
-
344
-
345
-
346
-
347
-
348
-
349
-
350
-
351
-
352
-
353
-
354
-
355
-
356
-
357
-
358
-
359
-
360
-
361
-
362
-
363
-
364
-
365
-
366
-
367
-
368
-
369
-
370
-
371
-
372
-
373
-
374
-
375
-
376
-
377
-
378
-
379
-
380
-
381
-
382
-
383
-
384
-
385
-
386
-
387
-
388
-
389
-
390
-
391
-
392
-
393
-
394
-
395
-
396
-
397
-
398
-
399
-
400
-
401
-
402
-
403
-
404
-
405
-
406
-
407
-
408
-
409
-
410
-
411
-
412
-
413
-
414
-
415
-
416
-
417
-
418
-
419
-
420
-
421
-
422
-
423
-
424
-
425
-
426
-
427
-
428
 |
 |
