Samsung SPH-A790 User Manual (user Manual) (ver.f2) (English) - Page 131
Creating Your Sprint PCS Picture MailSM Password, Save to Phone
 |
View all Samsung SPH-A790 manuals
Add to My Manuals
Save this manual to your list of manuals |
Page 131 highlights
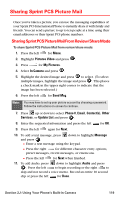
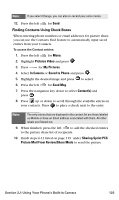
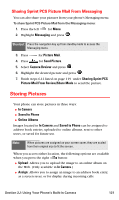
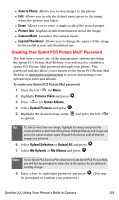
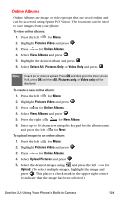
ⅷ Save to Phone: Allows you to save images to the phone. ⅷ Edit: Allows you to edit the default name given to the image when the picture was taken. ⅷ Erase: Allows you to erase a single or all of the stored images. ⅷ Picture Info: Displays detailed information about the image. ⅷ Camera Mode: Launches the Camera mode. ⅷ Expand/Thumbnail: Allows you to change the aspect of the image between full screen and thumbnail size. Creating Your Sprint PCS Picture MailSM Password The first time you use any of the management options involving the Sprint PCS Picture Mail Website, you will need to establish a Sprint PCS Picture Mail password through your phone. This password will also allow you to sign in to the Sprint PCS Picture Mail Website at www.sprint.com/picturemail to access and manage your uploaded pictures and albums. To create your Sprint PCS Picture Mail password: 1. Press the left for Menu. 2. Highlight Pictures Video and press . 3. Press for Online Albums. 4. Select Upload Pictures and press . 5. Highlight the desired image using to upload. and press the left Tip: To select more than one image, highlight the image and press the camera button on the front of the phone. Highlight the second image and press the camera button again. Repeat this process until all desired images are selected. 6. Select Upload Selection or Upload All and press . 7. Select My Uploads or My Albums and press Note: If your Sprint PCS Service Plan does not include Sprint PCS Picture Mail, you will first be prompted to subscribe to the service for an additional monthly charge. 8. Enter a four- to eight-digit password and press . (You may be prompted to confirm your password.) Section 2J: Using Your Phone's Built-in Camera 122
-
 1
1 -
2
-
3
-
4
-
5
-
6
-
7
-
8
-
9
-
10
-
11
-
12
-
13
-
14
-
15
-
16
-
17
-
18
-
19
-
20
-
21
-
22
-
23
-
24
-
25
-
26
-
27
-
28
-
29
-
30
-
31
-
32
-
33
-
34
-
35
-
36
-
37
-
38
-
39
-
40
-
41
-
42
-
43
-
44
-
45
-
46
-
47
-
48
-
49
-
50
-
51
-
52
-
53
-
54
-
55
-
56
-
57
-
58
-
59
-
60
-
61
-
62
-
63
-
64
-
65
-
66
-
67
-
68
-
69
-
70
-
71
-
72
-
73
-
74
-
75
-
76
-
77
-
78
-
79
-
80
-
81
-
82
-
83
-
84
-
85
-
86
-
87
-
88
-
89
-
90
-
91
-
92
-
93
-
94
-
95
-
96
-
97
-
98
-
99
-
100
-
101
-
102
-
103
-
104
-
105
-
106
-
107
-
108
-
109
-
110
-
111
-
112
-
113
-
114
-
115
-
116
-
117
-
118
-
119
-
120
-
121
-
122
-
123
-
124
-
125
-
 126
126 -
 127
127 -
 128
128 -
 129
129 -
 130
130 -
 131
131 -
 132
132 -
 133
133 -
 134
134 -
 135
135 -
 136
136 -
137
-
138
-
139
-
140
-
141
-
142
-
143
-
144
-
145
-
146
-
147
-
148
-
149
-
150
-
151
-
152
-
153
-
154
-
155
-
156
-
157
-
158
-
159
-
160
-
161
-
162
-
163
-
164
-
165
-
166
-
167
-
168
-
169
-
170
-
171
-
172
-
173
-
174
-
175
-
176
-
177
-
178
-
179
-
180
-
181
-
182
-
183
-
184
-
185
-
186
-
187
-
188
-
189
-
190
-
191
-
192
-
193
-
194
-
195
-
196
-
197
-
198
-
199
-
200
-
201
-
202
-
203
-
204
-
205
-
206
-
207
-
208
-
209
-
210
-
211
-
212
-
213
-
214
-
215
-
216
-
217
-
218
-
219
-
220
-
221
-
222
-
223
-
224
-
225
-
226
-
227
-
228
-
229
-
230
-
231
-
232
-
233
-
234
-
235
-
236
-
237
-
238
-
239
-
240
-
241
 |
 |