Sanyo PDGDXT10L Owners Manual - Page 106
(2) Replacing Consumable Parts, Replacing the Filters
 |
UPC - 086483067556
View all Sanyo PDGDXT10L manuals
Add to My Manuals
Save this manual to your list of manuals |
Page 106 highlights
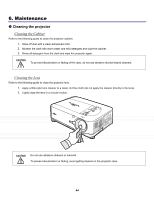
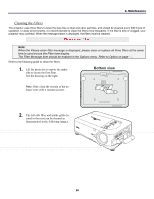
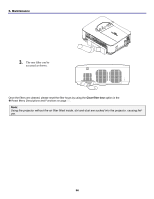
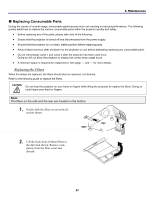
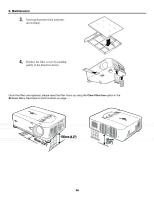
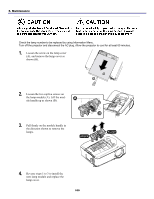
6. Maintenance Replacing Consumable Parts During the course of normal usage, consumable parts become worn out resulting in reduced performance. The following guides detail how to replace the various consumable parts within the projector quickly and safely. • Before replacing any of the parts, please take note of the following: • Ensure that the projector is turned off and disconnected from the power supply. • Ensure that the projector is in a clean, stable position before replacing parts. • Allow at least one hour after shutdown for the projector to cool before attempting replacing any consumable parts. • Do not interchange Lamp 1 and Lamp 2 after the projector has been used once. Doing so will not allow the projector to display the correct lamp usage hours. • A minimum space is required for replacement. See page 24 and 98 for more details. Replacing the Filters When the lamps are replaced, the filters should also be replaced, not cleaned. Refer to the following guide to replace the filters. CAUTION Do not drop the projector on your hand or fingers while lifting the projector to replace the filters. Doing so could injure your hand or fingers. Note: The filters on the side and the rear are located on the bottom. 1. Gently slide the filter covers in the direction shown. 2. Lift the foam from all three filters in the direction shown. Remove completely from the filter cover and discard. 97
-
 1
1 -
2
-
3
-
4
-
5
-
6
-
7
-
8
-
9
-
10
-
11
-
12
-
13
-
14
-
15
-
16
-
17
-
18
-
19
-
20
-
21
-
22
-
23
-
24
-
25
-
26
-
27
-
28
-
29
-
30
-
31
-
32
-
33
-
34
-
35
-
36
-
37
-
38
-
39
-
40
-
41
-
42
-
43
-
44
-
45
-
46
-
47
-
48
-
49
-
50
-
51
-
52
-
53
-
54
-
55
-
56
-
57
-
58
-
59
-
60
-
61
-
62
-
63
-
64
-
65
-
66
-
67
-
68
-
69
-
70
-
71
-
72
-
73
-
74
-
75
-
76
-
77
-
78
-
79
-
80
-
81
-
82
-
83
-
84
-
85
-
86
-
87
-
88
-
89
-
90
-
91
-
92
-
93
-
94
-
95
-
96
-
97
-
98
-
99
-
100
-
 101
101 -
 102
102 -
 103
103 -
 104
104 -
 105
105 -
 106
106 -
 107
107 -
 108
108 -
 109
109 -
 110
110 -
 111
111 -
112
-
113
-
114
-
115
-
116
-
117
-
118
-
119
-
120
-
121
-
122
-
123
-
124
-
125
-
126
-
127
-
128
-
129
-
130
-
131
-
132
-
133
-
134
-
135
 |
 |
