Sanyo PDGDXT10L Owners Manual - Page 33
(5) Installing the Optional Color Wheel
 |
UPC - 086483067556
View all Sanyo PDGDXT10L manuals
Add to My Manuals
Save this manual to your list of manuals |
Page 33 highlights
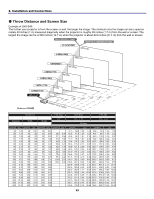
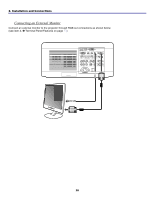
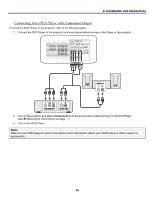
2. Installation and Connections Installing the Optional Color Wheel The PDG-DXT10L projector comes with a four-segment color wheel installed. An additional six-segment color wheel is optional. To replace the color wheel (located under the lamp cover adjacent to lamp 1) refer to the following guide. Note: Wait until the lamp house and the color wheel cool off. 1. Loosen the captive screw (A) on the lamp cover. 2. Remove the lamp cover by sliding it in the direction of the arrow (B). 3. Unscrew the retaining screws (x 4) on the four-segment color wheel. 24
-
 1
1 -
2
-
3
-
4
-
5
-
6
-
7
-
8
-
9
-
10
-
11
-
12
-
13
-
14
-
15
-
16
-
17
-
18
-
19
-
20
-
21
-
22
-
23
-
24
-
25
-
26
-
27
-
 28
28 -
 29
29 -
 30
30 -
 31
31 -
 32
32 -
 33
33 -
 34
34 -
 35
35 -
 36
36 -
 37
37 -
 38
38 -
39
-
40
-
41
-
42
-
43
-
44
-
45
-
46
-
47
-
48
-
49
-
50
-
51
-
52
-
53
-
54
-
55
-
56
-
57
-
58
-
59
-
60
-
61
-
62
-
63
-
64
-
65
-
66
-
67
-
68
-
69
-
70
-
71
-
72
-
73
-
74
-
75
-
76
-
77
-
78
-
79
-
80
-
81
-
82
-
83
-
84
-
85
-
86
-
87
-
88
-
89
-
90
-
91
-
92
-
93
-
94
-
95
-
96
-
97
-
98
-
99
-
100
-
101
-
102
-
103
-
104
-
105
-
106
-
107
-
108
-
109
-
110
-
111
-
112
-
113
-
114
-
115
-
116
-
117
-
118
-
119
-
120
-
121
-
122
-
123
-
124
-
125
-
126
-
127
-
128
-
129
-
130
-
131
-
132
-
133
-
134
-
135
 |
 |

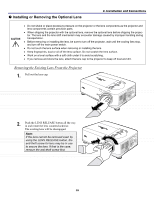
2. Installation and Connections
24
r
Installing the Optional Color Wheel
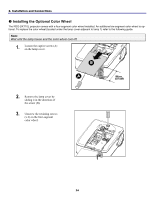
The PDG-DXT10L projector comes with a four-segment color wheel installed. An additional six-segment color wheel is op-
tional. To replace the color wheel (located under the lamp cover adjacent to lamp 1) refer to the following guide.
Note:
Wait until the lamp house and the color wheel cool off.
1.
Loosen the captive screw (A)
on the lamp cover.
2.
Remove the lamp cover by
sliding it in the direction of
the arrow (B).
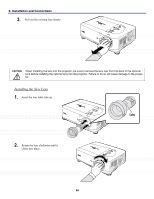
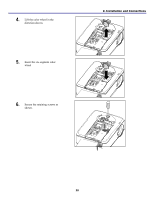
3.
Unscrew the retaining screws
(x 4) on the four-segment
color wheel.