Sanyo PLV Z3 Owners Manual - Page 11
Remote Control
 |
View all Sanyo PLV Z3 manuals
Add to My Manuals
Save this manual to your list of manuals |
Page 11 highlights
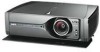
Remote Control q LILGLHT u RESET i w MENU CANCEL o SELECT !0 e r SCREEN !1 IMAGE ADJ. VIDEO DARK CLEAR !2 S-VIDEO U - 1 U - 2 t COMPO.1 USER SETTING C 1 U - 3 U - 4 COMPO.2 C 2 !3 y HDMI !4 LAMP MODE MY PICTURE PC LAMP !5 !6 Part Names and Functions q LIGHT button Lights the buttons on the remote control for about 10 seconds. w MENU button Opens or closes the On-Screen Menu. (p22) e POINT (UP/DOWN/LEFT/RIGHT) button Selects an item or adjusts value in the On-Screen Menu. These are also used to pan the image in the Digital zoom mode. (p40) r SCREEN button Selects a screen size. (p30, 31, 40) t INPUT buttons Selects input source. (p24, 32) y KEYSTONE buttons Corrects keystone distortion. (p21, 41) u POWER ON-OFF button Turns the projector on or off. (p19) i RESET button Resets to the previous figure. When selecting main menu, all the items will be reset. When selecting sub-menu, the selected item will be reset. This button works when selecting Image level adjustment, Computer adjustment (Manual), Keystone and Digital zoom function. o CANCEL button Goes back to the previous screen. When there is no previous screen to go back, displaying screen will disappear. !0 SELECT button Executes the item selected, or to expand or compress image in the Digital zoom mode. (p40) !1 IMAGE ADJ. button Displays the On-Screen Menu of the Image Adjust Menu in a line and adjusts image level. You can directly adjust an item. (p28, 29, 38,39) !2 IMAGE buttons Selects an Image Level.(p27, 37) !3 AUTO PC button Operates the Auto PC adjustment function. (p34) !4 NO SHOW button Turns the picture into black image. (p21) !5 MY PICTURE button Displays the captured image. (p21,42) !6 LAMP button Selects a lamp mode. (p29,39) 11
-
 1
1 -
2
-
3
-
4
-
5
-
 6
6 -
 7
7 -
 8
8 -
 9
9 -
 10
10 -
 11
11 -
 12
12 -
 13
13 -
 14
14 -
 15
15 -
 16
16 -
17
-
18
-
19
-
20
-
21
-
22
-
23
-
24
-
25
-
26
-
27
-
28
-
29
-
30
-
31
-
32
-
33
-
34
-
35
-
36
-
37
-
38
-
39
-
40
-
41
-
42
-
43
-
44
-
45
-
46
-
47
-
48
-
49
-
50
-
51
-
52
-
53
-
54
-
55
-
56
-
57
-
58
-
59
-
60
 |
 |
