Sanyo VDC-HD3100 VDC-HD3500 Setup Manual - Page 4
Installation - vdc
 |
UPC - 086483075124
View all Sanyo VDC-HD3100 manuals
Add to My Manuals
Save this manual to your list of manuals |
Page 4 highlights
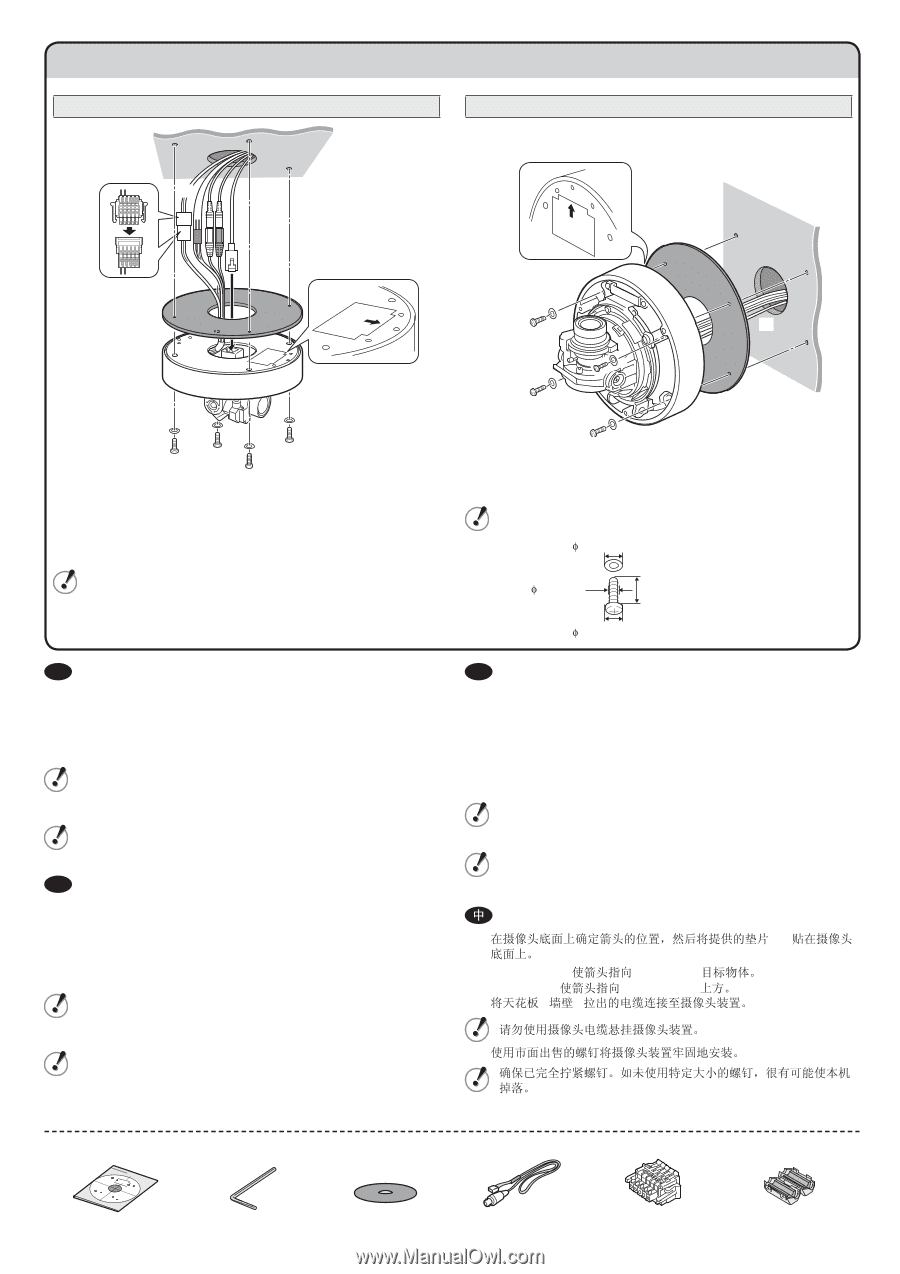
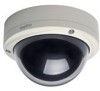
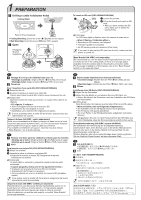
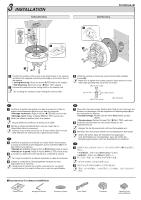
3 INSTALLATION Ceiling Mounting Continue Wall Mounting ⴼ ⴺ (A) CEIWLIANLGL TOP ⴺ WCAELILLITNOGP ⴾ (B) (A) ⴼ ⴾ (B) ⴺ Confirm the position of the arrow on the bottom face of the camera, and attach the supplied cushioning sheet (A) on the bottom face of the camera. • Ceiling Mounting: Direct the arrow (‐CEILING) to the subject. • Wall Mounting: Direct the arrow (‐WALL TOP) upward. ⴼ Connect the cables from the ceiling (wall) to the camera unit. Do not hang the camera unit by holding the camera cable. ⴾ Install the camera unit securely using commercially available screws (B). Make sure to tighten the screws properly. Using screws of sizes other than specified may cause the unit to fall. F9.5 (0.37) or less F4.0 (0.16) 35 (1.38) or more F9.5 (0.37) or less Unit: mm (inch) F ⴺ Confirmer la position de la flèche au bas de la caméra et fixer la plaque d'amortissement (A) fournie au bas de la caméra. • Montage au plafond: diriger la flèche (‐CEILING) vers le sujet. • Montage mural: diriger la flèche (‐WALL TOP) vers le haut. ⴼ Relier les câbles du plafond (mur) à la caméra. Ne pas pendre la caméra en la tenant par le câble. ⴾ Montez le groupe caméra de façon sûre au moyen de vis (disponibles dans le commerce). Assurez-vous de bien serrer les vis. Si vous utilisez des vis d'une taille différente de celle prescrite, l'appareil peut tomber. E ⴺ Confirmar la posición de la flecha en el lado inferior de la cámara, y colocar el material de amortiguación que se suministra (A) en el lado inferior de la cámara. • Montaje en el techo: Dirigir la flecha (‐CEILING) hacia el sujeto. • Montaje en la pared: Dirigir la flecha (‐WALL TOP) hacia arriba. ⴼ Conectar los cables del techo (pared) a la unidad de la cámara. No colgar la unidad de la cámara sujetando el cable de la cámara. ⴾ Instalar la unidad de la cámara fijamente mediante tornillos disponibles en el comercio. Asegurarse de apretar los tornillos correctamente. La unidad puede caerse si se usan tornillos que no son los especificados. D ⴺ Überprüfen Sie die korrekte Position des Pfeils an der Unterseite der Kamera und befestigen Sie die mitgelieferte Dämpfungslage (A) an der Unterseite der Kamera. • Deckenmontage: Richten Sie den Pfeil (‐CEILING) auf das Objekt. • Wandmontage: Richten Sie den Pfeil (‐WALL TOP) nach oben. ⴼ Schließen Sie die Kabel von der Decke (Wand) an der Kameraeinheit an. Hängen Sie die Kameraeinheit nicht am Kamerakabel auf. ⴾ Montieren Sie die Kamera mithilfe von handelsüblichen Schrauben. Atellen Sie sicher, dass die Schrauben fest angezogen sind. Die Einheit kann herunterfallen, wenn die Größe der Befestigungsschrauben nicht den Spezifikationen entspricht. Ё A CEILING WALL TOP)ϞᮍDŽ ■Accessories for camera installation Pattern Sheet Hexagonal Wrench Cushioning Sheet Video Cable Connector Clamping Core (VDC-HD3500P)
-
 1
1 -
 2
2 -
 3
3 -
 4
4 -
 5
5 -
 6
6
 |
 |