Sanyo VPC-CG102 VPC-CG102 Owners Manual English
Sanyo VPC-CG102 - Full HD 1080 Video Manual
 |
View all Sanyo VPC-CG102 manuals
Add to My Manuals
Save this manual to your list of manuals |
Sanyo VPC-CG102 manual content summary:
- Sanyo VPC-CG102 | VPC-CG102 Owners Manual English - Page 1
GUIDE FOR BASIC OPERATION Dual Camera VPC-CG100EX VPC-CG100GX VPC-CG100PX VPC-CG100TA VPC-CG102 Important note This manual explains how to safely operate the VPC-CG100EX, VPC-CG100GX, VPC-CG100PX, VPC-CG100TA and VPC-CG102. Any information regarding only one of these products will be labeled as - Sanyo VPC-CG102 | VPC-CG102 Owners Manual English - Page 2
For first-time users Please read this manual to familiarize yourself with your camera's operation. ↓ To use the various camera features The Instruction Manual that explains the features in detail can be obtained from our website (page 42). ↓ To use additional features Visit the Sanyo website to - Sanyo VPC-CG102 | VPC-CG102 Owners Manual English - Page 3
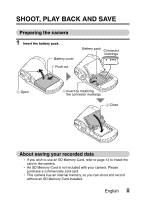
camera 1 Insert the battery pack. Battery cover 1 Push out Battery pack Connector markings 2 Open 3 Insert by matching the connector markings 4 Close About saving your recorded data h If you wish to use an SD Memory Card, refer to page 12 to install the card in the camera. h An SD Memory Card - Sanyo VPC-CG102 | VPC-CG102 Owners Manual English - Page 4
set the date and time, see page 20. 2 Record. To record a video clip: h Press the [ ] button to begin recording a video clip. h Press the [ ] button again to end the recording. To take a photo: h Press the [ ] button. h A still image is captured. ON/OFF button [ ] button [ ] button 14M-S 10 MENU - Sanyo VPC-CG102 | VPC-CG102 Owners Manual English - Page 5
camera is set up and ready to go i Sanyo declines any claim for compensation for recorded contents etc. in case of photographing or recording failure due to a chance camera or card the SET button. Full-HD Orange frame 6.5MB SET OK 100-0006 00:00:05 Remaining battery power indication English iv - Sanyo VPC-CG102 | VPC-CG102 Owners Manual English - Page 6
deleting files, press the MENU button. h Pressing the MENU button 3 times will return you to the screen in step 2. When you are finished using the camera... Press the ON/OFF button for at least 1 second to turn the - Sanyo VPC-CG102 | VPC-CG102 Owners Manual English - Page 7
dedicated USB interface cable to connect your camera to the computer. h Connect the cable between the camera's USB/AV terminal and the computer's USB connector. 2 Turn on the camera (page 17). h The USB Connection Screen appears on the camera's monitor. USB CONNECTION COMPUTER PRINTER CANCEL CANCEL - Sanyo VPC-CG102 | VPC-CG102 Owners Manual English - Page 8
press the SET button. h The message [Found New Hardware] appears in the task tray, showing that the camera is recognized as a drive. h The card is recognized (mounted) as a disk, and the [XACTI (E:)] icon appears in the [My Computer] window. h The drive name (E:) may be different on your computer - Sanyo VPC-CG102 | VPC-CG102 Owners Manual English - Page 9
list appears showing the devices connected to the computer's USB connector. 2 Left-click on the camera drive (E:). h The camera can now be disconnected. h The drive name (E:) may be different on your computer. No software is included with this camera. Please visit our website to obtain the available - Sanyo VPC-CG102 | VPC-CG102 Owners Manual English - Page 10
THE INCLUDED ACCESSORIES 3 How to use the accessories 5 ABOUT THE CARD 6 Media cards that can be used with this camera 6 What "card" means in this manual 6 „ SETUP PARTS NAMES 7 CHARGING THE BATTERY PACK 9 Charging the battery pack 10 INSTALLING THE CARD 12 INSTALLING THE BATTERY PACK 14 - Sanyo VPC-CG102 | VPC-CG102 Owners Manual English - Page 11
MANUAL OBTAINING THE INSTRUCTION MANUAL 42 Contents of the Instruction Manual 42 How to obtain the Instruction Manual 46 „ ABOUT THE EYE-FI TRANSFER FEATURE About the Eye-Fi transfer feature 48 „ APPENDICES COMMONLY ASKED QUESTIONS 49 SPECIFICATIONS 57 Camera 57 Camera connectors 61 Battery - Sanyo VPC-CG102 | VPC-CG102 Owners Manual English - Page 12
THE INCLUDED ACCESSORIES i Li-ion battery pack: 1 i Lithium-ion battery pack charger and power cord: 1 i Dedicated USB interface cable (page 46): 1 i Dedicated AV interface cable (page 40): 1 i Lens cap (page 5): 1 i GUIDE FOR BASIC OPERATION (VPC-CG100EX, VPC-CG100GX, VPC-CG100PX, VPC-CG100TA - Sanyo VPC-CG102 | VPC-CG102 Owners Manual English - Page 13
i QUICK GUIDE i Obtaining the PDF instruction manual and cautions English 4 - Sanyo VPC-CG102 | VPC-CG102 Owners Manual English - Page 14
How to use the accessories k Lens cap 1 2 ˛ 3 4 ˛ k Handstrap (Please purchase a commercially available handstrap.) i To avoid dropping the camera, it is recommended that you attach a handstrap. ˛ ˛ 5 English - Sanyo VPC-CG102 | VPC-CG102 Owners Manual English - Page 15
of card that can be inserted into and used with this camera is: i SD Memory Card i SDHC Memory Card i SDXC Memory Card What "card" means in this manual i In this manual, SD Memory Cards, SDHC Memory Cards and SDXC Memory Cards that can be used in this dual camera are referred to as "card". English - Sanyo VPC-CG102 | VPC-CG102 Owners Manual English - Page 16
SETUP SETUP PARTS NAMES Front ZOOM RANGE button Lens Monitor unit Stereo microphone Flash ON/OFF button * The tripod mounting hole is on the bottom. 7 English - Sanyo VPC-CG102 | VPC-CG102 Owners Manual English - Page 17
Rear Monitor Card slot cover ON/OFF button „ Operation pad [ ] button Photo shooting button MENU button SET button Multi-indicator Operation pad DC IN terminal cover Battery cover USB/AV terminal HDMI terminal Zoom switch [ ] button Video recording button REC/PLAY button English 8 SETUP - Sanyo VPC-CG102 | VPC-CG102 Owners Manual English - Page 18
to the socket on the battery pack charger. h Insert the connector straight and securely. Battery pack charger Power cord 2 Insert the battery pack in the battery charger. h Insert it in the direction indicated by the [o] mark on the battery pack. Battery pack charger Battery pack [o] mark 3 Plug - Sanyo VPC-CG102 | VPC-CG102 Owners Manual English - Page 19
charge it. i When the battery pack temperature is high, the safety function may be activated and halt charging. Charge a battery pack in the following cases i A battery pack which has not been used for a long time i Newly purchased battery pack FOR AMERICAN USERS: i Use a UL Listed, 1.8 to - Sanyo VPC-CG102 | VPC-CG102 Owners Manual English - Page 20
Charging Flashing Problem with the battery pack or battery pack charger i Immediately remove the battery pack from the charger. i Do not use an abnormal battery pack. (The usable life of the battery pack has probably expired.) CAUTION Do not charge the battery pack immediately after the camera - Sanyo VPC-CG102 | VPC-CG102 Owners Manual English - Page 21
before using it in your camera (page 13). If an unformatted card is used, the card itself may become unusable. Card slot cover 1 Raise up 4 Close 2 Swivel 3 Insert the card h To remove the card, press it in, and then release. The card will protrude slightly, and you - Sanyo VPC-CG102 | VPC-CG102 Owners Manual English - Page 22
Follow the instructions on the screen to format the card. Shooting without a card installed i When a card is installed, images are recorded to and played back from the card. When no card is installed, images are recorded to and played back from the camera's internal memory. When the camera is turned - Sanyo VPC-CG102 | VPC-CG102 Owners Manual English - Page 23
SETUP INSTALLING THE BATTERY PACK Please charge the supplied battery pack before using it. Battery cover Battery pack Connector markings 1 Push out 2 Open 3 Insert by matching the connector markings 4 Close English 14 - Sanyo VPC-CG102 | VPC-CG102 Owners Manual English - Page 24
compartment. In this case, please discontinue its use and replace it with a new battery. Do not use the battery with the outer covering or label removed i Doing so may result in malfunction. HINT About the internal backup battery i This camera's internal battery serves to maintain the date and - Sanyo VPC-CG102 | VPC-CG102 Owners Manual English - Page 25
the battery) rises, a \ icon lights on the monitor. It is still possible to record and play back even when the \ icon is lit; however it is advised that you discontinue use as soon as possible and turn the camera off. h If the temperature rises further, the \ icon will start to flash, and the camera - Sanyo VPC-CG102 | VPC-CG102 Owners Manual English - Page 26
button for at least 1 second. h If you briefly press the ON/OFF button, once, the camera will switch to the power save mode. h If you press the REC/PLAY button for at least 1 second, the camera turns on in the playback mode. Monitor unit ON/OFF button REC/PLAY button Turning off - Sanyo VPC-CG102 | VPC-CG102 Owners Manual English - Page 27
active In order to preserve battery pack power, the power save (sleep) function will automatically turn off the camera after about 1 minute of save mode has been active for about 1 hour, the camera will switch to the standby mode. In this case, you can restore the power by pressing the ON/OFF button - Sanyo VPC-CG102 | VPC-CG102 Owners Manual English - Page 28
, but this does not indicate a malfunction. i If the camera starts to feel uncomfortably hot during use, you might temporarily discontinue use until it cools down, or try holding it in your other hand for a while. Please use a tripod or other support when using the camera for a long time. 19 English - Sanyo VPC-CG102 | VPC-CG102 Owners Manual English - Page 29
SETUP DATE AND TIME SETTING The camera will record the date and time an image or audio recording on page 22. Example: To set the clock to 7:30 p.m. on December 24, 2010 1 Turn on the camera (page 17), and press the SET button. h The Clock Set Screen appears. h Follow the procedures below to - Sanyo VPC-CG102 | VPC-CG102 Owners Manual English - Page 30
3 Set the clock. 1 Select "TIME". 2 Press the SET button. h The Set Time Screen appears. 3 Set the time to "19:30". h The time is set in the following order: Set the hour → Set the minute. h A 24-hour clock is used for the time display. 4 Press the SET button. CLOCK SET TIME 19:30 OK 4 Set the - Sanyo VPC-CG102 | VPC-CG102 Owners Manual English - Page 31
recommended to check that the date and time settings are still correct after replacing the battery pack and before shooting or recording of any type ( follow step 1). To correct the date and time settings 1 Turn on the camera. - Sanyo VPC-CG102 | VPC-CG102 Owners Manual English - Page 32
recording) and the playback mode (for viewing your recorded images). 1 Turn on the camera (page 17). 2 Press the REC/PLAY button. h The mode changes. h is pressed. 14M-S 10 Ful -HD 000:00:14 REC/PLAY button 2010.12.24 18:41 SD Full-HD 6.5MB SET OK 100-0006 00 - Sanyo VPC-CG102 | VPC-CG102 Owners Manual English - Page 33
's many functions. Select the mode that is suitable for your purposes. Switching between the SIMPLE and NORMAL modes 1 Turn on the camera (page 17). h The previous mode is active. 2 Press the MENU button. h The Menu Screen for the active mode appears. 3 Select the operating mode icon, and - Sanyo VPC-CG102 | VPC-CG102 Owners Manual English - Page 34
Accessing/exiting the SIMPLE/NORMAL Mode Menu Screen 1 Set the camera to the recording or playback mode (page 23). 2 Select the desired operating mode (page 24). 3 If the Menu Screen is not displayed, press the MENU - Sanyo VPC-CG102 | VPC-CG102 Owners Manual English - Page 35
, and press the SET button. h The Setting Screen for the selected item appears. Push up Select an item to change Description of selected item Select video and photo size SN SET OK Push down Press To keep in HDTV size 14M 2M HDTV size 14M [4:3] SESTET OK English 26 - Sanyo VPC-CG102 | VPC-CG102 Owners Manual English - Page 36
up or down to select a tab. h The Menu Screen for the selected tab appears. Push up Push down Tab RECORDING MENU 1 1 2 3 VIDEO PHOTO Ful -HD 14M-S SCENE SELECT 1 FILTER 2 FLASH 3 SELF-TIMER SN SET OK Option tab 5 Toggle the SET button to the right. Push to the right RECORDING MENU - Sanyo VPC-CG102 | VPC-CG102 Owners Manual English - Page 37
an item to change RECORDING MENU 1 1 2 3 VIDEO PHOTO SCENE SELECT Ful -HD 14M-S 1 FILTER 2 FLASH 3 SELF-TIMER SET OK Applicable mode 16M 4640x3480 still image shooting. : This setting is effective during video clip recording. : This setting is effective during still image shooting and video - Sanyo VPC-CG102 | VPC-CG102 Owners Manual English - Page 38
SHOOTING SHOOTING VIDEO CLIP RECORDING 1 Turn on the camera (page 17), and set it to the recording mode (page 23). 2 Press the [ ] button. the recording. h Press the [ ] button again to stop recording. [] button Recording time Full-HD REC000:00:09 5 Available recording time remaining 29 English - Sanyo VPC-CG102 | VPC-CG102 Owners Manual English - Page 39
SHOOTING SHOOTING SINGLE SHOTS Capture a still image (single-shot). 1 Turn on the camera (page 17), and set it to the recording mode (page 23). [] button 2 Press the [ ] button. 1 Press the [ ] button halfway. h The autofocus operates, and the image - Sanyo VPC-CG102 | VPC-CG102 Owners Manual English - Page 40
camera focusing on? i A target mark & on the monitor Target mark shows the area the camera is 14M-S focusing on. i The camera the shooting angle. i The large target mark appears when Camera shake icon Shutter speed Aperture the camera focuses on a wide area in the center of the screen - Sanyo VPC-CG102 | VPC-CG102 Owners Manual English - Page 41
Turn on the camera (page 17), and set it to the recording mode (page 23). 2 Press the [ ] button. [ ] button [] button 3 When you see a scene you'd like to capture as a still image, press the [ ] button. 4 Press the [ ] button to end the video clip recording. SHOOTING 2M Full-HD REC000:00:09 - Sanyo VPC-CG102 | VPC-CG102 Owners Manual English - Page 42
image while recording a video clip, the flash does not operate. i When the remaining video recording time becomes approximately 50 seconds, it will no longer be possible to capture a still image while recording a video clip. If you intend to capture a still image while recording a video clip, it is - Sanyo VPC-CG102 | VPC-CG102 Owners Manual English - Page 43
has two zoom functions: optical zoom and digital zoom. 1 Point the camera lens at the subject. Zoom switch 2 Push the zoom [T/]] side again, the mode changes to the digital zoom mode and zooming continues. ZOOM RANGE button 3 Take the picture. For video clip recording, see page 29. For shooting - Sanyo VPC-CG102 | VPC-CG102 Owners Manual English - Page 44
of the CMOS sensor and is not a malfunction. i It is recommended that you use a tripod to stabilize the camera when recording video clips at a high magnification. About the "12x Advanced Zoom" i During video clip recording, the "12x Advanced Zoom" function makes it possible to electronically magnify - Sanyo VPC-CG102 | VPC-CG102 Owners Manual English - Page 45
PLAYBACK PLAYBACK PLAYING BACK VIDEO CLIPS AND STILL IMAGES 1 Set the camera to the playback mode (page 23). the SET button. h The image you selected in step 2 is displayed fullscreen. h If a video clip was selected, playback begins. Toggle the - Sanyo VPC-CG102 | VPC-CG102 Owners Manual English - Page 46
Video clip playback operation To do this... Do this Normal forward playback Press the SET button. Stop playback During playback, toggle the SET button down. Pause - Sanyo VPC-CG102 | VPC-CG102 Owners Manual English - Page 47
to be played back, the computer may not be able to play back the video fast enough, making it appear jerky. (The video will always be displayed properly on the camera monitor or a television.) i Depending on the card, recording may end even before the possible recording time indicated. Display the - Sanyo VPC-CG102 | VPC-CG102 Owners Manual English - Page 48
monitor NTSC: n PAL: m m n interface cable TV NTSC: m PAL: n n m Camera monitor n m n HDMI cable TV m n m m: Images are output n: Images are not output HINT i HDMI, the HDMI logo and High-Definition Multimedia Interface are trademarks or registered trademarks of HDMI Licensing, LLC - Sanyo VPC-CG102 | VPC-CG102 Owners Manual English - Page 49
". Supplied dedicated AV interface cable To USB/AV terminal White plug: To Audio Input (L) terminal Red plug: To Audio Input (R) terminal Yellow plug:To Video Input terminal Connecting to the HDMI terminal Use a separately sold mini-HDMI cable to connect to a TV. Set the input to "HDMI". Mini HDMI - Sanyo VPC-CG102 | VPC-CG102 Owners Manual English - Page 50
monitor. (Use the TV controls to adjust the volume.) i The same playback procedure as when playing back with the camera is used to play back audio recordings as well. CAUTION Insert and pull out the cable carefully i When connecting the cables, make sure that the - Sanyo VPC-CG102 | VPC-CG102 Owners Manual English - Page 51
and use the Instruction Manual. HOW TO READ THIS MANUAL QUICK SEARCH BY OPERATION CHECKING THE INCLUDED ACCESSORIES How to use the accessories ABOUT THE CARD Media cards that can be used with this camera What "card" means in this manual GETTING THE MOST OUT OF YOUR CAMERA High-quality images with - Sanyo VPC-CG102 | VPC-CG102 Owners Manual English - Page 52
CLIP RECORDING SHOOTING SINGLE SHOTS Using the flash SHOOT A STILL IMAGE WHILE RECORDING A VIDEO CLIP MACRO-PHOTOGRAPHY (ZOOM) PLAYBACK PLAYING BACK VIDEO CLIPS AND STILL IMAGES How to save one frame from a video clip as a still image SLIDESHOW PLAYBACK PLAYBACK VOLUME DELETING FILES Delete single - Sanyo VPC-CG102 | VPC-CG102 Owners Manual English - Page 53
output setting File No. continued setting Formatting (initializing) CHECKING THE REMAINING CARD MEMORY Checking the remaining number of images and video recording time For audio recordings CHECKING THE REMAINING BATTERY PACK CHARGE „ OTHER DEVICES AND CONNECTIONS CONNECTING TO A COMPUTER OPERATING - Sanyo VPC-CG102 | VPC-CG102 Owners Manual English - Page 54
QUESTIONS TROUBLESHOOTING Camera Notes regarding the Scene Select feature and filters SPECIFICATIONS Camera Camera connectors Battery life Possible No. of Images/Possible Shooting Time/Possible Recording Time Concerning the multi-indicator Supplied battery pack charger Supplied Li-ion battery pack - Sanyo VPC-CG102 | VPC-CG102 Owners Manual English - Page 55
How to obtain the Instruction Manual 1 Remove the card from the camera. h The program to access the website is stored in your camera's internal memory. This program cannot be accessed while a card is installed in the camera. 2 Start your computer, and use the supplied dedicated USB interface cable - Sanyo VPC-CG102 | VPC-CG102 Owners Manual English - Page 56
menu) appears. 6 Click on [Go to Xacti CG100/CG102 Web Support Page]. h The screen to select your desired language appears. When you click on a language selection, the website page introducing this camera opens. h Select and download the desired instruction manual from the website. HINT If the - Sanyo VPC-CG102 | VPC-CG102 Owners Manual English - Page 57
i Automatic halt of Eye-Fi operation when battery is low i AC adaptor connection restrictions (may or may not be supported, depending on the camera) i SSID setup/delete HINT i The Instruction Manual for the Eye-Fi transfer feature can be obtained from the Sanyo website (page 46). * "Adobe Reader" is - Sanyo VPC-CG102 | VPC-CG102 Owners Manual English - Page 58
power is low. A recorded file is being saved on the card or internal memory. The camera has determined that the image is bright enough and the flash is not necessary. Action Place the camera in your pocket to warm it up before using it. Keep the battery pack in an environment of 10 to 40 °C (50 - Sanyo VPC-CG102 | VPC-CG102 Owners Manual English - Page 59
the camera is turned off. Select the resolution setting according to the intended use. 4, 5, 6, 7, 8, :: Appropriate for printing letter-size or larger, and for printing a close-up of part of a photo (trimming). +, G, t: For printing standard photo (photo service) sizes. ,, [: For photos displayed - Sanyo VPC-CG102 | VPC-CG102 Owners Manual English - Page 60
- - Action Because shooting with the optical zoom uses the optics of a physical lens, you can shoot without losing minute details in the image. The digital zoom, on the other hand, works by magnifying a portion of the image that hits the image sensor and may produce a coarser image. Set the scene - Sanyo VPC-CG102 | VPC-CG102 Owners Manual English - Page 61
with the images. When capturing an image, devise a way to compensate for a bright subject, for example, by changing the shooting angle. Hold the camera correctly and slowly press the [ ] button halfway to lock the focus. Then press the [ ] button all the way to capture the image. APPENDICES - Sanyo VPC-CG102 | VPC-CG102 Owners Manual English - Page 62
images Why is the playback image distorted? Answer This may happen when trying to play back images stored on a card from a different digital camera. If the subject moves or the camera is moved during recording, a distorted image may sometimes occur. Action Play back images that were recorded on - Sanyo VPC-CG102 | VPC-CG102 Owners Manual English - Page 63
, magnified images appear less clear. The image was captured using the digital zoom. - The sound of the camera's mechanical action was recorded. The volume on the TV is set to the minimum. There is a problem with the printer. Action Not a malfunction. Not a malfunction. We cannot guarantee the - Sanyo VPC-CG102 | VPC-CG102 Owners Manual English - Page 64
is a noise heard from a nearby TV or radio during battery recharging? Why does the "Insufficient card memory" or "Insufficient internal memory" message appear? Why does the "Card is protected" message appear? Why can't the camera be operated? A problem such as inability to record or play back occurs - Sanyo VPC-CG102 | VPC-CG102 Owners Manual English - Page 65
? Answer - Why does the "System error" message appear? A problem has occurred within the camera or card. Action When the camera is connected to a TV, you can switch the camera's video output to NTSC or PAL. If you have questions about accessories etc., please consult with a dealer near you for - Sanyo VPC-CG102 | VPC-CG102 Owners Manual English - Page 66
Memory Card (up to 64 GB) Image sensor/ camera effective number of pixels 1/2.33-inch (1.1 cm) CMOS sensor Still images: Approx. 14.3 million pixels Videos (HD mode): Approx. 11.9 million pixels Videos (SD mode): Approx. 14.3 million pixels * Video clip files recorded with models VPC-CA65 and VPC - Sanyo VPC-CG102 | VPC-CG102 Owners Manual English - Page 67
30p) h The 60 fps frame rate of this camera is 59.94 fps, and the 30 fps frame rate is 29.97 fps. Full-auto TTL; manual setting available Focal length: f = 6.8 mm to ND filter 35 mm film camera conversion Still image shooting: 38 mm to 190 mm (Optical zoom 5×) Video clip recording: Double-range zoom - Sanyo VPC-CG102 | VPC-CG102 Owners Manual English - Page 68
mode: 1/30 to 1/1,500 sec. (no flash) Video clip recording mode: 1/30 to 1/10,000 sec. (1/15 sec. max. when scene select function is set to lamp Q or the high sensitivity mode) Still image shooting (standard output sensitivity*)/ video clip recording mode: Auto (video clip recording: ISO 50 to 800 - Sanyo VPC-CG102 | VPC-CG102 Owners Manual English - Page 69
Flash modes Auto-flash, forced flash, flash off Focus TTL-type AF (still image shooting mode: 9-point range finder/spot focus; video clip recording mode: Continuous focus), manual .) (camera only [without battery pack and card]) Approx. 176 g (6.2 oz.) (including battery pack and card) APPENDICES - Sanyo VPC-CG102 | VPC-CG102 Owners Manual English - Page 70
number of scan lines): 750p (720p)/ 1125i (1080i)/525p (480p) Audio output: L-PCM 48 kHz sampling Battery life Shooting Playback Still image shooting mode Video clip recording mode Approx. 190 images: CIPA standard (when a SanDisk 2 GB SD Memory Card is used) Approx. 60 minutes: Recorded in - Sanyo VPC-CG102 | VPC-CG102 Owners Manual English - Page 71
setting Internal Memory SD Memory Card 8 GB 16 GB 4 5 6 7 8 Still image mode SD Memory Card by SanDisk is used. i Even with cards of the same capacity, the amount of data that can actually be stored may differ depending on the card brand, etc. i The continuous shooting time for each video - Sanyo VPC-CG102 | VPC-CG102 Owners Manual English - Page 72
. Color Multi-indicator status Camera status Multi-indicator Green Lit Flashing Connected to a computer or printer Power save mode active Orange Lit Connected to a TV Slow Rise in internal temperature During selfRed Flashing Fast timer photography Very fast Accessing card 63 English - Sanyo VPC-CG102 | VPC-CG102 Owners Manual English - Page 73
) 84.0 (W) × 50.5 (D) × 22.5 (H) mm 3.31" (W) × 1.99" (D) × 0.89" (H) Approx. 49 g (1.7 oz.) i When using the supplied battery pack charger abroad, the power cord may need to be replaced in accordance with local requirements. Please contact your local dealer for details. Supplied Li-ion - Sanyo VPC-CG102 | VPC-CG102 Owners Manual English - Page 74
are registered trademarks of Intel Corporation (USA). In this manual, the Microsoft® Windows® 2000 operating system, Microsoft® software© 2003-2005 FotoNation In Camera Red Eye - covered by U.S. Patent No. 6,407,777. Other patents Pending. SDXC logo is a trademark. HDMI, the HDMI logo and High - Sanyo VPC-CG102 | VPC-CG102 Owners Manual English - Page 75
up and ready to go i Sanyo Electric shall not be held responsible for any problems resulting from the use of this camera. i Sanyo Electric declines all responsibility for damages due to improper use of the camera, failure to adhere to the instructions given in this manual, or repairs or changes done - Sanyo VPC-CG102 | VPC-CG102 Owners Manual English - Page 76
SANYO Electric Co., Ltd.
-
 1
1 -
 2
2 -
 3
3 -
 4
4 -
 5
5 -
 6
6 -
 7
7 -
8
-
9
-
10
-
11
-
12
-
13
-
14
-
15
-
16
-
17
-
18
-
19
-
20
-
21
-
22
-
23
-
24
-
25
-
26
-
27
-
28
-
29
-
30
-
31
-
32
-
33
-
34
-
35
-
36
-
37
-
38
-
39
-
40
-
41
-
42
-
43
-
44
-
45
-
46
-
47
-
48
-
49
-
50
-
51
-
52
-
53
-
54
-
55
-
56
-
57
-
58
-
59
-
60
-
61
-
62
-
63
-
64
-
65
-
66
-
67
-
68
-
69
-
70
-
71
-
72
-
73
-
74
-
75
-
76
 |
 |

VPC-CG100EX
VPC-CG100GX
VPC-CG100PX
VPC-CG100TA
VPC-CG102
GUIDE FOR
BASIC OPERATION
Dual Camera
Please read these instructions carefully before using the camera.
Make sure to read and understand the separate booklet “SAFETY MANUAL”.
Keep this manual in a safe place for later reference.
Important note
This manual explains how to safely operate the VPC-CG100EX,
VPC-CG100GX, VPC-CG100PX, VPC-CG100TA and VPC-CG102.
Any information regarding only one of these products will be labeled as such.