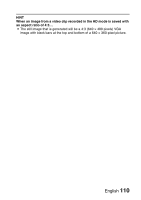
Sanyo VPC HD2 Instruction Manual, VPC-HD2EX - Page 120
Select DELETE, and press the SET button., <DELETE SINGLE>, <DELETE ALL>, CAUTION
 |
UPC - 086483066788
View all Sanyo VPC HD2 manuals
Add to My Manuals
Save this manual to your list of manuals |
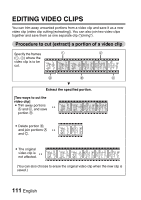
Page 120 highlights
4 Select "DELETE", and press the SET button. h The currently displayed image is deleted. h To delete other data, select the data, and press the SET button. h To return to the Playback Setting Screen, press the MENU button twice. h The Delete Confirmation Screen again appears. To delete the data, select "YES", and press the SET button. When data delete is completed, "No image" is shown. CAUTION i Data which is protected from accidental deletion cannot be deleted. To delete protected data, set the protect setting for the data to off (page 103), and then follow the data delete procedure. HINT i You can also access the Delete Single Confirmation Screen from the Playback Screen by toggling the SET button up. English 106
-
 1
1 -
2
-
3
-
4
-
5
-
6
-
7
-
8
-
9
-
10
-
11
-
12
-
13
-
14
-
15
-
16
-
17
-
18
-
19
-
20
-
21
-
22
-
23
-
24
-
25
-
26
-
27
-
28
-
29
-
30
-
31
-
32
-
33
-
34
-
35
-
36
-
37
-
38
-
39
-
40
-
41
-
42
-
43
-
44
-
45
-
46
-
47
-
48
-
49
-
50
-
51
-
52
-
53
-
54
-
55
-
56
-
57
-
58
-
59
-
60
-
61
-
62
-
63
-
64
-
65
-
66
-
67
-
68
-
69
-
70
-
71
-
72
-
73
-
74
-
75
-
76
-
77
-
78
-
79
-
80
-
81
-
82
-
83
-
84
-
85
-
86
-
87
-
88
-
89
-
90
-
91
-
92
-
93
-
94
-
95
-
96
-
97
-
98
-
99
-
100
-
101
-
102
-
103
-
104
-
105
-
106
-
107
-
108
-
109
-
110
-
111
-
112
-
113
-
114
-
 115
115 -
 116
116 -
 117
117 -
 118
118 -
 119
119 -
 120
120 -
 121
121 -
 122
122 -
 123
123 -
 124
124 -
 125
125 -
126
-
127
-
128
-
129
-
130
-
131
-
132
-
133
-
134
-
135
-
136
-
137
-
138
-
139
-
140
-
141
-
142
-
143
-
144
-
145
-
146
-
147
-
148
-
149
-
150
-
151
-
152
-
153
-
154
-
155
-
156
-
157
-
158
-
159
-
160
-
161
-
162
-
163
-
164
-
165
-
166
-
167
-
168
-
169
-
170
-
171
-
172
-
173
-
174
-
175
-
176
-
177
-
178
-
179
-
180
-
181
-
182
-
183
-
184
-
185
-
186
-
187
-
188
-
189
-
190
-
191
-
192
-
193
-
194
-
195
-
196
-
197
-
198
-
199
-
200
-
201
-
202
-
203
-
204
-
205
-
206
-
207
-
208
-
209
-
210
-
211
-
212
-
213
-
214
-
215
-
216
-
217
-
218
-
219
-
220
-
221
-
222
-
223
-
224
-
225
-
226
-
227
 |
 |
English
106
4
Select “DELETE”, and press the SET button.
<DELETE SINGLE>
h
The currently displayed image is deleted.
h
To delete other data, select the data, and press the SET button.
h
To return to the Playback Setting Screen, press the MENU button
twice.
<DELETE ALL>
h
The Delete Confirmation Screen again appears. To delete the data,
select “YES”, and press the SET button. When data delete is
completed, “No image” is shown.
CAUTION
i
Data which is protected from accidental deletion cannot be deleted. To
delete protected data, set the protect setting for the data to off (page 103),
and then follow the data delete procedure.
HINT
i
You can also access the Delete Single Confirmation Screen from the
Playback Screen by toggling the SET button up.