Sanyo VPC HD2 Instruction Manual, VPC-HD2EX - Page 177
CONNECTING TO A TV, Enjoy higher image quality progressive output
 |
UPC - 086483066788
View all Sanyo VPC HD2 manuals
Add to My Manuals
Save this manual to your list of manuals |
Page 177 highlights
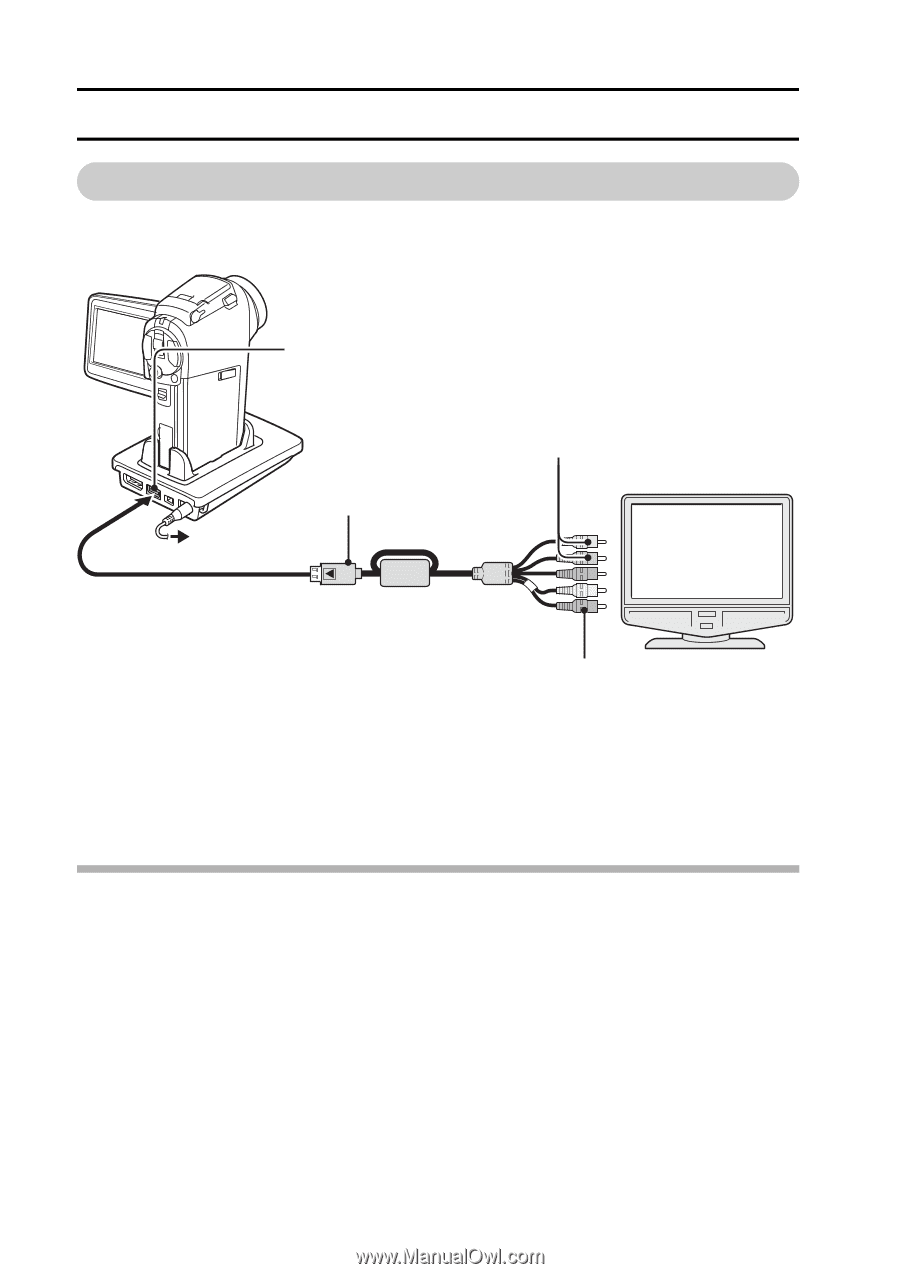
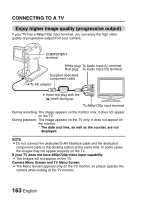
CONNECTING TO A TV Enjoy higher image quality (progressive output) If your TV has a 480p/720p input terminal, you can enjoy the high video quality of progressive output from your camera. COMPONENT terminal White plug: To Audio Input (L) terminal Red plug: To Audio Input (R) terminal Supplied dedicated component cable To AC adaptor i Insert the plug with the [n] mark facing up. To 480p/720p input terminal During recording: The image appears on the monitor only; it does not appear on the TV. During playback: The image appears on the TV only; it does not appear on the monitor. * The date and time, as well as the counter, are not displayed. NOTE i Do not connect the dedicated S-AV interface cable and the dedicated component cable to the docking station at the same time. In some cases the images may not appear properly on the TV. If your TV does not have 480p/720p video input capability i The images will not appear on the TV. Camera Menu Screen and TV Menu Screen i The Menu Screen appears only on the TV monitor, so please operate the camera while looking at the TV monitor. 163 English
-
 1
1 -
2
-
3
-
4
-
5
-
6
-
7
-
8
-
9
-
10
-
11
-
12
-
13
-
14
-
15
-
16
-
17
-
18
-
19
-
20
-
21
-
22
-
23
-
24
-
25
-
26
-
27
-
28
-
29
-
30
-
31
-
32
-
33
-
34
-
35
-
36
-
37
-
38
-
39
-
40
-
41
-
42
-
43
-
44
-
45
-
46
-
47
-
48
-
49
-
50
-
51
-
52
-
53
-
54
-
55
-
56
-
57
-
58
-
59
-
60
-
61
-
62
-
63
-
64
-
65
-
66
-
67
-
68
-
69
-
70
-
71
-
72
-
73
-
74
-
75
-
76
-
77
-
78
-
79
-
80
-
81
-
82
-
83
-
84
-
85
-
86
-
87
-
88
-
89
-
90
-
91
-
92
-
93
-
94
-
95
-
96
-
97
-
98
-
99
-
100
-
101
-
102
-
103
-
104
-
105
-
106
-
107
-
108
-
109
-
110
-
111
-
112
-
113
-
114
-
115
-
116
-
117
-
118
-
119
-
120
-
121
-
122
-
123
-
124
-
125
-
126
-
127
-
128
-
129
-
130
-
131
-
132
-
133
-
134
-
135
-
136
-
137
-
138
-
139
-
140
-
141
-
142
-
143
-
144
-
145
-
146
-
147
-
148
-
149
-
150
-
151
-
152
-
153
-
154
-
155
-
156
-
157
-
158
-
159
-
160
-
161
-
162
-
163
-
164
-
165
-
166
-
167
-
168
-
169
-
170
-
171
-
 172
172 -
 173
173 -
 174
174 -
 175
175 -
 176
176 -
 177
177 -
 178
178 -
 179
179 -
 180
180 -
 181
181 -
 182
182 -
183
-
184
-
185
-
186
-
187
-
188
-
189
-
190
-
191
-
192
-
193
-
194
-
195
-
196
-
197
-
198
-
199
-
200
-
201
-
202
-
203
-
204
-
205
-
206
-
207
-
208
-
209
-
210
-
211
-
212
-
213
-
214
-
215
-
216
-
217
-
218
-
219
-
220
-
221
-
222
-
223
-
224
-
225
-
226
-
227
 |
 |