Sanyo VPC S6 Instruction Manual, VPC-S6
Sanyo VPC S6 - Xacti Digital Camera Manual
 |
UPC - 086483059193
View all Sanyo VPC S6 manuals
Add to My Manuals
Save this manual to your list of manuals |
Sanyo VPC S6 manual content summary:
- Sanyo VPC S6 | Instruction Manual, VPC-S6 - Page 1
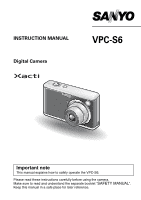
INSTRUCTION MANUAL Digital Camera VPC-S6 Important note This manual explains how to safely operate the VPC-S6. Please read these instructions carefully before using the camera. Make sure to read and understand the separate booklet "SAFETY MANUAL". Keep this manual in a safe place for later - Sanyo VPC S6 | Instruction Manual, VPC-S6 - Page 2
to comply with the limits for a Class B digital device, pursuant to Part 15 of the FCC and used in accordance with the instructions, may cause harmful interference to user's authority to operate the equipment. Declaration of Conformity Model number: VPC-S6 Trade Name: SANYO Responsible party: SANYO - Sanyo VPC S6 | Instruction Manual, VPC-S6 - Page 3
to. CAUTION Points that require special attention. (page xx) Refer to the page indicated for detailed information. You may find the answers to questions or problems concerning camera operation in the sections "COMMONLY ASKED QUESTIONS" (page 128) and "TROUBLESHOOTING" (page 134). English ii - Sanyo VPC S6 | Instruction Manual, VPC-S6 - Page 4
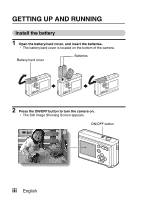
GETTING UP AND RUNNING Install the battery 1 Open the battery/card cover, and insert the batteries. h The battery/card cover is located on the bottom of the camera. Battery/card cover Batteries 2 Press the ON/OFF button to turn the camera on. h The Still Image Shooting Screen appears. ON/OFF - Sanyo VPC S6 | Instruction Manual, VPC-S6 - Page 5
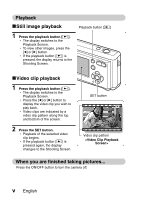
the shutter button. h The image is captured. Shutter button kVideo clip recording 1 Press the MENU button, and press the [m] button. h The camera changes to the video clip recording mode. 2 Press the MENU button. MENU button [m] button [l] button 3 Press the shutter button. h Recording begins - Sanyo VPC S6 | Instruction Manual, VPC-S6 - Page 6
Shooting Screen. SET button Video clip pattern When you are finished taking pictures... Press the ON/OFF button to turn the camera off. v English - Sanyo VPC S6 | Instruction Manual, VPC-S6 - Page 7
QUICK SEARCH BY OPERATION Your camera has an abundance of convenient features and functions 36 Close-up photography • "FOCUS RANGE" (macro mode) on page 59 For more accurate focus • "FOCUS RANGE" (manual focus) on page 60 Set the focus to a narrow range • "FOCUS AREA SETTING" on page 68 Check the - Sanyo VPC S6 | Instruction Manual, VPC-S6 - Page 8
" on page 61 Make images lighter or darker • "EXPOSURE CORRECTION" on page 39 Measure the brightness of a specific area • "LIGHT-MEASURING MODE SETTING" on page 69 Adjust the camera's sensitivity • "ISO SENSITIVITY" on page 70 Change the color of the images • "FILTERS" (monochrome filter/ sepia - Sanyo VPC S6 | Instruction Manual, VPC-S6 - Page 9
on page 30 Delete data • "ERASING DATA" on page 80 Protect images from accidental erasure • "IMAGE PROTECT" on page 78 Format a card • "INITIALIZING THE CARD MEMORY AND INTERNAL MEMORY" on page 113 Specify the number of prints, index print, and date imprint • "PRINT SETTINGS" on page 88 View the - Sanyo VPC S6 | Instruction Manual, VPC-S6 - Page 10
QUICK SEARCH BY OPERATION 1 CONTENTS 4 CHECKING THE INCLUDED ACCESSORIES 7 GETTING THE MOST OUT OF YOUR CAMERA 9 SYSTEM MAP 11 „ SETUP PARTS NAMES 12 INSTALLING THE CARD AND BATTERIES 14 TURNING THE CAMERA ON AND OFF 17 DATE AND TIME SETTING 19 „ BASIC OPERATION BEFORE TAKING PICTURES 22 - Sanyo VPC S6 | Instruction Manual, VPC-S6 - Page 11
CONTENTS „ SHOOTING (SHOOTING SETTING SCREEN) ACCESSING THE SHOOTING SETTING SCREEN 47 TOUCH SENSOR (TOUCH FOCUS) SETTING 57 RESOLUTION SETTING 58 FOCUS RANGE 59 SELF-TIMER 61 SHUTTER OPERATION SETTING 63 FOCUS AREA SETTING 68 LIGHT-MEASURING MODE SETTING 69 ISO SENSITIVITY 70 WHITE BALANCE - Sanyo VPC S6 | Instruction Manual, VPC-S6 - Page 12
INTERNAL MEMORY .....113 RESETTING THE CAMERA SETTINGS 115 CHECKING THE REMAINING INTERNAL MEMORY AND CARD MEMORY 116 CHECKING THE REMAINING BATTERY CHARGE 117 „ OTHER DEVICES AND CONNECTIONS DIRECT PRINTING 119 „ APPENDICES COMMONLY ASKED QUESTIONS 128 TROUBLESHOOTING 134 SPECIFICATIONS 141 - Sanyo VPC S6 | Instruction Manual, VPC-S6 - Page 13
: 1 i SANYO Software Pack (CD-ROM): 1 i AA alkaline batteries: 2 (batteries made exclusively to be used as included accessories) i Dedicated USB interface cable: 1 i "SAFETY MANUAL" (safety precautions booklet) Please read this booklet carefully before using the digital camera. i Quick Guide - Sanyo VPC S6 | Instruction Manual, VPC-S6 - Page 14
and used with this camera are: i SD Memory Card i Multi Media Card What "card" means in this manual i In this manual, SD Memory Cards and Multi Media Cards that can be used in this digital camera are referred to as "card". i The cards in the illustrations in this manual are SD Memory Cards, but all - Sanyo VPC S6 | Instruction Manual, VPC-S6 - Page 15
can take still photos and record video clips. It's loaded with lots of functions that are possible only in a digital camera, including a super-quick focus, an easy-to-understand guidance display on a large screen, a more extensive Scene Select feature, and more. You'll never miss a photo - Sanyo VPC S6 | Instruction Manual, VPC-S6 - Page 16
Mode Select Screen Switch between the still photo shooting and video clip recording modes with a single on-screen action. Accessing the Shooting Setting Screen has never been so fast. PHOTO MOVIE English 10 - Sanyo VPC S6 | Instruction Manual, VPC-S6 - Page 17
your photos. Or take the card to a photo shop to have your photos printed there. Internet Dedicated USB interface cable Computer Printer 11 English AC adaptor (sold separately) Separately sold or commercially available SD Memory Card/ Multi Media Card i Card reader i DPOF- compatible printer - Sanyo VPC S6 | Instruction Manual, VPC-S6 - Page 18
SETUP PARTS NAMES Front Shutter button Touch sensor indicator ON/OFF button Flash Mirror: Check the camera angle when taking a picture of yourself. Self-timer indicator Lens USB terminal English 12 - Sanyo VPC S6 | Instruction Manual, VPC-S6 - Page 19
PARTS NAMES Rear Playback button [=] Zoom switch [W]/[T] Strap holder MENU button [n] button [m] button LCD monitor Bottom SET button [o] button Access light [l] button Battery/card cover DC IN terminal h Use only the SANYO-specified AC adaptor. Tripod stand hole 13 English - Sanyo VPC S6 | Instruction Manual, VPC-S6 - Page 20
THE CARD AND BATTERIES Your camera has an internal 15MB memory, when means that you can take photos (record image data) even when no card is installed. By using a card, however, you will be able to take many more photos. The card can be used after it has been formatted with the camera (page - Sanyo VPC S6 | Instruction Manual, VPC-S6 - Page 21
batteries. h Make sure that the batteries' polarities (M and N) are correct. Batteries 4 Close the battery/card cover. When removing the card... h To remove the card, press it down, and then release. The card will protrude slightly, and you can then pull it out. 1 Open 2 Press and release 3 Pull - Sanyo VPC S6 | Instruction Manual, VPC-S6 - Page 22
while the power is on, important data may be lost. Sanyo Electric shall not be held responsible for any losses that result from failure to comply with this warning. HINT Shooting without a card installed i The camera has a 15MB internal memory that lets you photograph and play back images even when - Sanyo VPC S6 | Instruction Manual, VPC-S6 - Page 23
. h The Playback Screen appears on the LCD monitor (page 29). Playback button [=] LCD monitor Turning off the camera 1 Press the ON/OFF button. h The camera turns off. h When the playback button [=] or ON/OFF button is pressed - Sanyo VPC S6 | Instruction Manual, VPC-S6 - Page 24
active about 10 minutes after the camera is turned on (factory-preset setting). i The user can specify the time elapsed before the power save function is activated (page 108). i When the camera is connected to a computer or printer using the dedicated USB interface cable, the power save function is - Sanyo VPC S6 | Instruction Manual, VPC-S6 - Page 25
30 p.m. on December 24, 2005 1 Press the ON/OFF button to turn the camera on, and press the MENU button. 2 Press the [o] button. h The Shooting Setting Option Screen (page 98). 1/2 CLOCK SET OPERATION BEEP HELP DISP POST VIEW DIGITAL ZOOM LCD BRIGHTNESS 4 Press the [n] or [o] button to select the - Sanyo VPC S6 | Instruction Manual, VPC-S6 - Page 26
5 Set the date. 1 Select "DATE". 2 Press the SET button. h The Set Date Screen appears. 3 Set the date to "2005/12/24". h The date is set in the following order: Set the year → Set the month → Set the day. h Press the [l] or [m] button to select the year, month or day. Press the [n] or [o] button to - Sanyo VPC S6 | Instruction Manual, VPC-S6 - Page 27
DATE AND TIME SETTING h If "DISP OFF" is selected, the date the image was captured is not shown during playback. 4 Press the SET button. 8 Select "EXIT", and press the SET button. h The date and time setting is completed, and you are returned to the Option Screen. h To return to the Shooting Screen, - Sanyo VPC S6 | Instruction Manual, VPC-S6 - Page 28
OPERATION BEFORE TAKING PICTURES How to hold the camera Hold the camera securely, keeping your elbows close to your body and making sure the camera is stable. Correct hold Incorrect hold A finger is blocking the lens or flash. Make sure that the lens and flash are not blocked by your fingers - Sanyo VPC S6 | Instruction Manual, VPC-S6 - Page 29
same distance as the desired subject. i Subjects without vertical lines Use the focus-lock function to lock the focus on the subject while holding the camera vertically. 23 English - Sanyo VPC S6 | Instruction Manual, VPC-S6 - Page 30
are present Use the focus-lock function to lock the focus on an object at the same distance as the desired subject, then reposition the camera to compose the picture. i Fast-moving subjects Use the focus-lock function to lock the focus on an object at the same distance as the - Sanyo VPC S6 | Instruction Manual, VPC-S6 - Page 31
clip recording mode). When shooting, you can switch the shooting mode on the Mode Select Screen. 1 Press the ON/OFF button to turn the camera on, and press the MENU button. h The Mode Select Screen appears. 2 Press the [l] or [m] button. h The shooting mode is switched. - Sanyo VPC S6 | Instruction Manual, VPC-S6 - Page 32
sound data is recorded in the camera's internal memory or on the card installed in the camera. i When a card is installed in the camera, the data is recorded on the card. If no card is installed, the data is recorded in the camera's internal memory. Taking pictures in backlight conditions... i When - Sanyo VPC S6 | Instruction Manual, VPC-S6 - Page 33
images are captured. For more information about taking sequential shots, please see page 64. Shooting single shots 1 Press the ON/OFF button to turn the camera on. h The Still Image Shooting Screen appears. 2 Rest your finger on the shutter button. h If the touch sensor (page 57) has been set to ON - Sanyo VPC S6 | Instruction Manual, VPC-S6 - Page 34
wish to focus on, you can refocus, for example, F2.8 by changing the shooting angle. 1/30 i The large target mark appears when the camera focuses on a wide area in Shutter speed the center of the screen. Aperture About the focus indicator i A green focus indicator appears when Motion alert - Sanyo VPC S6 | Instruction Manual, VPC-S6 - Page 35
viewing both single shots and sequential shots are the same. 5 Press the playback button [=]. h If the playback button [=] was pressed to turn the camera on, however, press the playback button [=] for at least 1 second. h The image most recently captured appears on the LCD monitor. Playback button - Sanyo VPC S6 | Instruction Manual, VPC-S6 - Page 36
9-image display playback 1 Press the playback button [=]. Zoom switch 2 Press [W] ([P]) on the zoom switch. h The 9-image display appears. 3 Select the image to play back. h Press the arrow buttons to move the orange frame to the desired image, and press the SET button. h Instead of pressing the - Sanyo VPC S6 | Instruction Manual, VPC-S6 - Page 37
CAPTURING AND PLAYING BACK STILL IMAGES Magnifying (zooming in) the image 1 Display the image that you want to magnify. 2 Press [T] ([]]) on the zoom switch. h Magnification is enabled. h The image is magnified, and the central portion of image is displayed. h Press the arrow buttons to view - Sanyo VPC S6 | Instruction Manual, VPC-S6 - Page 38
VIDEO CLIP RECORDING AND PLAYBACK Recording a video clip 1 Press the ON/OFF button to turn the camera on. 2 Press the MENU button. h The Mode Select Screen appears. 3 Press the [m] button to select "MOVIE", and press the MENU button. h The Video Clip Recording - Sanyo VPC S6 | Instruction Manual, VPC-S6 - Page 39
VIDEO CLIP RECORDING AND PLAYBACK Playing back the video clip 6 Press the playback button [=]. h If the playback button [=] was pressed to turn the camera on, however, press the playback button [=] for at least 1 second. h The video clip just recorded appears on the LCD monitor. h Video clips are - Sanyo VPC S6 | Instruction Manual, VPC-S6 - Page 40
speed. Return to normal playback speed Press the SET button. When you are finished viewing video clips... i Press the ON/OFF button to turn the camera off. English 34 - Sanyo VPC S6 | Instruction Manual, VPC-S6 - Page 41
point in the video clip. i Press the MENU button for about 1 second to cancel the bar. To play back data from the internal memory i Remove the card from the camera. CAUTION If no audio is heard... i Audio cannot be played back. The data for a video clip is very large. i Therefore, be aware that - Sanyo VPC S6 | Instruction Manual, VPC-S6 - Page 42
has two zoom functions: optical zoom and digital zoom. You can specify whether or not the digital zoom is enabled (page 105). 1 Point the camera lens at the subject. Zoom switch 2 Press the zoom switch to compose the desired image. [T]: Zoom in on the subject. [W]: Zoom out. h When the zoom - Sanyo VPC S6 | Instruction Manual, VPC-S6 - Page 43
. Use this setting when capturing an image in a location where flash photography is prohibited, or when shooting a night landscape scene (flash off). J: The digital camera will detect the subject brightness and use the flash only when required. At this time the flash will operate in a manner that - Sanyo VPC S6 | Instruction Manual, VPC-S6 - Page 44
3 Press the [n] ([?]) button to set the flash mode. h Each time the [n] ([?]) button is pressed, the flash mode changes. h Display the icon for the desired flash mode. 4 Press the shutter button. h The picture is snapped and the flash operates according to the selected mode. HINT In the automatic - Sanyo VPC S6 | Instruction Manual, VPC-S6 - Page 45
EXPOSURE CORRECTION When capturing images, you can make the image lighter or darker. 1 Point the camera lens at the subject. h If the Mode Select Screen or a menu screen (Shooting Setting Screen) is active, press the MENU button to exit it. 2 With the - Sanyo VPC S6 | Instruction Manual, VPC-S6 - Page 46
to get beautiful photos every time, simply by selecting the setting that matches your shooting conditions. 1 Press the ON/OFF button to turn the camera on, and press the MENU button. h The Mode Select Screen appears. ON/OFF button MENU button 2 Press the [l] or [m] button to select the desired - Sanyo VPC S6 | Instruction Manual, VPC-S6 - Page 47
OVERVIEW OF THE EASY SETTINGS SCREEN SCENE: FULL AUTO USE AUTO SETTINGS 1 Scene select menu (page 42) .: Full auto photography /: Sports photography 0: Portrait photography 1: Landscape photography 2: Night view photography (Available only when shooting single shots) 3: Fireworks photography ( - Sanyo VPC S6 | Instruction Manual, VPC-S6 - Page 48
You can select from various preset settings (aperture, shutter speed, etc.) for specific shooting conditions. 1 Display the Easy Settings Screen (page 40). 2 Select the scene select menu. .: The camera automatically makes the optimum settings suitable for the surrounding conditions (full auto - Sanyo VPC S6 | Instruction Manual, VPC-S6 - Page 49
SCENE SELECT 3 Select the desired icon from the scene select menu, and press the SET button. h This completes the scene select setting. 4 Take the picture. For video clip recording, see page 32. For still image shooting, see page 27. h To return to normal photography, select . from the scene select - Sanyo VPC S6 | Instruction Manual, VPC-S6 - Page 50
O - - O: Available -: Not available CAUTION i When capturing images using the fireworks 3 or night view 2 setting, use a tripod or other method to stabilize the camera. i A table showing the limitations for settings corresponding to scene select icons other than . is on page 139. English 44 - Sanyo VPC S6 | Instruction Manual, VPC-S6 - Page 51
FILTERS The filter feature changes image characteristics such as color tones, to apply unique effects to the photographed image. 1 Display the Easy Settings Screen (page 40). 2 Select the filter menu. 6: No filter is used (none). 7: Skin tones are enhanced in closeup shots (cosmetic filter). 8: - Sanyo VPC S6 | Instruction Manual, VPC-S6 - Page 52
3 Select the desired icon from the filter menu, and press the SET button. h This completes the filter setting. 4 Take the picture. For video clip recording, see page 32. For still image shooting, see page 27. h To return to normal photography, select 6 from the filter menu, and press the SET button. - Sanyo VPC S6 | Instruction Manual, VPC-S6 - Page 53
operation mode; and to manage various settings such as turning the shutter button touch sensor ON/OFF. 1 Press the ON/OFF button to turn the camera on, and press the MENU button. h The Mode Select Screen appears. ON/OFF button MENU button 2 Press the [l] or [m] button to select the desired - Sanyo VPC S6 | Instruction Manual, VPC-S6 - Page 54
Switching the page The Shooting Setting Screen consists of two pages: PAGE 1 and PAGE 2. 1 Display the Shooting Setting Screen. 2 Press the [l] button. h The Shooting Setting Screen PAGE changes. h Each time the [l] button pressed, the PAGE changes. 12 TOUCH SENSOR ON - Sanyo VPC S6 | Instruction Manual, VPC-S6 - Page 55
ACCESSING THE SHOOTING SETTING SCREEN Overview of the Shooting Setting Screen (still images) PAGE 1 12 TOUCH SENSOR ON 49 English - Sanyo VPC S6 | Instruction Manual, VPC-S6 - Page 56
resolution [: Shoot at 640 × 480 resolution 3 Focus range menu (page 59) *: Shoot using the autofocus. +: Close-up photography ): Distant focus -: Manual focus L: Continuous AF 4 Flash menu (page 37) k: Automatic flash mode m: Forced flash mode l: Flash off mode n: Red-eye reduction 5 Self-timer - Sanyo VPC S6 | Instruction Manual, VPC-S6 - Page 57
ACCESSING THE SHOOTING SETTING SCREEN PAGE 2 12 FOCUS METHOD 9-PT AUTOFOCUS 51 English - Sanyo VPC S6 | Instruction Manual, VPC-S6 - Page 58
). *: Corresponds to ISO50 u: Corresponds to ISO100 v: Corresponds to ISO200 w: Corresponds to ISO400 4 White balance menu (page 71) >: The camera will determine the setting automatically. r: For photography in fair weather (sunny) conditions o: In overcast conditions p: Under fluorescent lighting - Sanyo VPC S6 | Instruction Manual, VPC-S6 - Page 59
ACCESSING THE SHOOTING SETTING SCREEN Overview of the Shooting Setting Screen (video clips) PAGE 1 10:15 TOUCH SENSOR ON 53 English - Sanyo VPC S6 | Instruction Manual, VPC-S6 - Page 60
pixels (15 frames/second, standard compression) 3 Focus range menu (page 59) *: Shoot using the autofocus. +: Close-up photography ): Distant focus -: Manual focus 4 Self-timer menu (page 61) N: Self-timer off y: Shooting begins 2 seconds after the shutter button is pressed. x: Shooting begins 10 - Sanyo VPC S6 | Instruction Manual, VPC-S6 - Page 61
ACCESSING THE SHOOTING SETTING SCREEN PAGE 2 10:15 FLICKER REDUCT OFF 55 English - Sanyo VPC S6 | Instruction Manual, VPC-S6 - Page 62
1 Flicker-reduction menu (page 73) *: Set the flicker-reduction function to OFF. o: Set the flicker-reduction function to ON. 2 ISO sensitivity menu (page 70) t: Sets the ISO sensitivity automatically (corresponds to ISO100 to 400). *: Corresponds to ISO100 u: Corresponds to ISO200 v: Corresponds to - Sanyo VPC S6 | Instruction Manual, VPC-S6 - Page 63
41 TOUCH SENSOR ON 3 Select the desired icon, and press the SET button. h The selected touch sensor function is set. CAUTION i When the camera is attached to a tripod, the touch sensor sensibility may be diminished. This happens because the touch sensor works by detecting changes in the capacitance - Sanyo VPC S6 | Instruction Manual, VPC-S6 - Page 64
(pixels) to a higher setting, image detail is enhanced for a smoother, finer picture. However, the file size also becomes large and uses more memory. Select the resolution setting that suits your purpose. 1 Display PAGE 1 of the Shooting Setting Screen (page 47). 2 In the still image shooting - Sanyo VPC S6 | Instruction Manual, VPC-S6 - Page 65
47). 2 Select the focus range menu. h The focus menu appears. *: The camera automatically focuses on the subject within a range of 10 cm (3.94 in.) ( to 8 m (26.25 ft), as well as to infinity (manual focus). L: The camera continuously focuses on the subject (continuous AF: still image shooting mode - Sanyo VPC S6 | Instruction Manual, VPC-S6 - Page 66
HINT About the focus range i The focus distance indication shows the distance between the lens surface and the subject. i In some cases there may be a slight variance between the distance (numerical figure) you set in the manual focus mode and the actual distance. Use the LCD monitor to confirm the - Sanyo VPC S6 | Instruction Manual, VPC-S6 - Page 67
SELF-TIMER 1 Display PAGE 1 of the Shooting Setting Screen (page 47). 2 Select the self-timer menu. h The self-timer icons are shown. N: Turns off the self-timer function. y: The image is captured about 2 seconds after the shutter button is pressed. x: The image is captured about 10 seconds after - Sanyo VPC S6 | Instruction Manual, VPC-S6 - Page 68
HINT To pause or cancel the self-timer function... i If the shutter button is pressed again before the shutter is released, the self-timer countdown temporarily stops. Press the shutter button one more time to restart the self-timer. i To cancel self-timer photography, set the self-timer setting to - Sanyo VPC S6 | Instruction Manual, VPC-S6 - Page 69
operates when the shutter button is pressed. 1 Set the camera to the still image shooting mode, and display PAGE 1 of the Shooting Setting Screen (page 47). 2 Select the operation mode menu. c: When the shutter button - Sanyo VPC S6 | Instruction Manual, VPC-S6 - Page 70
Shooting sequential shots When the shutter button is pressed, still images are captured in succession. 1 Select the sequential shots icon P from the operation mode menu, and press the SET button. h If the resolution is set to k, the setting changes automatically to y. 2 Press the shutter button to - Sanyo VPC S6 | Instruction Manual, VPC-S6 - Page 71
SHUTTER OPERATION SETTING How to use the auto bracket shots (bracket series) feature Successive still images are captured as the exposure changes (bracket series). 1 Select the bracket series icon I from the operation mode menu, and press the SET button. h If the resolution is set to E, the setting - Sanyo VPC S6 | Instruction Manual, VPC-S6 - Page 72
the SET button. h The selected frame shape fills the display. SELECT PATTERN BACK TO MENU 4 Capture the image for the background (frame). h Point the lens at the background subject, and snap the picture. 5 Next, capture the image that will be superimposed in the frame. h Take the photo of the - Sanyo VPC S6 | Instruction Manual, VPC-S6 - Page 73
SHUTTER OPERATION SETTING ID photos You can create ID photos to use in circulars, ads, and other publications, as well as in identification documents. 1 Select the ID photo icon . from the operation mode menu, and press the SET button. 2 Press the MENU button twice. h The ID photo outline appears - Sanyo VPC S6 | Instruction Manual, VPC-S6 - Page 74
from 9 different focus points within the shooting area visible on the LCD monitor. When the image is focused, a target mark & appears. Spot focus: The camera focuses on the subject in the center of the LCD monitor. 1 Display the Shooting Setting Screen (page 47). 2 Select the focus mode menu - Sanyo VPC S6 | Instruction Manual, VPC-S6 - Page 75
LIGHT-MEASURING MODE SETTING You can select from 3 types of light-measuring modes. Multi-section light-measuring: The exposure is adjusted after sampling from multiple areas of the entire shooting screen. Center-weighted light-measuring: The exposure is adjusted after light is measured from the - Sanyo VPC S6 | Instruction Manual, VPC-S6 - Page 76
ISO SENSITIVITY With the initial settings, the ISO sensitivity is automatically set according to the brightness of the subject. However, the ISO sensitivity can be set to a fixed setting. 1 Display PAGE 2 of the Shooting Setting Screen (page 47). 2 Select the ISO sensitivity menu. h The ISO - Sanyo VPC S6 | Instruction Manual, VPC-S6 - Page 77
be manually set. 1 Display PAGE 2 of the Shooting Setting Screen (page 47). 2 Select the white balance menu. h The white balance menu appears. 12 >: The camera will make the line. 2 Fill the entire screen with a plain white card (or piece of paper, etc.), and press the SET button. 71 English - Sanyo VPC S6 | Instruction Manual, VPC-S6 - Page 78
3 Select the desired icon, and press the SET button. h This completes the white balance setting. h Once the white balance setting is programmed for the ] icon, it is retained even if another white balance setting (>, r, o, p, or q) is selected. If you changed to another setting, whenever you select - Sanyo VPC S6 | Instruction Manual, VPC-S6 - Page 79
the background lighting pulsates at the frequency of the power supply. The flickerreduction setting is set for a frequency of 50 Hz. 1 Set the camera to the video clip recording mode, and display PAGE 2 of the Shooting Setting Screen (page 47). 2 Select the flicker-reduction menu. h The flicker - Sanyo VPC S6 | Instruction Manual, VPC-S6 - Page 80
PLAYBACK PAGE 1 (BASIC SETTINGS) DISPLAYING THE PLAYBACK SETTING SCREENS The Playback Setting Screens are used to adjust your camera's playback settings. 1 Press the playback button [=]. h The display changes to the Playback Screen. Playback button [=] 2 Press the MENU button. h The Playback - Sanyo VPC S6 | Instruction Manual, VPC-S6 - Page 81
DISPLAYING THE PLAYBACK SETTING SCREENS Switching the page The Playback Setting Screen consists of two pages: PAGE 1 and PAGE 2. 1 Display a Playback Setting Screen. 2 Press the [l] button. h The Playback Setting Screen changes to the other PAGE. h Each time the [l] button is pressed, the PAGE - Sanyo VPC S6 | Instruction Manual, VPC-S6 - Page 82
PROTECT Change image protect setting 1 Protect (page 78) h Protect data from accidental erasure (write protect). 2 Erase (page 80) h Delete images from the card memory. 3 Zoom jump playback (page 82) h Magnify the image for a better view of the details. 4 Resize (page 83) h Reduce the resolution of - Sanyo VPC S6 | Instruction Manual, VPC-S6 - Page 83
DISPLAYING THE PLAYBACK SETTING SCREENS PAGE 2 COPY IMAGE Copy image 1 Copy image (page 86) 2 Print settings (page 88) h Specify the print settings. 3 Slideshow (page 95) h Play back the images in a slideshow format. 4 PAGE display (page 75) 5 Option icon (page 98) h Display the Option Screen. 6 - Sanyo VPC S6 | Instruction Manual, VPC-S6 - Page 84
IMAGE PROTECT Prevent accidental erasure of data. 1 Display the data that you want to protect from accidental erasure, and display PAGE 1 of the Playback Setting Screen (page 74). 2 Select the protect icon A, and press the SET button. h "LOCK?" appears. h If the protect mode has already been - Sanyo VPC S6 | Instruction Manual, VPC-S6 - Page 85
IMAGE PROTECT CAUTION i Even if the protect mode is set for certain data files, they will be erased if the card is reformatted (page 113). HINT To select a different image in steps 2 and 3... i Press the [l] or [m] button. To cancel the protect mode for an image... i Display - Sanyo VPC S6 | Instruction Manual, VPC-S6 - Page 86
the data one at a time, or all at once. 1 To erase data from the card, perform the erase procedure with the card installed in the camera. To erase data from the camera's internal memory, remove the card before performing the erase procedure. 2 Display PAGE 1 of the Playback Setting Screen (page 74 - Sanyo VPC S6 | Instruction Manual, VPC-S6 - Page 87
ERASING DATA 5 Select "YES" and press the SET button. h The currently displayed image is deleted. h To erase other data, select the data, and press the SET button. h The Erase Confirmation Screen again appears. To erase the data, select "YES", and press the SET button. When - Sanyo VPC S6 | Instruction Manual, VPC-S6 - Page 88
ZOOM JUMP PLAYBACK You can magnify a portion of a still image to check the accuracy of the focus. 1 Display a still image to view using zoom jump playback. Zoom switch 2 Press the SET button. h The image is magnified. h If the magnified view appears to be in focus, then the overall image will be - Sanyo VPC S6 | Instruction Manual, VPC-S6 - Page 89
CHANGING IMAGE SIZE (RESIZE) The size of a still image that has already been captured at a resolution of t or more can be changed to 1,600 × 1,200 pixels or 640 × 480 pixels. The resized image is saved as a separate image. 1 Display the still image whose size you want to change. 2 Display PAGE 1 - Sanyo VPC S6 | Instruction Manual, VPC-S6 - Page 90
ROTATE IMAGE Captured still images can be rotated to the correct orientation for viewing. 1 Display the image you wish to rotate, and display PAGE 1 of the Playback Setting Screen (page 74). 2 Select the rotate icon L, and press the SET button. h The Rotate Image Screen appears. RIGHT:Rotates - Sanyo VPC S6 | Instruction Manual, VPC-S6 - Page 91
EXTRACTING A STILL IMAGE FROM A VIDEO CLIP You can select one image (scene) from a video clip, copy it, and save it as a still image (the original data remains unchanged). 1 Play back a video clip, and pause at the point you wish to copy and save. 2 Display PAGE 1 of the Playback Setting Screen ( - Sanyo VPC S6 | Instruction Manual, VPC-S6 - Page 92
the copy direction. INT MEM H CARD: Copy image data from the internal memory to the card. CARD H INT MEM: Copy image data from the card to the internal memory. COPY IMAGE CHOOSE COPY DIRECTION INT MEM CARD CARD INT MEM EXIT * If no card is set in the camera, you cannot copy data. English 86 - Sanyo VPC S6 | Instruction Manual, VPC-S6 - Page 93
COPY DATA 5 Press the SET button. h The screen to select the type of copy appears. h The copy source is shown in the background on the screen. COPY SINGLE: Copy the data for one image. COPY ALL: Copy all the data from the copy source to the copy destination. 6 Select the desired type of copy. - Sanyo VPC S6 | Instruction Manual, VPC-S6 - Page 94
camera, as with conventional film, you can have prints made at shops offering digital print services. Moreover, this camera is DPOF-compatible, so you can use the camera specified print settings apply to all the still images on the card. EACH IMAGE: The print settings are specified for each - Sanyo VPC S6 | Instruction Manual, VPC-S6 - Page 95
with a printer or have the digital print service shop print out a still image from a video clip, you must first save it (save frame [page 85]) as a still image. About the DPOF format i DPOF (Digital Print Order Format) is a print order format. You can connect your camera to a DPOF-compatible printer - Sanyo VPC S6 | Instruction Manual, VPC-S6 - Page 96
Setting Screen (page 88). 2 Select ALL IMAGES or EACH IMAGE. ALL IMAGES: The set print settings are applied to all the still images on the card. EACH IMAGE: The set print settings are applied only to the image currently displayed. PRINT SETTING ALL IMAGES EACH IMAGE INDEX ALL CLEAR EXIT 3 Press - Sanyo VPC S6 | Instruction Manual, VPC-S6 - Page 97
PRINT SETTINGS 4 Specify whether the date is displayed on the print, and the number of prints. 1 Press the [n] or [o] button to select "DATE". 2 Press the SET button. h The Print Date Screen appears. 3 Press the [n] or [o] button to select the desired option. YES:Print the - Sanyo VPC S6 | Instruction Manual, VPC-S6 - Page 98
5 Select "ADD TO PRINT SETTING" and press the SET button. h The Confirm Print Settings Screen appears. If the print settings are correct: Select "EXIT", and press the SET button. If the print settings were changed: Select "MODIFY PRINT SETTING", and press the SET button. EACH IMAGE SETTINGS DATE - Sanyo VPC S6 | Instruction Manual, VPC-S6 - Page 99
PRINT SETTINGS 3 Press the SET button. h The Index Print Screen appears. YES: Specify an index print copy. EXIT: Discontinue the setting procedure, and return to the Print Setting Screen. INDEX SET INDEX PRINT? YES EXIT 4 Select "YES", and press the SET button. h This completes the setting for - Sanyo VPC S6 | Instruction Manual, VPC-S6 - Page 100
Clearing all the print settings Delete the print settings for all images. 1 Display the Print Setting Screen (page 88). 2 Select "ALL CLEAR". PRINT SETTING ALL IMAGES EACH IMAGE INDEX ALL CLEAR EXIT 3 Press the SET button. h The Confirm All Clear Screen appears. YES: Clear the print settings for - Sanyo VPC S6 | Instruction Manual, VPC-S6 - Page 101
SLIDESHOW PLAYBACK 1 Display PAGE 2 of the Playback Setting Screen (page 74). 2 Select the slideshow icon V, and press the SET button. h The Slideshow Screen appears. TIME: Adjust the transition speed (the period that an image is displayed before it changes to the next image). EFFECT: Select a - Sanyo VPC S6 | Instruction Manual, VPC-S6 - Page 102
3 Select "START", and press the SET button. h Slideshow playback starts. h To stop slideshow playback, press the SET button or MENU button. English 96 - Sanyo VPC S6 | Instruction Manual, VPC-S6 - Page 103
function setting 4 Filter function setting 5 Image number 6 Protect setting 7 File size 8 Aperture value 9 Shutter speed 0 Exposure correction setting A Remaining card memory B Date and time of image C Video clip mode settings D Resolution and frame rate E File format F Playback time INFO 2816 - Sanyo VPC S6 | Instruction Manual, VPC-S6 - Page 104
. PAGE indication 3 Press the [m] button. h The Option Screen appears. h If the [o] button is pressed, the Option Screen menu appears. 12 ADV. SETTINGS CAMERA SETTINGS 1/2 BAS/ADV SETTINGS To exit the Option Screen To return to the Shooting Screen or Playback Screen → Press the MENU button. To - Sanyo VPC S6 | Instruction Manual, VPC-S6 - Page 105
DISPLAYING THE OPTION SCREEN Overview of the Option Screen 1/2 CLOCK SET OPERATION BEEP HELP DISP POST VIEW DIGITAL ZOOM LCD BRIGHTNESS LANGUAGE POWER SAVE FILE NO. RESET FORMAT RESET SETTINGS 99 English - Sanyo VPC S6 | Instruction Manual, VPC-S6 - Page 106
) h Set the file number reset function to ON or OFF. 0 Format (page 113) h Reformat the camera's internal memory or the card installed in the camera. A Reset camera settings (page 115) h Reset the camera to the factory-preset settings. B PAGE display (pages 48, 75 and 98) C Remaining battery power - Sanyo VPC S6 | Instruction Manual, VPC-S6 - Page 107
the still image shooting button is pressed, or when a photo is taken using the self-timer. KEY SW: Select the sound that is produced when a camera button (SET button, MENU button, etc.) is pressed. OPERATION BEEP SHUTTER KEY SW : ON : ON CHANGE SETTINGS ALL OFF EXIT 101 English - Sanyo VPC S6 | Instruction Manual, VPC-S6 - Page 108
3 Select "CHANGE SETTINGS", and press the SET button. h The screen to select the operation buttons appears. SHUTTER: Set the sound for the shutter button. KEY SW: Set the sounds of the operation buttons (except for the ON/OFF button and shutter button). EXIT: Return to the Operation Sounds Screen. - Sanyo VPC S6 | Instruction Manual, VPC-S6 - Page 109
HELP DISPLAY You can set whether or not the help messages are shown on the LCD monitor. 1 Display the Option Screen (page 98). 2 Select the help display icon r and press the SET button. h The Help Setting Screen appears. ON: The HELP messages are enabled. OFF: The HELP messages are disabled. HELP - Sanyo VPC S6 | Instruction Manual, VPC-S6 - Page 110
POST-VIEW SETTING Specify the duration that the captured image appears on the LCD monitor (post-view) after the shutter button is pressed. 1 Display the Option Screen (page 98). 2 Select the post-view icon o, and press the SET button. h The Post-view Screen appears. 1 SEC: The post-view image is - Sanyo VPC S6 | Instruction Manual, VPC-S6 - Page 111
only the optical zoom. 1 Display the Option Screen (page 98). 2 Select the digital zoom icon Q, and press the SET button. h The Digital Zoom Screen appears. ON: Digital zoom is enabled. OFF: Digital zoom is disabled. DIGITAL ZOOM ON OFF 3 Select the desired function, and press the SET button - Sanyo VPC S6 | Instruction Manual, VPC-S6 - Page 112
LCD MONITOR BRIGHTNESS Adjust the brightness of the camera's LCD monitor display. Use this adjustment when the monitor image is difficult to view because of ambient lighting. In addition, in very bright surroundings, such - Sanyo VPC S6 | Instruction Manual, VPC-S6 - Page 113
SCREEN LANGUAGE You can set the LCD monitor of your camera to display the messages in any one of several languages. 1 Display the Option Screen (page 98). 2 Select the language icon z, and press the SET button. h - Sanyo VPC S6 | Instruction Manual, VPC-S6 - Page 114
after a specified period of inactivity. The power save function works to conserve the battery power when the camera is not being used, or to prevent the batteries from dying if the camera has accidentally been left on. You can specify the elapsed time (standby time) before the power save function - Sanyo VPC S6 | Instruction Manual, VPC-S6 - Page 115
POWER SAVE FUNCTION 3 Select the desired option, and press the SET button. h The Set Standby Time Screen appears. 4 Press the [n] or [o] button to set the standby time. 5 Press the SET button. h The power save function is set. POWER SAVE BATT/CAM 1 min 109 - Sanyo VPC S6 | Instruction Manual, VPC-S6 - Page 116
, the consecutive numbering of file names continues from the last number recorded by the camera. File name (image number) Card A 0001, 0002...... 0012, 0013 Replace card Card B 0001, 0002...... 0012, 0013 File name (image number - Sanyo VPC S6 | Instruction Manual, VPC-S6 - Page 117
the next recorded image continues from last file name recorded on Card B. Card A 0001, 0002 ..... 0012, 0013 Replace card Card B 0020, 0021, 0022, 0023 ...... 0025, 0026 Previously recorded images HINT What about the internal memory? i The file number reset function works the same for the internal - Sanyo VPC S6 | Instruction Manual, VPC-S6 - Page 118
1 Display the Option Screen (page 98). 2 Select the file number reset icon i. FILE NO. RESET 3 Press the SET button. h The File Number Reset Screen appears. ON: The file number reset function is "ON". OFF: The file number reset function is "OFF". ON OFF 4 Select "OFF", and press the SET button. - Sanyo VPC S6 | Instruction Manual, VPC-S6 - Page 119
THE CARD MEMORY AND INTERNAL MEMORY The supplied card must be formatted with this camera. In addition, a card must be formatted with this camera: i After purchasing, when used for the first time, or i If it was formatted using a personal computer or another digital camera. The card cannot - Sanyo VPC S6 | Instruction Manual, VPC-S6 - Page 120
on the LCD monitor. CAUTION Caution during reformatting i Please do not turn off the camera or insert/remove the card while the card is being formatted. Reformatting erases the data i When the card or internal memory is initialized, all the recorded data is erased. Protected data is also erased, so - Sanyo VPC S6 | Instruction Manual, VPC-S6 - Page 121
NO: Do not change the settings, and return to the Option Screen. RESET SETTINGS RESET? YES NO 3 Select "YES", and press the SET button. h The camera settings are reset to the factory-preset settings. HINT i Note that the following settings do not change with this procedure: Date and time setting - Sanyo VPC S6 | Instruction Manual, VPC-S6 - Page 122
a table showing the maximum number of images and recording time for the internal memory and for a specific card, please see "Possible No. of Images/Possible Shooting Time" on page 146. 1 Press the ON/OFF button to turn the camera on, and press the MENU button. h The Mode Select Screen appears. - Sanyo VPC S6 | Instruction Manual, VPC-S6 - Page 123
is low, may appear early for an incorrect indication of the remaining charge. Also, depending on the conditions of use of the camera or the ambient conditions (temperature, etc.), the indicated remaining charge may change. Therefore, this indication can only be used as a general - Sanyo VPC S6 | Instruction Manual, VPC-S6 - Page 124
on the Playback Setting Screen or Information Screen. i Battery life may differ even among batteries of the same type. i Depending on the usage of the camera (such as the number of times the flash is used, etc.) or the ambient temperature (temperatures below 10°C [50°F]) the number of images that - Sanyo VPC S6 | Instruction Manual, VPC-S6 - Page 125
use the supplied USB interface cable to connect the camera to the printer. h Connect the camera's USB terminal to the printer's USB connector. h The USB Connection Screen appears on the camera's LCD monitor. USB CONNECTION CARD READER CANCEL Supplied dedicated USB interface cable USB terminal To - Sanyo VPC S6 | Instruction Manual, VPC-S6 - Page 126
printer is turned off while it is connected, the camera may not operate correctly. If the camera does not operate correctly, disconnect the USB interface cable, turn off the camera, and then reconnect the cable. i During PictBridge printing, the camera's button operation response is slower. i If the - Sanyo VPC S6 | Instruction Manual, VPC-S6 - Page 127
DIRECT PRINTING To select one image and print it (one image) Procedure to select one still image and print it. 1 Complete the printing setup (page 119). 2 Select the one image icon Y, and press the SET button. h The screen to select images for printing appears. 3 Press the [l] or [m] button. h - Sanyo VPC S6 | Instruction Manual, VPC-S6 - Page 128
4 Specify the number of prints. 1 Select "COPIES", and press the SET button. 2 Press the [n] or [o] button to specify the number of prints. 3 Press the SET button. h "PRINT" is selected. 5 Press the SET button. h Printing begins. ONE IMAGE 100-0009 COPIES 1 PRINT EXIT HINT To cancel printing 1 - Sanyo VPC S6 | Instruction Manual, VPC-S6 - Page 129
"PRINT", and press the SET button. h Printing begins. PRINT EXIT CAUTION Printing is not possible if there are more than 999 still images in the card. i Delete unwanted images before printing. 123 English - Sanyo VPC S6 | Instruction Manual, VPC-S6 - Page 130
Thumbnail prints (index) Make an index print of all the images. 1 Complete the printing setup (page 119). 2 Select the index print icon [, and press the SET button. h The Index Print Screen appears. INDEX 100-0009 3 Select "PRINT", and press the SET button. h Printing begins. PRINT EXIT - Sanyo VPC S6 | Instruction Manual, VPC-S6 - Page 131
the images that are set to print and their DPOF settings. CAUTION i Reserved images printing w is not possible if a printer is used that does not support your camera's DPOF function. 125 English - Sanyo VPC S6 | Instruction Manual, VPC-S6 - Page 132
To change the printer settings and print images (change printer settings) Images are printed according to settings specified by the camera, such as paper type, size, layout, printing quality, etc. 1 Complete the printing setup (page 119). 2 Select the printer settings icon v, and press the SET - Sanyo VPC S6 | Instruction Manual, VPC-S6 - Page 133
the printer that is connected. i To use printer functions which do not appear on your camera's Printer Settings Screen, select "PRINTER VALUE". i If a function set by the camera is not available in the printer, the camera's printer settings will automatically change to "PRINTER VALUE". 127 English - Sanyo VPC S6 | Instruction Manual, VPC-S6 - Page 134
touch sensor work? You are wearing gloves. Why does the access light flash? Why doesn't the flash operate? Recorded data is being saved on the card or to the camera's internal memory. The camera has determined that the image is bright enough and the flash is not necessary. Action Place the - Sanyo VPC S6 | Instruction Manual, VPC-S6 - Page 135
t: For printing standard photo (photo service) sizes. [: For photos displayed on a web page, or sent as email attachments. Because shooting with the optical zoom uses the optics of a physical lens, you can shoot without losing minute details in the image. The digital zoom, on the other hand, works - Sanyo VPC S6 | Instruction Manual, VPC-S6 - Page 136
due to the liquid crystals. Action Set the scene select function to the landscape 1 mode when photographing. Or, set the focus range setting to manual focus -, and set the distance to ∞. Set the flickerreduction setting to off *. Not a malfunction. Spots that appear in the LCD monitor only appear - Sanyo VPC S6 | Instruction Manual, VPC-S6 - Page 137
created from a magnified portion of a zoom jump image, or for video clips. This may happen when trying to play back images stored on a card from a different digital camera. If a bright subject is shot in the video clip recording mode, vertical stripes may appear on the LCD monitor or in the image - Sanyo VPC S6 | Instruction Manual, VPC-S6 - Page 138
digital zoom. - There is a problem with the printer. There is no more available memory on the card or in the camera's internal memory. The lock switch on the card Please refer to the instruction manual for your printer. Erase unnecessary data, or use a card that has more memory available. Move the - Sanyo VPC S6 | Instruction Manual, VPC-S6 - Page 139
COMMONLY ASKED QUESTIONS Misc. Question Can I use my camera abroad? Answer - Why does the "SYSTEM ERROR" message appear? A problem has occurred within the camera or card. Action If you have questions about using the AC adaptor and power cord abroad, please consult with a dealer near you for - Sanyo VPC S6 | Instruction Manual, VPC-S6 - Page 140
TROUBLESHOOTING Before taking your camera to the repair shop, check the following table for a possible solution to the problem. CAMERA Problem No power. Power The camera sure to orient it correctly. Close the battery/card cover completely. Press the ON/ OFF button, shutter button, playback button, - Sanyo VPC S6 | Instruction Manual, VPC-S6 - Page 141
TROUBLESHOOTING Problem An image is not captured when the shutter button is pressed. Shooting The operation buttons (arrow buttons, MENU button, etc.) do not work. The flash does not operate. The digital digital zoom setting is set to "OFF". The batteries are consumed. Action Install a new card - Sanyo VPC S6 | Instruction Manual, VPC-S6 - Page 142
Shooting LCD monitor Problem When zooming in or out, the zoom movement stops ISO sensitivity to a lower setting. Reference page 36 70 Press the playback button 29 [=]. Hold the camera correctly, and make sure the 22 flash is not obstructed. Capture the image in the range of 144 - Sanyo VPC S6 | Instruction Manual, VPC-S6 - Page 143
TROUBLESHOOTING Viewing images Problem The video clip picture is flickering. The image is too subject is too close to the camera. The focus setting is not correct. The camera moved when the shutter button was pressed. The focus is not locked properly. The lens is dirty. Action Set the - Sanyo VPC S6 | Instruction Manual, VPC-S6 - Page 144
correctly. Hold the camera correctly, and make sure the lens is not obstructed. Play back after capturing images. Cancel the protect mode. Set the protect setting for the data to OFF. Depending on the card, the capacity may be less than 1GB. Please refer to the instructions that accompanied the - Sanyo VPC S6 | Instruction Manual, VPC-S6 - Page 145
TROUBLESHOOTING Notes regarding the scene select feature and filters During still image shooting . When using a filter, the + focus range setting is not available. / 0 1 The + and ) focus range settings are not available. 2 3 Focus range: Fixed at ). Flash: Fixed at l. 139 English - Sanyo VPC S6 | Instruction Manual, VPC-S6 - Page 146
During video clip recording . / When using a filter, the + focus range setting is not available. 0 1 2 3 The + and ) focus range settings are not available. The focus range is fixed at ). About the scene select function and focus range settings i The scene select function changes to . when the - Sanyo VPC S6 | Instruction Manual, VPC-S6 - Page 147
), DCF (Design rules for camera file system) is standard for digital still camera image files to provide interoperability between digital photography devices for the images stored on removable memory cards. However, it is not guaranteed that all devices will support the DCF standard. Video clips - Sanyo VPC S6 | Instruction Manual, VPC-S6 - Page 148
clip recording only) ,: 160 × 120 pixels, 15 frames/second (video clip recording only) Full-auto TTL, manual setting possible 3.0× optical zoom lens f=5.8 mm to 17.4 mm (35 mm film camera conversion f=35 mm to 105 mm) Autofocus, 5 groups, 6 elements (2 with aspheric surfaces), internal ND filter - Sanyo VPC S6 | Instruction Manual, VPC-S6 - Page 149
SPECIFICATIONS Range Digital zoom Shutter speed Sensitivity LCD monitor Normal photography: 10 cm (3.94 in.) to ∞ (Wide), 40 cm (15.75 in.) to ∞ (Tele) Macro photography: 5 cm (1.97 - Sanyo VPC S6 | Instruction Manual, VPC-S6 - Page 150
focus), manual focus (14 SANYO HR-3UF) × 2 * AA-size manganese batteries cannot be used. model VAR-G4AEX for Europe, U.K. and others, and model VAR-G4AU for North America and others 93.1(W) × 60.5(H) × 27.1(D) mm 3.67" (W) × 2.38" (H) × 1.07" (D) Approx. 124 g (4.37 oz.) (without batteries and card - Sanyo VPC S6 | Instruction Manual, VPC-S6 - Page 151
SPECIFICATIONS Camera Connector USB/AV (communication/sound and image output) terminal DC IN (external DC power input) terminal USB 2.0 (High-speed) DC (when using a Matsushita Electric Industrial Co., Ltd. 64MB SD Memory Card). ** With continuous playback when using the LCD monitor. NOTE i - Sanyo VPC S6 | Instruction Manual, VPC-S6 - Page 152
shows the possible number of captured images and the possible recording time for the camera's internal memory (15MB) and for the commercially available 128MB and 1GB SD Memory Cards. Shooting Resolution mode setting setting k*1 Single-shot y mode/ x Sequential z shots mode t [ Video clip - Sanyo VPC S6 | Instruction Manual, VPC-S6 - Page 153
on the different camera operations. Access light status Off - Lit - Slow Flashing Fast Very fast Camera status Power OFF Connected to a computer or printer Power save mode (sleep) Error or when error is displayed; warning Accessing card or internal memory Access light 147 English - Sanyo VPC S6 | Instruction Manual, VPC-S6 - Page 154
actual product. Also, actual specifications are subject to change without prior notice and therefore may differ from the contents of this manual. i Sanyo Electric shall not be held responsible for any problems resulting from the use of this camera. i Sanyo Electric declines all responsibility for - Sanyo VPC S6 | Instruction Manual, VPC-S6 - Page 155
The shutter button was pressed before the image was focused. 2 After the image was focused, the subject moved. h Even if camera focuses the subject once, if the distance between the camera and the subject is changed, the subject may become out of focus. 3 The focus setting is not set for the correct - Sanyo VPC S6 | Instruction Manual, VPC-S6 - Page 156
subject is automatically determined when you press the shutter button halfway. In contrast to this, with the manual focus mode, you manually set the focus by specifying the correct distance between the camera and the subject before taking the picture. k How to photograph a moving subject 1 Set the - Sanyo VPC S6 | Instruction Manual, VPC-S6 - Page 157
, or you'll miss the action. NOTE i Tips to not missing those great action shots: Make sure you're holding the camera correctly. Keep the subject in the lens at all times, moving the camera with him while waiting for the right shot. Move your whole body-not just your arms-with the - Sanyo VPC S6 | Instruction Manual, VPC-S6 - Page 158
, it's better to use the optical zoom. Using the digital zoom produces a coarser image. Hold the camera securely, keeping your elbows close to your body and making sure the camera is stable. Using a tripod or other means of stabilizing the camera will increase the likelihood of getting a clear photo - Sanyo VPC S6 | Instruction Manual, VPC-S6 - Page 159
SANYO Electric Co., Ltd.
-
 1
1 -
 2
2 -
 3
3 -
 4
4 -
 5
5 -
 6
6 -
 7
7 -
8
-
9
-
10
-
11
-
12
-
13
-
14
-
15
-
16
-
17
-
18
-
19
-
20
-
21
-
22
-
23
-
24
-
25
-
26
-
27
-
28
-
29
-
30
-
31
-
32
-
33
-
34
-
35
-
36
-
37
-
38
-
39
-
40
-
41
-
42
-
43
-
44
-
45
-
46
-
47
-
48
-
49
-
50
-
51
-
52
-
53
-
54
-
55
-
56
-
57
-
58
-
59
-
60
-
61
-
62
-
63
-
64
-
65
-
66
-
67
-
68
-
69
-
70
-
71
-
72
-
73
-
74
-
75
-
76
-
77
-
78
-
79
-
80
-
81
-
82
-
83
-
84
-
85
-
86
-
87
-
88
-
89
-
90
-
91
-
92
-
93
-
94
-
95
-
96
-
97
-
98
-
99
-
100
-
101
-
102
-
103
-
104
-
105
-
106
-
107
-
108
-
109
-
110
-
111
-
112
-
113
-
114
-
115
-
116
-
117
-
118
-
119
-
120
-
121
-
122
-
123
-
124
-
125
-
126
-
127
-
128
-
129
-
130
-
131
-
132
-
133
-
134
-
135
-
136
-
137
-
138
-
139
-
140
-
141
-
142
-
143
-
144
-
145
-
146
-
147
-
148
-
149
-
150
-
151
-
152
-
153
-
154
-
155
-
156
-
157
-
158
-
159
 |
 |
VPC-S6
INSTRUCTION MANUAL
Digital Camera
Please read these instructions carefully before using the camera.
Make sure to read and understand the separate booklet “
SAFETY MANUAL
”.
Keep this manual in a safe place for later reference.
Important note
This manual explains how to safely operate the VPC-S6.