Seagate BlackArmor NAS 400 Series User Guide - Page 13
BlackArmor Users Start Here, A copy of the BlackArmor NAS 440/420 User Guide
 |
View all Seagate BlackArmor NAS 400 Series manuals
Add to My Manuals
Save this manual to your list of manuals |
Page 13 highlights
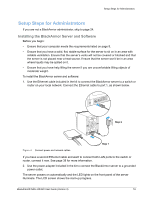
How to Get Started 10. (Optional) Turn your BlackArmor server into a media server so that BlackArmor users can access music, photos and videos (see page 22). 11. Continue with BlackArmor Users Start Here in the next section to begin using your BlackArmor server to save, protect, and share your own files. BlackArmor Users Start Here To get started with your BlackArmor server: 1. Ensure that you have these items from the BlackArmor administrator: • The BlackArmor Discovery software • The BlackArmor Backup software • Your BlackArmor log in name and password • The names of the folder share(s) that you can access • A description of any access limitations you have (for instance, read-only access to a particular folder share) • A copy of the BlackArmor NAS 440/420 User Guide 2. Install the BlackArmor software (see page 16). You don't need to install BlackArmor Backup if you are already using other software for regular file backups. 3. Connect to the server and the folder shares you have access to using BlackArmor Discovery (see page 17). 4. Share your files by saving them to shares that can be accessed by other people on your local network or over the Web. 5. (Optional) Create a full backup of your important files, or set up recurring backups, using BlackArmor Backup (see page 50). 6. (Optional) If a USB printer has been connected to the BlackArmor server, add it to your list of available printers, following your operating system's instructions. BlackArmor® NAS 440/420 User Guide (Version 3) 14
-
 1
1 -
2
-
3
-
4
-
5
-
6
-
7
-
 8
8 -
 9
9 -
 10
10 -
 11
11 -
 12
12 -
 13
13 -
 14
14 -
 15
15 -
 16
16 -
 17
17 -
 18
18 -
19
-
20
-
21
-
22
-
23
-
24
-
25
-
26
-
27
-
28
-
29
-
30
-
31
-
32
-
33
-
34
-
35
-
36
-
37
-
38
-
39
-
40
-
41
-
42
-
43
-
44
-
45
-
46
-
47
-
48
-
49
-
50
-
51
-
52
-
53
-
54
-
55
-
56
-
57
-
58
-
59
-
60
-
61
-
62
-
63
-
64
 |
 |
