Seagate Mirra Personal Server Setup Guide - Page 4
STEP 2: Install - windows 7
 |
View all Seagate Mirra Personal Server manuals
Add to My Manuals
Save this manual to your list of manuals |
Page 4 highlights
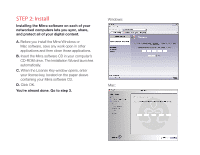
STEP 2: Install Installing the Mirra software on each of your networked computers lets you sync, share, and protect all of your digital content. A. Before you install the Mirra Windows or Mac software, save any work open in other applications and then close those applications. B. Insert the Mirra software CD in your computer's CD-ROM drive. The Installation Wizard launches automatically. C. When the License Key window opens, enter your license key, located on the paper sleeve containing your Mirra software CD. D. Click OK. You're almost done. Go to step 3. Windows: Mac:
-
 1
1 -
 2
2 -
 3
3 -
 4
4 -
 5
5 -
 6
6
 |
 |

STEP 2: Install
Installing the Mirra software on each of your
networked computers lets you sync, share,
and protect all of your digital content.
A.
Before you install the Mirra Windows or
Mac software, save any work open in other
applications and then close those applications.
B.
Insert the Mirra software CD in your computer’s
CD-ROM drive. The Installation Wizard launches
automatically.
C.
When the License Key window opens, enter
your license key, located on the paper sleeve
containing your Mirra software CD.
D.
Click OK.
You’re almost done. Go to step 3.
Windows:
Mac: