Seagate OneTouch II OneTouch II Quick Start Card Mac - Page 1
Seagate OneTouch II Manual
 |
View all Seagate OneTouch II manuals
Add to My Manuals
Save this manual to your list of manuals |
Page 1 highlights
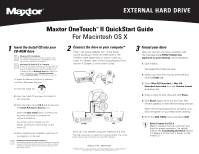
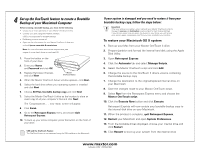
EXTERNAL HARD DRIVE Maxtor OneTouchTM II QuickStart Guide For Macintosh OS X 1 Insert the Install CD into your CD-ROM drive Macintosh OS 9 Installation For detailed steps on how to install your drive for use with the OS 9 operating system, see Chapter 2, in the User's Guide, included on the Install CD. Macintosh OS 9 and OS X 10.1 Features A few of the OneTouch II features for OS 9 and OS X 10.1 may not be supported in the software included with your drive. For current information, go to: www.maxtor.com. 1) Select the link for Worldwide Support. 2) Select your region. 3) Select the link for Software downloads. 4) Select OneTouch II Mac from the menu for your OS. To install the Maxtor OneTouch II software and Dantz Retrospect Express: 1. Insert the Install CD. 2. Open the Install CD and open the folder for your language. 3. Open the folder named OS X and Double-click the Install Retrospect Express icon. Select the Easy Install option and follow the on-screen directions to complete the software installation. For details, refer to Chapter 2 in the Maxtor OneTouch II User's Guide, on the Install CD. 4. After completing the installation, eject the CD by dragging it to the trash. Installation without Retrospect Express™ If you wish to install your drive without Retrospect Express, you can go directly to Step 2 and connect the drive to your computer. The Maxtor OneTouch feature will not work unless you install Retrospect Express. 2 Connect the drive to your computer* Plug in the power adapter, turn on the power switch and plug in either the USB cable or the FireWire cable (depending on which model you have). For details, refer to the Connecting the Drive section in Chapter 2 of the User's Guide. FireWire USB FireWire USB Drive can only operate using one interface at a time. *The USB model does not support the FireWire interface. The combo model may also be connected with the USB interface. Maxtor P/N: 20264100 ©2004 Maxtor Corporation. Maxtor and the Maxtor stylized logo are registered trademarks, and Maxtor OneTouch is a trademark of Maxtor Corporation. Dantz and Retrospect are either registered trademarks or trademarks of Dantz Development Corporation. Specifications subject to change without notice. 3 Format your drive After you connect your drive, a window with the message that a FAT32 Volume has appeared on your desktop, will be displayed. 1. Click Initialize. The Apple Disk Utility will open. 2. Select your drive from the list at the left and click the Erase tab. 3. Select Mac OS Extended or Mac OS Extended Journaled from the Volume format drop-down list. 4. Enter a name for your drive and click Erase. 5. Click Erase, again, when the the Erase Disk window appears, to start the formatting process. When the formatting process is complete, your drive will appear on your Macintosh's desktop. 6. Go to the Disk Utility menu and select Quit. Drive Format for OS X Maxtor requires that you re-format your drive for proper operation. For details, refer to the Connecting the Drive section in Chapter 2 of the User's Guide, on the Install CD.
-
 1
1 -
 2
2
 |
 |