Seagate STM310004SDAB0G-RK User Guide - Page 24
Step 1 - Connect the Drive
 |
UPC - 751921029488
View all Seagate STM310004SDAB0G-RK manuals
Add to My Manuals
Save this manual to your list of manuals |
Page 24 highlights
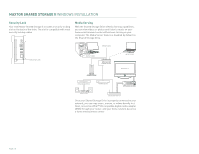
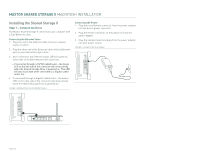
MAXTOR SHARED STORAGE II MACINTOSH INSTALLATION Installing the Shared Storage II Step 1 - Connect the Drive The Maxtor Shared Storage II connects to your computer with a Cat5 Ethernet cable. Connecting the Ethernet Cable 1. Plug one end of the Ethernet cable into your network, router or switch. 2. Plug the other end of the Ethernet cable into the Ethernet port on your Shared Storage II drive. 3. Once connected, the Ethernet status LED(s) located on either side of the Ethernet port will illuminate: - If connected through a 10/100 cable/router - the Green LED on the left side of the connector will show activity when the Shared Storage Drive is powered on. This LED will also illuminate when connected to a Gigabit cable/ router too. 4. If connected through a Gigabit cable/router - the Amber LED on the right side of the connector will show activity when the Shared Storage Drive is powered on. FIGURE 3 CONNECTING THE ETHERNET CABLE Connecting the Power 1. Plug the round female connector from the power adapter into the drive's power connector. 2. Plug the female connector on the power cord into the power adapter. 3. Plug the standard electrical plug from the power adapter into your power source. FIGURE 4 CONNECTING THE POWER PAGE 22
-
 1
1 -
2
-
3
-
4
-
5
-
6
-
7
-
8
-
9
-
10
-
11
-
12
-
13
-
14
-
15
-
16
-
17
-
18
-
 19
19 -
 20
20 -
 21
21 -
 22
22 -
 23
23 -
 24
24 -
 25
25 -
 26
26 -
 27
27 -
 28
28 -
 29
29 -
30
-
31
-
32
-
33
-
34
-
35
-
36
-
37
-
38
-
39
-
40
-
41
-
42
-
43
-
44
-
45
-
46
-
47
-
48
-
49
-
50
-
51
-
52
-
53
 |
 |
