Sennheiser HE 1 Instruction manual HE 1
Sennheiser HE 1 Manual
 |
View all Sennheiser HE 1 manuals
Add to My Manuals
Save this manual to your list of manuals |
Sennheiser HE 1 manual content summary:
- Sennheiser HE 1 | Instruction manual HE 1 - Page 1
HE 1 MANUAL - Sennheiser HE 1 | Instruction manual HE 1 - Page 2
HE 1 Instruction manual - Sennheiser HE 1 | Instruction manual HE 1 - Page 3
Sennheiser electronic GmbH & Co. KG Am Labor 1, 30900 Wedemark, Germany www.sennheiser.com Printed and hand-bound in Germany, Publ. 09/17, 566616/A03 EN - Sennheiser HE 1 | Instruction manual HE 1 - Page 4
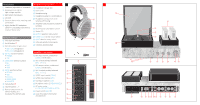
) V XLR-3 output sockets, balanced 8 (BAL / R / L) 9 W S/PDIF input, coaxial (COAX) X S/PDIF input, optical (OPT) 0 Y USB input (Type B) (USB) Z Headphone socket 2 (HEADPHONE 2) A [ IEC mains socket (~100-240 VAC 50/60 Hz 40 W) B \ Power switch (ON/OFF) ] Cover for product information - Sennheiser HE 1 | Instruction manual HE 1 - Page 5
the signal levels of the OUTPUT audio outputs 36 Adjusting the volume 37 Muting the audio 38 Opening/closing the headphone storage box 39 Cleaning and maintaining the HE 1 40 Servicing the HE 1 41 Replacing the ear pads 41 Replacing the headband padding 42 Replacing the amplifier tubes 42 - Sennheiser HE 1 | Instruction manual HE 1 - Page 6
Contents Transporting the HE 1 47 If a problem occurs 48 Specifications 51 Reference diffuse-field frequency response curve 54 Manufacturer Declarations 55 Contact If you have any questions regarding your HE 1 or require any help, please contact your Sennheiser partner: Hotline: +49 69 89 - Sennheiser HE 1 | Instruction manual HE 1 - Page 7
especially through the extended tubes. Install in accordance with the manufacturer's instructions. 8. Do not install near any heat sources such as radiators, parts supplied or recommended by Sennheiser. 12.Use only with shelves, racks, or tables that can safely support the weight the product (see - Sennheiser HE 1 | Instruction manual HE 1 - Page 8
HVE 1 Tube Amplifier for Electrostatic Headphones 0123 The symbols on this instructions contained in this instruction manual. Never open the product as there is a risk of electric shock. There are no user serviceable parts inside the product. Only refer repairs to an authorized Sennheiser service - Sennheiser HE 1 | Instruction manual HE 1 - Page 9
Important safety instructions Safety instructions for lithium batteries (BFI 1 remote control) WARNING If abused or cannot contact each other - danger of shorting out/fire hazard. Only use batteries specified by Sennheiser. Store the products in a cool and dry place at room temperature (approx. 20 - Sennheiser HE 1 | Instruction manual HE 1 - Page 10
tube headphone amplifier have been designed for reproducing music from analog and digital high-end systems. This product is intended for private domestic use only. It is considered improper use when the product is used for any application not named in the corresponding instruction manual. Sennheiser - Sennheiser HE 1 | Instruction manual HE 1 - Page 11
and the tube headphone amplifier. Contact your Sennheiser partner to arrange for a complete revision and careful refreshment of the product (see "Contact" on page 4). The service card inserted in the rear cover of this instruction manual provides information on the servicing carried out. Notes - Sennheiser HE 1 | Instruction manual HE 1 - Page 12
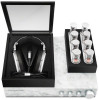
contents HVE 1 tube headphone amplifier HE 1-HP electrostatic headphones 3 power cables (only for regions with EU, UK and US power plug, length 1.8 m) BFI 1 remote control incl. CR 2032 battery (3 V) Brochure, instruction manual, certificate with measurement result and service card Microfiber cloth - Sennheiser HE 1 | Instruction manual HE 1 - Page 13
be found on the fold-out page at the beginning of this instruction manual. Overview of the LED indicator Status LED Meaning - Power switch set page 42) flashes blue quickly 2 times Incompatible digital audio signal; headphones are/ audio output is muted (OUTPUT rotary switch in position MUTE) - Sennheiser HE 1 | Instruction manual HE 1 - Page 14
marking. INPUT CROSS FEED OUTPUT When using the remote control for adjusting a setting or the volume, the rotary switch or the volume control on the headphone amplifier automatically adjusts to the desired position. 12 - Sennheiser HE 1 | Instruction manual HE 1 - Page 15
under the product. The installation location and the substructure have effects on the sound quality. Observe the following notes: ▷▷ Place the tube headphone amplifier on a stable, flat, horizontal and low-vi- bration surface that can safely carry the weight of the amplifier. ▷▷ Ensure circulating - Sennheiser HE 1 | Instruction manual HE 1 - Page 16
connection cable for your audio source. Please observe the recommended maximum cable length as given in the table. ▷▷ To connect the tube headphone amplifier to your audio source, refer to the connection diagram suitable for your your audio source (see the following chapters): ANALOG Connection - Sennheiser HE 1 | Instruction manual HE 1 - Page 17
Putting the HE 1 into operation | Connecting the tube headphone amplifier to audio sources A Connection possibility of the audio source: analog, XLR-3, balanced BAL ORPHEUS L R RL Connection cable: 2 balanced XLR-3 cables B Connection possibility of the - Sennheiser HE 1 | Instruction manual HE 1 - Page 18
device to PCM can be found in the Sound or Settings menu or in the instruction manual of your device. If an incompatible digital audio signal is being received, the status LED of the HE 1 flashes blue. The headphones are/the audio output is muted (OUTPUT rotary switch in position MUTE) and music - Sennheiser HE 1 | Instruction manual HE 1 - Page 19
Putting the HE 1 into operation | Connecting the tube headphone amplifier to audio sources D Connection possibility of the audio source: digital, optical connection OPT PCM ORPHEUS Connection cable: optical cable E Connection possibility of the audio - Sennheiser HE 1 | Instruction manual HE 1 - Page 20
into operation | Using the tube headphone amplifier connected to a Mac/PC Using the tube headphone amplifier connected to a Mac/PC files using third-party software can be found on the HE 1 product page at www.sennheiser.com/download. Apple OS X operating system For an Apple Mac OS X operating system - Sennheiser HE 1 | Instruction manual HE 1 - Page 21
Putting the HE 1 into operation | Using the tube headphone amplifier connected to a Mac/PC ▷▷ Open the "Audio Midi Setup" utility program and select "Sennheiser HE 1" from the left-side column. ▷▷ From the drop-down menu, select "Use this device for sound output". ▷▷ In the device settings, select - Sennheiser HE 1 | Instruction manual HE 1 - Page 22
the HE 1 into operation | Using the tube headphone amplifier connected to a Mac/PC Microsoft Windows operating software package can also be downloaded from the Internet at www.sennheiser.com/download or be obtained from your Sennheiser partner. You need administrator rights for installation. 20 - Sennheiser HE 1 | Instruction manual HE 1 - Page 23
Putting the HE 1 into operation | Using the tube headphone amplifier connected to a Mac/PC ▷▷ Open the Control Panel and select "Sound". The "Sound" window opens. ▷▷ Select "HE 1" as the default audio output device. ▷▷ Click - Sennheiser HE 1 | Instruction manual HE 1 - Page 24
Putting the HE 1 into operation | Using the tube headphone amplifier connected to a Mac/PC Tab Status Using the Sennheiser Control Panel The Control Panel allows you to configure the HE 1 for the reproduction of high-resolution music files and to monitor the current operating - Sennheiser HE 1 | Instruction manual HE 1 - Page 25
Putting the HE 1 into operation | Using the tube headphone amplifier connected to a Mac/PC Tab Client information Control Panel view Display/Setting option Current state Information on the PC client on which the Control - Sennheiser HE 1 | Instruction manual HE 1 - Page 26
connection cable for your audio device. Please observe the recommended maximum cable length as given in the table. ▷▷ To connect the tube headphone amplifier to your audio source, refer to the connection diagram suitable for your your audio source (see the following chapters): ANALOG Connection - Sennheiser HE 1 | Instruction manual HE 1 - Page 27
PuttingtheHE1intooperation | Connectingtheheadphonetubeamplifiertoapoweramplifierortoactiveloudspeakers A Connection possibility of the audio device: analog, XLR-3, balanced BAL ORPHEUS L R RL Connection cables: 2 balanced XLR-3 cables B Connection possibility of the audio device: analog, RCA, - Sennheiser HE 1 | Instruction manual HE 1 - Page 28
Putting the HE 1 into operation | Connecting the tube headphone amplifier to the power supply system Connecting the tube headphone amplifier to the power supply system CAUTION Danger of damage to the product! If you connect to an unsuitable power supply, the product can be - Sennheiser HE 1 | Instruction manual HE 1 - Page 29
status LED starts pulsing. The operating elements and the amplifier tubes extend automatically and switch to the last position. The glass cover of the headphone storage box opens. Once the initialization and the warm-up phase of the amplifier tubes is completed, the status LED lights up white. The - Sennheiser HE 1 | Instruction manual HE 1 - Page 30
Using the HE 1 | Switching the tube headphone amplifier on Deactivating the blockage protection If, during initialization, the operating elements and the amplifier tubes cannot extend automatically because they are blocked or if - Sennheiser HE 1 | Instruction manual HE 1 - Page 31
2. Press the on/off button. Or: I ▷▷ Press the button on the remote control. The status LED starts pulsing. The glass cover of the headphone storage box closes. The amplifier tubes and the operating elements retract to the "off" position. Once the switch-off procedure is completed, the status - Sennheiser HE 1 | Instruction manual HE 1 - Page 32
Using the HE 1 | Connecting headphones Connecting headphones You can connect up to two Sennheiser HE 1-HP electrostatic headphones to the tube headphone amplifier. The volume setting and the selected audio input apply to both headphones. HEADPHONE 1 Connecting headphones ▷▷ If necessary, open the - Sennheiser HE 1 | Instruction manual HE 1 - Page 33
Using the HE 1 | Putting on the headphones Putting on the headphones ▷▷ Put on your headphones and then pull the ear cups down until they rest comfortably over the ears. Make sure you wear them the right way round by observing - Sennheiser HE 1 | Instruction manual HE 1 - Page 34
BALANCED CROSS FEED OFF LOW HIGH OUTPUT PHONES LINE BOX CONTROL BOX 1 O/C BOX 2 O/C INPUT audio inputs Selected input on the headphone amplifier BALANCED / BAL XLR-3 (analog) UNBALANCED / UNBAL RCA (analog) USB / USB USB (digital) OPTICAL / OPT Optical (digital) COAXIAL / COAX - Sennheiser HE 1 | Instruction manual HE 1 - Page 35
1. Select the desired INPUT audio source and start playing music from the selected device. 2. If your selected device is fitted with an adjustable output (e.g. headphone output), adjust the output volume to at least a medium level. 3. Adjust the listening volume on the HE 1 to a medium level that is - Sennheiser HE 1 | Instruction manual HE 1 - Page 36
of the music signal is hard-panned to just one of the stereo channels. Some people will find such recordings tiring to listen to using headphones. This effect can be minimized by activating the crossfeed function of the HE 1. The crossfeed function feeds the bass portion of the music signal to - Sennheiser HE 1 | Instruction manual HE 1 - Page 37
tube headphone amplifier The HE 1-HP electrostatic headphones are selected as the audio output. The headphones are connected to the HEADPHONE 1 socket and/or the HEADPHONE 2 output is set to LINE, the headphone storage box remains closed when the HE 1 is switched on. In this case, open - Sennheiser HE 1 | Instruction manual HE 1 - Page 38
Using the HE 1 | Adjusting the signal levels of the OUTPUT audio outputs Adjusting the signal levels of the OUTPUT audio outputs You can increase or reduce the audio output level depending on the power amplifier or the active loudspeakers used. Thus, the complete adjustment range of the HE 1 volume - Sennheiser HE 1 | Instruction manual HE 1 - Page 39
hearing defects. Toggling between the audio sources may cause enormous volume jumps that can permanently damage your hearing. ▷▷ Before putting the headphones on and before switching between audio sources, adjust the volume to a low level. ▷▷ Do not continuously expose yourself to high volume - Sennheiser HE 1 | Instruction manual HE 1 - Page 40
CROSS FEED OFF LOW HIGH OUTPUT PHONES LINE BOX CONTROL BOX 1 O/C BOX 2 O/C Muting the audio You can mute the headphones and the audio outputs of the tube headphone amplifier: ▷▷ Turn the OUTPUT rotary switch until MUTE points to the marking. Or: ▷▷ Press the button on the remote control - Sennheiser HE 1 | Instruction manual HE 1 - Page 41
storage box and the optional separate BOX 2 storage box open automatically during switch-on and close automatically during switch-off of the tube headphone amplifier. To open or close the glass cover of the BOX 1 or BOX 2 storage box during operation: ▷▷ Press the BOX 1 O/C button or the BOX - Sennheiser HE 1 | Instruction manual HE 1 - Page 42
Cleaning and maintaining the HE 1 Cleaning and maintaining the HE 1 CAUTION Liquids can damage the electronics of the product! Liquids entering the housing of the product can cause a short-circuit and damage the electronics. ▷▷ Keep all liquids far away from the product. ▷▷ Do not use any solvents - Sennheiser HE 1 | Instruction manual HE 1 - Page 43
Sennheiser partner to arrange for a complete revision and careful refreshment of the product (see "Contact" on page 4). By default, servicing includes the replacement of the ear pads, headband padding and amplifier tubes. The service card inserted in the cover of this instruction manual provides - Sennheiser HE 1 | Instruction manual HE 1 - Page 44
Servicing the HE 1 | Replacing the headband padding Replacing the headband padding For replace all 8 tubes with new ones. Instructions on tube replacement are enclosed with the tube replacement set or can be downloaded from the Internet at www.sennheiser.com/download. You can use the amplifier - Sennheiser HE 1 | Instruction manual HE 1 - Page 45
Servicing the HE 1 | Replacing the battery of the BFI 1 remote control Replacing . CAUTION Danger of accidents! Misuse or swallowing of batteries can cause injuries and health problems. ▷▷ Observe the safety instructions for lithium batteries on page 7. ▷▷ Keep batteries away from children. 1. Use a - Sennheiser HE 1 | Instruction manual HE 1 - Page 46
Servicing the HE 1 | Calibrating the mechanical components 1 INPUT OPTICAL USB COAXIAL OFF UNBALANCED BALANCED CROSS FEED OFF LOW HIGH 2 OUTPUT PHONES LINE BOX CONTROL BOX 1 O/C BOX 2 O/C - Sennheiser HE 1 | Instruction manual HE 1 - Page 47
1 INPUT OPTICAL USB COAXIAL OFF UNBALANCED BALANCED CROSS FEED OFF LOW HIGH 2 OUTPUT PHONES LINE BOX CONTROL BOX 1 O/C BOX 2 O/C Servicing the HE 1 | Restoring the factory default settings Restoring the factory default settings To reset all individually stored signal levels of the INPUT - Sennheiser HE 1 | Instruction manual HE 1 - Page 48
HE 1 is connected to your Mac or PC via USB and that it is switched on. ▷▷ From Windows or MacOS, start the "Sennheiser HE 1 Updater" program and follow the instructions on the screen. The program automatically checks if the new DAC firmware is compatible with your HE 1. If this is the case - Sennheiser HE 1 | Instruction manual HE 1 - Page 49
1 Transporting the HE 1 Use the original packaging or contact your Sennheiser partner to arrange for the transport of the HE 1 (see "Contact" on page 4). 1. Place the foam protection a (supplied) in the headphone compartment. Place the headphones b onto the foam protection. Roll up the cable so that - Sennheiser HE 1 | Instruction manual HE 1 - Page 50
If a problem occurs ... If a problem occurs ... Problem Possible cause Corrective action Page The headphones cannot be switched Another audio output device is is connected to a PC via USB selected. Select "Sennheiser HE 1" as the audio 18 output device. No driver is installed. Install the - Sennheiser HE 1 | Instruction manual HE 1 - Page 51
The separate headphone Only connect the separate headphone 30 storage box is connected to the storage box to the HEADPHONE 2 HEADPHONE 1 a problem occurs that is not listed in the above table or if the problem cannot be solved with the proposed solutions, please contact your Sennheiser partner - Sennheiser HE 1 | Instruction manual HE 1 - Page 52
If a problem occurs ... High-voltage protection In order to best protect you, the high voltage of the electrostatic headphones and tube headphone amplifier is permanently If the high-voltage protection is still activated, please contact your Sennheiser partner (see "Contact" on page 4). 50 - Sennheiser HE 1 | Instruction manual HE 1 - Page 53
Specifications Specifications HE 1-HP headphones Transducer principle Acoustic operating principle Ear coupling Contact pressure Frequency characteristic Frequency response Max. sound pressure level THD Connection cable Connector Operating voltage Polarization voltage Max. input level Weight ( - Sennheiser HE 1 | Instruction manual HE 1 - Page 54
Specifications 52 HVE 1 tube headphone amplifier Max. ouput level Frequency response THD Inputs Outputs Weight Dimensions (W x H x D) Temperature range Relative air humidity (non-condensing) Power supply Voltage range Power consumption Analog input (XLR-3) Min. input level (full - Sennheiser HE 1 | Instruction manual HE 1 - Page 55
sample rates S/PDIF PCM coaxial/optical: 44.1; 48; 88.2; 96 kHz coaxial: 176.4; 192 kHz Digital input (USB Type B) USB standard USB audio class Supported file formats min. USB 2.0 USB Audio Class 2 PCM: 32 bits, 44.1; 48; 88.2; 96; 176.4; 192; 352.8; 384 kHz DSD: 64 (2,822,400 Hz), 128 (5, - Sennheiser HE 1 | Instruction manual HE 1 - Page 56
500 1k 2k HE 90 5k 10k Hz Explanations on the diffuse-field frequency response curve In an anechoic chamber, 8 highly linear loudspeakers emit noise signals third and reproduced alternately over the speakers and the headphones to be measured. A large number of test persons then evaluate the - Sennheiser HE 1 | Instruction manual HE 1 - Page 57
the consumer which is granted by law. To make a claim under this warranty, contact Sennheiser Australia Pty Ltd, Unit 3, 31 Gibbes Street Chatswood NSW 2067, Australia; Phone: (02) 9910 6700, email: [email protected]. All expenses of claiming the warranty will be borne by the person making - Sennheiser HE 1 | Instruction manual HE 1 - Page 58
health. Trademarks and licenses Sennheiser is a registered trade mark of Sennheiser electronic GmbH & Co. KG. Other product and company names mentioned in this instruction manual may be the trademarks the lower part of the cover to open it. HVE 1 Tube Amplifier for Electrostatic Headphones 0123 56 - Sennheiser HE 1 | Instruction manual HE 1 - Page 59
of Conformity (DoC) SE NNHEISER Model No: HE 1, SD-U16L We, Sennheiser Electronic Corporation One Enterprise Drive • Old Lyme • CT 06371 • USA Tel: received, including interference that may cause undesired operation. Responsible Party: Michael Lieske This device complies with Part - Sennheiser HE 1 | Instruction manual HE 1 - Page 60
reçues, y compris celles qui pourraient avoir des effets non désirés sur son fonctionnement. Toute modification non expressément approuvée par Sennheiser electronic Corp. peut annuler le droit de l'utilisateur à l'emploi de l'équipement en question. China RoHS Part Name) 有害物质 (Pb) (Hg) (Cd - Sennheiser HE 1 | Instruction manual HE 1 - Page 61
Manufacturer Declarations 59 - Sennheiser HE 1 | Instruction manual HE 1 - Page 62
Manufacturer Declarations 60 - Sennheiser HE 1 | Instruction manual HE 1 - Page 63
-
 1
1 -
 2
2 -
 3
3 -
 4
4 -
 5
5 -
 6
6 -
 7
7 -
8
-
9
-
10
-
11
-
12
-
13
-
14
-
15
-
16
-
17
-
18
-
19
-
20
-
21
-
22
-
23
-
24
-
25
-
26
-
27
-
28
-
29
-
30
-
31
-
32
-
33
-
34
-
35
-
36
-
37
-
38
-
39
-
40
-
41
-
42
-
43
-
44
-
45
-
46
-
47
-
48
-
49
-
50
-
51
-
52
-
53
-
54
-
55
-
56
-
57
-
58
-
59
-
60
-
61
-
62
-
63
 |
 |

HE 1 MANUAL