Sharp AR-207 AR-207 Operation Manual
Sharp AR-207 Manual
 |
View all Sharp AR-207 manuals
Add to My Manuals
Save this manual to your list of manuals |
Sharp AR-207 manual content summary:
- Sharp AR-207 | AR-207 Operation Manual - Page 1
MODEL AR-207 DIGITAL LASER COPIER OPERATION MANUAL Page • GETTING STARTED 2 • MAKING COPIES 13 • SPECIAL FEATURES 32 • STATUS INDICATORS 42 • GENERAL INFORMATION 51 • OPTIONAL EQUIPMENT 69 - Sharp AR-207 | AR-207 Operation Manual - Page 2
copier's serial number located on the back of the unit. Model Number AR-207 Serial Number Date of Purchase Place of Purchase Authorized Sharp Copier Service This Digital Copier is rated Class 1 and complies with 21 CFR 1040.10 and 1040.11 of the CDRH standards. This means that the copier does - Sharp AR-207 | AR-207 Operation Manual - Page 3
41 STATUS INDICATORS q TONER CARTRIDGE REPLACEMENT 42 q MISFEED REMOVAL 44 q DEVELOPER REQUIRED 50 q MAINTENANCE REQUIRED 50 GENERAL INFORMATION q USER PROGRAMS 51 - Settings for auditing accounts 54 q POWER SAVE MODES 58 q USER MAINTENANCE 60 q COPIER TROUBLE 62 q SUPPLIES 65 - Sharp AR-207 | AR-207 Operation Manual - Page 4
manual and the copier. For quick reference during copier use, keep this manual in a handy location. q This copier can be used as a laser printer and as a facsimile machine by installing optional components. However, this manual describes only the copier the copier regarding specifications, functions - Sharp AR-207 | AR-207 Operation Manual - Page 5
and manuals q Editing features like XY zoom and black/white reverse q Digital editing features like 2 IN 1/4 IN 1 copying Optional features q This copier can be used as a laser printer by installing an optional printer expansion kit. q This copier can be used as a facsimile machine by installing - Sharp AR-207 | AR-207 Operation Manual - Page 6
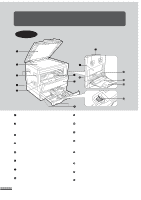
Use to move the copier. Power switch Press to turn the copier power on and off. Operation panel All copier controls are located here for easy Open to remove misfeeds and to service the copier. Side cover handle Lift and pull to open the side cover. Bypass tray guides Adjust to the width of the - Sharp AR-207 | AR-207 Operation Manual - Page 7
here. Reversing tray Pull out to remove misfed originals. Toner cartridge lock release lever Use to unlock the toner cartridge. Toner cartridge Contains toner. Photoconductive drum Copy images are formed on the photoconductive drum. Roller rotating knob Turn to remove misfed paper. Fusing unit - Sharp AR-207 | AR-207 Operation Manual - Page 8
size. Alarm indicators : Maintenance indicator (p. 50) : Toner cartridge replacement required indicator (p. 42) : Developer replacement required indicator (p. 50) : Paper required indicator (p. 10) : Misfeed indicator (p. 44) POWER SAVE indicator (p. 58) Lights up when the copier is in a power save - Sharp AR-207 | AR-207 Operation Manual - Page 9
64%, manually select a paper tray. AUTO IMAGE key and indicator Press for automatic copy ratio selection. Paper feed location/misfeed location indicators (p. 44) The selected paper feed location location of misfed paper is shown by a blinking red indicator ( ). DUAL PAGE settings The copier assumes - Sharp AR-207 | AR-207 Operation Manual - Page 10
to the same outlet, the light may flicker. Be sure to allow the required space around the machine for servicing and proper ventilation. 4" (10cm) A small amount of ozone is produced within the copier during operation.The emission level is insufficient to cause any health hazard. NOTE: The present - Sharp AR-207 | AR-207 Operation Manual - Page 11
Do not drop the copier, subject it to shock or strike it against any object. Store spare toner cartridges in a dark place without removing from the package before use. If they are exposed to direct sunlight, poor copies may result. Do not touch the photoconductive drum (green portion). Scratches or - Sharp AR-207 | AR-207 Operation Manual - Page 12
through 11 on page 12. If not, the edges of copies may become smudged with toner. Also, the AUTO PAPER SELECT and the AUTO IMAGE features will not paper, the tray must be adjusted. See the next page. Maximum height line 10 q Set the paper along the guides. q The tray holds up to 250 sheets of - Sharp AR-207 | AR-207 Operation Manual - Page 13
the lock lever of the front guide and slide the front guide to match the width of the paper. Front guide 4 Move the left guide to the appropriate slot as marked may occur. q When using 11" x 17" copy paper, store the left guide in the slot at the left front of the paper tray. 5 Load copy paper - Sharp AR-207 | AR-207 Operation Manual - Page 14
paper size setting cannot be made even in the COPY mode. See Note on page 63. 9 Use the TRAY SELECT key to select the paper tray of which key is pressed, a paper tray will be indicated with a blinking paper feed location indicator. 10 Use the ORIGINAL SIZE ENTER key to select the paper size which - Sharp AR-207 | AR-207 Operation Manual - Page 15
has been programmed in the auditing mode, it will not function until an assigned 3-digit account number has been entered. See page 54 for setting the auditing mode. If the copier has been programmed in the auditing mode, " in the copy quantity display in the initial conditions. " will appear - Sharp AR-207 | AR-207 Operation Manual - Page 16
holes are positioned to the right or along the side guides. In this case the settings for location of margin and image rotation in duplex copying may need to be changed to ensure the images are produced in the desired orientation. See pages 22 and 41. q Special originals such as transparency film - Sharp AR-207 | AR-207 Operation Manual - Page 17
paper tray. See page 51, USER PROGRAMS MANUAL, and PHOTO. q Automatic exposure is the standard initial setting for this copier. In this mode, the characteristics of the original are "read" by the exposure system and adjustments are automatically made. This optimizes the contrast of the copied images - Sharp AR-207 | AR-207 Operation Manual - Page 18
. Adjust the original guides to the size of image rotation feature. This feature is useful when the originals and copies are in the landscape (horizontal) orientation and the two-sided copies are to be read by turning them left to right rather than top to bottom. To set this feature, see page - Sharp AR-207 | AR-207 Operation Manual - Page 19
COPY section all go out. Two-sided copies from two-sided originals 1 Ensure that no original is left on the original table. Adjust the original guides to the size of the originals and set the originals face up in the document feeder tray. q 5-1/2" x 8-1/2" size original or copy paper cannot be used - Sharp AR-207 | AR-207 Operation Manual - Page 20
that no original is left on the original table. Adjust the original guides to the size of the originals and set the originals face up in the image rotation feature. This feature is useful when the originals and copies are in the landscape (horizontal) orientation. To set this feature, see page 22. - Sharp AR-207 | AR-207 Operation Manual - Page 21
will start after warm-up. q If the copier has been programmed in the auditing mode, the START key indicator will not light up and " " will appear in the copy quantity display. Enter an assigned 3-digit account number. See page 13. q If an optional printer expansion kit or facsimile expansion kit is - Sharp AR-207 | AR-207 Operation Manual - Page 22
read" by the exposure system and adjustments are automatically made. This optimizes the contrast of the copied images by reducing the effect of colored or shaded background areas. See page 30 to adjust the automatic exposure level. q For manual different original, simply replace the original and - Sharp AR-207 | AR-207 Operation Manual - Page 23
. 4 Set the number of copies and press the START key. q The indicator will blink. q The copy will not be output until both sides have been scanned. 21 - Sharp AR-207 | AR-207 Operation Manual - Page 24
image of every front side can be rotated 180° using the image read by turning them left to right rather than top to bottom. To set this feature, follow the procedure below. This feature can also be set using user program No. 20. Setting image OFF 1: ON The factory default setting is 0. 3 Press - Sharp AR-207 | AR-207 Operation Manual - Page 25
MAKING COPIES Reduction/enlargement/zoom REDUCTION/ENLARGEMENT/ZOOM Reduction and enlargement ratios can be selected either automatically with the AUTO IMAGE key or manually with the PRESET RATIO selector ( , ) keys and/or the zoom ( , ) keys. The zoom function enables precise copy ratio selection - Sharp AR-207 | AR-207 Operation Manual - Page 26
/ZOOM Manual 1 is lit. A. Preset reduction ratios are: 95%, 77%, 64%, and 50% . B. Preset enlargement ratios are: 121%, 129 and hold it down again. D. Same-size reset: Press the or key repeatedly until the copy the ZOOM indicator blinks, the selected copy image is too large for the copy paper size - Sharp AR-207 | AR-207 Operation Manual - Page 27
, smudges may appear if the copy paper is not at least as large as the original image. 1 Unfold the bypass tray. q When feeding 8-1/2" x 14" or 11" x 17" sized paper, extend the bypass tray. 2 Set the paper guides to the copy paper width. 3 Insert the copy paper (print face down) all the way - Sharp AR-207 | AR-207 Operation Manual - Page 28
MAKING COPIES Bypass feed (special paper) BYPASS FEED (special paper) 4 Press the TRAY SELECT key to select the bypass tray. 5 Leave the copy quantity at 0 if using special papers. Set the number of copies if using standard copy paper or envelopes. 6 Press the START key. 26 - Sharp AR-207 | AR-207 Operation Manual - Page 29
SORT/GROUP This copier has two sorter modes for different copying jobs: one sorts copies into sets matching the sequence of the originals and the second groups copies by originals. The sort/group feature cannot be used with the dual page copy feature. To change the SORT/GROUP mode, press the SORT/ - Sharp AR-207 | AR-207 Operation Manual - Page 30
/group Copying in the sort mode When copying in the sort mode, the original image will be stored in the copier memory each time an original is scanned and copying will start after all originals have been scanned. 1 Set the originals face up in the document feeder tray. q The original table cannot - Sharp AR-207 | AR-207 Operation Manual - Page 31
Enter your account number using the numeric keys. The number of copies of the interrupt copying will be accumulated against this account number. See page 13. q When the RSPF is being used, the copier will stop after completing the copying of the original which has been fed into the RSPF. 2 When the - Sharp AR-207 | AR-207 Operation Manual - Page 32
corresponding to the current automatic exposure level will light up. The factory default setting is level "3". 3 Press the light ( ) or dark ( ) key to lighten or darken the automatic exposure level as desired. 4 Press the AUTO/MANUAL/PHOTO key. q The AUTO indicator will stop blinking and will light - Sharp AR-207 | AR-207 Operation Manual - Page 33
light ( ) key. q The exposure indicator marked "1" will light up, indicating that the toner save mode is selected. 4 Press the AUTO/MANUAL/PHOTO key. q The PHOTO indicator will stop blinking and will light up steadily. The toner save mode is now active. q To return to the standard mode, repeat the - Sharp AR-207 | AR-207 Operation Manual - Page 34
be changed independently. This feature cannot be used with the 2 in 1 or 4 in 1 feature. To use the XY ZOOM feature with the DUAL PAGE COPY feature, set the DUAL PAGE COPY feature first and then the XY ZOOM feature. (Enlargement cannot be set.) SPECIAL FEATURES XY zoom 1 Place the original in the - Sharp AR-207 | AR-207 Operation Manual - Page 35
SPECIAL FEATURES XY zoom XY ZOOM 5 Use the PRESET RATIO selector ( , ) keys and zoom ( , ) keys to change the copy ratio in the horizontal direction in a similar manner as for the vertical direction. 6 Press the copy ratio display ( ) key. q The selected ratio for the horizontal direction will be - Sharp AR-207 | AR-207 Operation Manual - Page 36
is canceled, the MANUAL mode will not automatically be canceled. 1 Place the original in the document feeder tray or on the original table. SPECIAL FEATURES B/W reverse 2 Press the B/W REVERSE key. 3 Ensure that the desired paper tray is selected. 4 Make all other desired copier selections and - Sharp AR-207 | AR-207 Operation Manual - Page 37
with the 2 in 1 or 4 in 1 feature and sort/group feature. If the AUTO IMAGE feature has been selected, this feature cannot be selected. To use the DUAL PAGE COPY feature with the XY ZOOM feature, set the DUAL PAGE COPY feature first and then the XY ZOOM feature. (Enlargement cannot be set.) 1 Place - Sharp AR-207 | AR-207 Operation Manual - Page 38
7 is not set, rotation copying will function when the 2 in 1 or 4 in 1 function is selected. See page 51. However, if enlargement copying onto a paper size larger than 8-1/2" x 11" is performed, the image cannot be rotated. When this occurs, the detected size and orientation of the original will be - Sharp AR-207 | AR-207 Operation Manual - Page 39
can be made with or without the border lines shown in the illustration. See user program No. 6 on page 51. q The order of originals which will four patterns of layout for 4 in 1 copying. See user program No. 17 and 18 on page 51. q The 2 in 1 or 4 in 1 feature operates only in the sort or group - Sharp AR-207 | AR-207 Operation Manual - Page 40
pattern numbers, see the previous page. 5 Press the START key. is less than 50%, part of original image may not be copied because scanned original image data, the ORIGINAL DATA indicator will blink. When the ORIGINAL DATA indicator blinks, the copier will stop scanning. To start copying of scanned - Sharp AR-207 | AR-207 Operation Manual - Page 41
+ Center erase AB AB This copier has an edge erase mode and a center erase mode. q Edge erase can be used to eliminate shadow lines around the edges of copies caused be set from 0" to 1" in five steps using user program No. 16. See page 51. q This feature cannot be used with the 2 in 1 or 4 in 1 - Sharp AR-207 | AR-207 Operation Manual - Page 42
SPECIAL FEATURES Erase ERASE 4 Set the number of copies. 5 Press the START key. 40 - Sharp AR-207 | AR-207 Operation Manual - Page 43
A The MARGIN SHIFT feature automatically shifts the text or image to increase the margin by approximately 1/4". q The location of the margin to be increased can be selected to be either at the left edge or the top of the page. To select the location, see step 2 below. q This feature cannot be used - Sharp AR-207 | AR-207 Operation Manual - Page 44
of the front cover to open the cover. STATUS INDICATORS Toner cartridge replacement Toner cartridge lock release lever 3 Push the toner cartridge lock release lever and pull the toner cartridge out. Remove the toner cartridge while supporting it with the left hand at the green label position - Sharp AR-207 | AR-207 Operation Manual - Page 45
TONER CARTRIDGE REPLACEMENT 5 Gently insert the toner cartridge along the guides until it locks in place while pushing the lock release lever. If dirt or dust is adhered to the toner cartridge, remove it before installing the cartridge. 6 Pull out the shutter and remove it from the toner cartridge - Sharp AR-207 | AR-207 Operation Manual - Page 46
equipment, see their respective sections of the operation manual. First confirm the misfeed location. ( P.44) ( P.45, 48) ( P.49) ( P.72) A C Location A Feeding roller cover Misfeed in the RSPF If an original misfeed occurs in the RSPF, the copier will stop and the red indicator which indicates - Sharp AR-207 | AR-207 Operation Manual - Page 47
removed from the exit area, open the front part of the document feeder tray to remove the original the document feeder cover to cancel the misfeed location indicator. After misfed originals are removed, a will go out. Misfeed in the copier 1 Open the bypass tray. Lift slightly on the side - Sharp AR-207 | AR-207 Operation Manual - Page 48
2 Check the misfeed location. Remove the misfed paper following the instructions for each location in the illustration below. removing paper. Do not touch the photoconductive drum (green portion) when removing the misfed paper. Doing so may damage the drum and cause smudges on copies. 3 Close - Sharp AR-207 | AR-207 Operation Manual - Page 49
drum (green portion) when removing the misfed paper. Doing so may damage the drum and cause smudges on copies. q Be careful about unfixed toner in the transport area 1 Open the paper guide by pressing down the projection on either side of the guide and remove the misfed paper. The fusing - Sharp AR-207 | AR-207 Operation Manual - Page 50
MISFEED REMOVAL 3 Close the side cover by pressing the handle on the cover. q The misfeed ( ) indicator will go out. Misfeed in the upper paper tray Before opening the upper paper tray, be sure to open the bypass tray, lift slightly on the side cover and slide the cover out until it stops, and then - Sharp AR-207 | AR-207 Operation Manual - Page 51
MISFEED REMOVAL Misfeed in the lower paper tray 1 Grasp the handle of the lower side cover and gently open the cover. 2 Remove the misfed paper. q Be careful not to tear the misfed paper during removal. 3 If the misfed paper is not seen in step 2, gently lift and pull out the lower paper tray and - Sharp AR-207 | AR-207 Operation Manual - Page 52
lights up, the developer should be replaced. DEVELOPER REPLACEMENT SHOULD ONLY BE DONE BY AN AUTHORIZED SHARP SERVICE TECHNICIAN. Contact your service center as soon as possible. MAINTENANCE REQUIRED When the indicator lights up, service by an authorized SHARP service technician is required - Sharp AR-207 | AR-207 Operation Manual - Page 53
time. The copier returns to page 58. 6 Border line for 2 in 1 or 4 in 1 Enables or disables the border line which is printed in 2 in 1 or 4 in 1 copying. See page 37. 7 Rotation copy Enables or disables rotation of original images. See page Resetting account Resets all audit accounts or resets - Sharp AR-207 | AR-207 Operation Manual - Page 54
4, press the CLEAR ( ) key. The copier will return to step 2. q The program 3, see page 54. Program name Auto -off setting Border line for 2 in Resetting account Erase width adjustment Layout in 2 in 1 copy Layout in 4 in 1 copy Offset of paper output tray Image rotation in duplex copying Location - Sharp AR-207 | AR-207 Operation Manual - Page 55
0 OFF * 1 ON Border line for 2 in 1 or 4 Image rotation in duplex copying * 0 OFF 1 ON Location of the margin * 1 Left 2 Top Factory default settings are indicated with an asterisk (*). For layout in 2 in 1 copy and 4 in 1 copy, see page - Sharp AR-207 | AR-207 Operation Manual - Page 56
the numeric keys. 3. Press the START key.) Then follow the appropriate instructions for the program. Program No. 10: Auditing mode If the auditing Press the key. The copier will return to step 2 on page 52. 1. Enter a 3-digit account number using the numeric keys. q Any 3-digit number except "000" - Sharp AR-207 | AR-207 Operation Manual - Page 57
the copy quantity display. q If no account number has been registered, "12E" will appear in the copy quantity display. Press the key. The copier will return to step 2 on page 52. 1. Use the copy ratio display ( ) key to select the account number to be changed. q Use the key to advance through the - Sharp AR-207 | AR-207 Operation Manual - Page 58
display. Press the key. The copier will return to step 2 on page 52. 1. Use the copy ratio digits will appear alternately while the 0 key is pressed. Example: 1,234 copies q The upper limit for the number of copies is 49,999. If the number of copies made reaches 50,000, the number will be reset - Sharp AR-207 | AR-207 Operation Manual - Page 59
no account number has been registered, "15E" will appear in the copy quantity display. Press the key. The copier will return to step 2 on page 52. 1. To reset an individual account, press the 0 key. To reset all accounts, press key 1. 2. Press the START key. q If you have pressed the 0 key in step - Sharp AR-207 | AR-207 Operation Manual - Page 60
set appropriate times according to the actual usage of the copier. See page 51. Preheat mode When the copier enters the preheat mode, the POWER SAVE indicator will up before copying can begin. As an ENERGY STAR® Partner, SHARP has determined that this product meets the ENERGY STAR® guidelines for - Sharp AR-207 | AR-207 Operation Manual - Page 61
manually. This time is set with user program No. 2 for the preheat mode and user program No. 3 for the auto power shut-off mode. For these settings, see page 52. q The copier when an optional printer expansion kit or facsimile expansion kit is installed. 1 Press the START key. q The copier will exit - Sharp AR-207 | AR-207 Operation Manual - Page 62
USER MAINTENANCE Proper care is essential for clean, sharp copies. Please take a few minutes to regularly clean your copier. Original table use thinner, benzene, or similar volatile cleaning agents. q Wipe the scanning window on the original table. Paper feed roller Bypass tray paper feed roller - Sharp AR-207 | AR-207 Operation Manual - Page 63
USER MAINTENANCE Transfer charger cleaning If copies start becoming streaky or blotchy, the is stopped on the way, smudges on copies may occur. q If the white sheet metal is smudged with toner, wipe it with a soft, clean cloth. 5 Return the charger cleaner to its original position. Close the - Sharp AR-207 | AR-207 Operation Manual - Page 64
COPIER TROUBLE? Problem Copier does not operate. Copies are too dark or too light. Blank copies Solution q Copier plugged in? Plug the copier into a grounded outlet. See page 8. q Power switch ON? Turn the power switch ON. See page 14. q Copy density properly adjusted? See pages 15 and 30. - Sharp AR-207 | AR-207 Operation Manual - Page 65
indicator on? q Is the indicator on? q Is the COPY indicator off? Developer is reguired. Contact your SHARP service center as soon as possible. See page 50. Maintenance is required. Contact your SHARP service center as soon as possible. See page 50. Use the COPY/FAX key to select the COPY mode. See - Sharp AR-207 | AR-207 Operation Manual - Page 66
page 42, TONER CARTRIDGE REPLACEMENT. A misfeed has occurred. See page 44, MISFEED REMOVAL. q Is the same power outlet used for the lighting fixture and the copier? Connect the copier to a power outlet which is not used for other electric appliances. 64 Be sure to use only genuine SHARP parts - Sharp AR-207 | AR-207 Operation Manual - Page 67
use envelopes that have metal clasps, plastic snappers, string closures, windows, linings, self-adhesive patches or synthetic materials. These will cause physical damage to the copier. q For best results, use only paper recommended by SHARP. q Special papers except envelopes must be fed one sheet at - Sharp AR-207 | AR-207 Operation Manual - Page 68
Standard supplies for this copier that are to be replaced by the user are copy paper and toner cartridge. For best copying results, be sure to use only SHARP Genuine Supplies which are designed, engineered and tested to maximize the life and performance of SHARP copiers. Look for the Genuine - Sharp AR-207 | AR-207 Operation Manual - Page 69
Developer system Light source Resolution Gradation Power supply Power consumption Overall dimensions (with bypass tray folded) Digital laser copier brush development Xenon lamp Scan: 400 dpi Output: 600 dpi Scan: 256 levels Output: 2 levels AC 120V, 60 Hz, 11 amperes Max. 1.3 kW 23-15/64" (W) - Sharp AR-207 | AR-207 Operation Manual - Page 70
SPECIFICATIONS Weight Copier dimensions Operating conditions Optional equipment Approx. 94.9 lbs. (43 kg) Toner cartridge included 23-15/64" (W) x 20-29/32" (D) x 25-19/32" (H) (590 mm (W) x 531 mm (D) x 650 mm (H)) Temperature: 59°F to 86°F (15°C to 30°C) Humidity: 20% to 85% 250-sheet - Sharp AR-207 | AR-207 Operation Manual - Page 71
OPTIONAL EQUIPMENT CONTENTS Page q SYSTEM CONFIGURATION 70 q 250-SHEET PAPER FEED UNIT (AR-DE5)/ 2x250-SHEET PAPER FEED UNIT (AR-DE6 71 69 OPTIONAL EQUIPMENT - Sharp AR-207 | AR-207 Operation Manual - Page 72
the following. Facsimile expansion kit (AR-FX2)* Printer expansion kit (AR-PB8)* PS2 expansion kit (AR-PS1)* LCD panel kit (AR-PA1)* Job separator tray kit (AR-TR2)* Print server card (AR-NC3D)* * These options are not used for the copier operation. System configuration OPTIONAL EQUIPMENT 250 - Sharp AR-207 | AR-207 Operation Manual - Page 73
convenience of increased paper capacity for the copier and a greater choice of paper sizes readily available for copying. The AR-DE5 contains one 250-sheet paper tray and the AR-DE6 contains two 250-sheet paper trays. PART NAMES 250-sheet paper feed unit AR-DE5 Side cover 2 x 250-sheet paper feed - Sharp AR-207 | AR-207 Operation Manual - Page 74
250-SHEET PAPER FEED UNIT (AR-DE5)/2x250-SHEET PAPER FEED UNIT (AR-DE6) Misfeed removal The copier will stop when a misfeed occurs. The misfeed ( ) indicator and the red indicator that the misfeed ( ) indicator has gone out. 72 250-sheet paper feed unit (AR-DE5) OPTIONAL 2x250-sheet paper feed unit - Sharp AR-207 | AR-207 Operation Manual - Page 75
Approx. 20.1 lbs. (9.1 kg) 23-15/64" (W) x 18-35/64" (D) x 6-27/32" (H) (590 mm (W) x 471 mm (D) x 173.5 mm (H)) Drawn from the copier As a part of our policy of continuous improvement, SHARP reserves the right to make design and specification changes for product improvement without prior notice - Sharp AR-207 | AR-207 Operation Manual - Page 76
I Image rotation in duplex copying 22 Initial settings 7 Interrupt 29 L Light key 15, 43, 52 Loading copy paper 10 M Maintenance - user maintenance 60 - maintenance required indicator 50 Manual exposure 15 Manual feeding 25 Margin shift 41 Misfeed removal - bypass tray 45 - in the copier - Sharp AR-207 | AR-207 Operation Manual - Page 77
paper 25 Specifications - copier 67 - paper 65 Status indicators 42 Storage of supply 66 Stream feeding mode 14 T Toner cartridge life 43 Toner cartridge replacement 42 Toner save mode 31 Total output count 6 Troubleshooting 62 Two-sided copying 16, 21 U User maintenance - bypass tray - Sharp AR-207 | AR-207 Operation Manual - Page 78
AR-201NT/T/FT/ST (Black Toner) Date Issued: Nov. 1, 2000 MSDS No. F-00991 Section 2. Supplier's Name and Address Sharp tests performed using toner. When used as intended according to instructions, studies do The classification is based upon the development of lung tumors in rats receiving - Sharp AR-207 | AR-207 Operation Manual - Page 79
Evaporation Rate: Not applicable Appearance: Fine powder Odor: Odorless Specific Gravity: 1.1 Solubility in Water: Negligible PH: Not Use of a dust mask is recommended when handling a large quantity of toner or during long term exposure, as with any non-toxic dust. Engineering Control - Sharp AR-207 | AR-207 Operation Manual - Page 80
Product AR-201ND/DV/SD (Black Developer) Date Issued: Nov. 1, 2000 MSDS No. F-30991 Section 2. Supplier's Name and Address Sharp Corporation LDL0 of this toner which is included in this developer is over 2,000mg/kg. Mutagenicity The toner, which is included in this developer, has been tested - Sharp AR-207 | AR-207 Operation Manual - Page 81
Not applicable Appearance: Fine powder Odor: Odorless Specific Gravity: about 7.3 Solubility in Water: Negligible Morrow, U. Mohr, S. Takenaka, and R. Mermelstein (1991) Pulmonary Response to Toner upon Chronic Inhalation Exposure in Rats. Fundamental and Applied Toxicology 17, pp. 280-299 - Sharp AR-207 | AR-207 Operation Manual - Page 82
MEMO 80 - Sharp AR-207 | AR-207 Operation Manual - Page 83
dealer from which you purchased the Product. AR-207 Digital Laser Copier In the event that this authorized dealer does not honor its warranty commitments, please contact the General Manager, Business Products Group, Sharp Electronics Corporation, Sharp Plaza, Mahwah, NJ 07430-2135, so that - Sharp AR-207 | AR-207 Operation Manual - Page 84
AR-207 SHARP ELECTRONICS CORPORATION Sharp Plaza, Mahwah, New Jersey 07430-2135. www.sharp-usa.com SHARP ELECTRONICS OF CANADA LTD. 335 Britannia Road East, Mississauga, Ontario, L4Z 1W9 SHARP CORPORATION PRINTED IN CHINA 2000L KSΠTINSE0447QSZZ
-
 1
1 -
 2
2 -
 3
3 -
 4
4 -
 5
5 -
 6
6 -
 7
7 -
8
-
9
-
10
-
11
-
12
-
13
-
14
-
15
-
16
-
17
-
18
-
19
-
20
-
21
-
22
-
23
-
24
-
25
-
26
-
27
-
28
-
29
-
30
-
31
-
32
-
33
-
34
-
35
-
36
-
37
-
38
-
39
-
40
-
41
-
42
-
43
-
44
-
45
-
46
-
47
-
48
-
49
-
50
-
51
-
52
-
53
-
54
-
55
-
56
-
57
-
58
-
59
-
60
-
61
-
62
-
63
-
64
-
65
-
66
-
67
-
68
-
69
-
70
-
71
-
72
-
73
-
74
-
75
-
76
-
77
-
78
-
79
-
80
-
81
-
82
-
83
-
84
 |
 |

•
GETTING STARTED
•
MAKING COPIES
•
SPECIAL FEATURES
•
STATUS INDICATORS
•
GENERAL INFORMATION
•
OPTIONAL EQUIPMENT
2
13
32
42
51
69
DIGITAL LASER COPIER
OPERATION MANUAL
MODEL
Page
AR-207