Sharp EL9900C EL-9900C - Page 15
Display screen, Power ON/OFF key, Key operation keys, Graphing keys - specifications
 |
UPC - 074000016873
View all Sharp EL9900C manuals
Add to My Manuals
Save this manual to your list of manuals |
Page 15 highlights
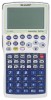
Chapter 1: Getting Started 1 Display screen: Displays up to 132 pixels wide by 64 pixels tall of graphs and texts. 2 Power ON/OFF key: Turns calculator ON. To turn off the calculator, press @, then o. 3 Key operation keys: These keys are used to change the key functions. @: Changes the cursor to "2", and the next keystroke enters the function or mode printed above each key in yellow. A: Changes the cursor to "A", and the next keystroke enters the alphabetical letter printed above each key in purple. Note: Press @ . to lock the specific keys in the alphabet entering mode. (ALPHA-LOCK) 4 Graphing keys: These keys specify settings for the graphing-related mode. Y: G: T: W: Z: U: ,: ": y: d: f: k: Opens the formula input screen for drawing graphs. Draws a graph based on the formulas programmed in the Y window. Opens a Table based on the formulas programmed in Y. Sets the display ranges for the graph screen. Changes the display range of the graph screen. Places the cursor pointer on the graph for tracing, and displays the coordinates. Displays the substitution feature. Displays both a graph and a table at the same time. Opens the table setup screen. Draws items on the graph. Use this key also to save or recall the graph/pixel data. Sets the operations of the graph screen. Calculates specific values based on formulas programmed in Y 5
-
 1
1 -
2
-
3
-
4
-
5
-
6
-
7
-
8
-
9
-
 10
10 -
 11
11 -
 12
12 -
 13
13 -
 14
14 -
 15
15 -
 16
16 -
 17
17 -
 18
18 -
 19
19 -
 20
20 -
21
-
22
-
23
-
24
-
25
-
26
-
27
-
28
-
29
-
30
-
31
-
32
-
33
-
34
-
35
-
36
-
37
-
38
-
39
-
40
-
41
-
42
-
43
-
44
-
45
-
46
-
47
-
48
-
49
-
50
-
51
-
52
-
53
-
54
-
55
-
56
-
57
-
58
-
59
-
60
-
61
-
62
-
63
-
64
-
65
-
66
-
67
-
68
-
69
-
70
-
71
-
72
-
73
-
74
-
75
-
76
-
77
-
78
-
79
-
80
-
81
-
82
-
83
-
84
-
85
-
86
-
87
-
88
-
89
-
90
-
91
-
92
-
93
-
94
-
95
-
96
-
97
-
98
-
99
-
100
-
101
-
102
-
103
-
104
-
105
-
106
-
107
-
108
-
109
-
110
-
111
-
112
-
113
-
114
-
115
-
116
-
117
-
118
-
119
-
120
-
121
-
122
-
123
-
124
-
125
-
126
-
127
-
128
-
129
-
130
-
131
-
132
-
133
-
134
-
135
-
136
-
137
-
138
-
139
-
140
-
141
-
142
-
143
-
144
-
145
-
146
-
147
-
148
-
149
-
150
-
151
-
152
-
153
-
154
-
155
-
156
-
157
-
158
-
159
-
160
-
161
-
162
-
163
-
164
-
165
-
166
-
167
-
168
-
169
-
170
-
171
-
172
-
173
-
174
-
175
-
176
-
177
-
178
-
179
-
180
-
181
-
182
-
183
-
184
-
185
-
186
-
187
-
188
-
189
-
190
-
191
-
192
-
193
-
194
-
195
-
196
-
197
-
198
-
199
-
200
-
201
-
202
-
203
-
204
-
205
-
206
-
207
-
208
-
209
-
210
-
211
-
212
-
213
-
214
-
215
-
216
-
217
-
218
-
219
-
220
-
221
-
222
-
223
-
224
-
225
-
226
-
227
-
228
-
229
-
230
-
231
-
232
-
233
-
234
-
235
-
236
-
237
-
238
-
239
-
240
-
241
-
242
-
243
-
244
-
245
-
246
-
247
-
248
-
249
-
250
-
251
-
252
-
253
-
254
-
255
-
256
-
257
-
258
-
259
-
260
-
261
-
262
-
263
-
264
-
265
-
266
-
267
-
268
-
269
-
270
-
271
-
272
-
273
-
274
-
275
-
276
-
277
-
278
-
279
-
280
-
281
-
282
-
283
-
284
 |
 |
