Sharp LC-46LE540U LC-42LE540U LC-46LE540U Operation Manual - Page 51
Internet Setup, Displaying Updated Information and, Support Service
 |
View all Sharp LC-46LE540U manuals
Add to My Manuals
Save this manual to your list of manuals |
Page 51 highlights
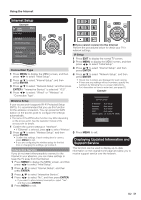
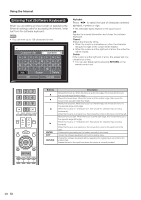
Using the Internet Internet Setup Example Initial Setup Menu Initial Setup EZ Setup Broadcasting Setup Internet Setup Language Individual Setup [English] Reset DivX ® Setup Connection Type If you cannot connect to the Internet Perform the procedures below to check your TV's network settings. IP Setup 1 Press EXIT to display the normal TV screen. 2 Press MENU to display the MENU screen, and then press c/d to select "Initial Setup". 3 Press a/b to select "Internet Setup", and then press ENTER. 1 Press MENU to display the MENU screen, and then 4 Press a/b to select "Network Setup", and then press c/d to select "Initial Setup". press EN. TER 2 Press a/b to select "Internet Setup", and then press ENTER. 3 Press a/b to select ''Network Setup'',and then press ENTER if ''Interactive Service'' is selected ''YES''. 4 Press c/d to select ''Wired'' or ''Wireless'' at • Check that numbers are displayed for each setting. • If there are any settings without numbers, specify the numbers by following the on-screen instructions. • For information on how to enter text, see page 62. Example ''Connection Type''. Setting information Wireless Setup [Current setup] If your access point supports Wi-Fi Protected Setup (WPS), it is recommended that you use this function for the wireless connection. You can press the WPS button on the access point to configure the settings automatically. • The name of the WPS button function may differ depending on the access point. See the operation manual of the IP Address : Auto setup Netmask Gateway : Auto setup : Auto setup DNS : Auto setup Wireless MAC : 12:34:56:78:9A:BC Change access point for details. 1 Confirm the current settings in "Interface". • If "Ethernet" is selected, press c/d to select "Wireless". 2 Press a/b to select "Wireless Setup", and then press ENTER. • Confirm the settings. If each setting item is correct, press MENU to exit. • If you are configuring the wireless setup for the first time or changing the settings, go to step 3. 5 Press MENU to exit. Displaying Updated Information and Support Service Interactive Service If you do not want other people to connect to the Internet in your absence, you can make settings to keep the TV away from the Internet. 1 Press MENU to display the MENU screen, and then press c/d to select "Initial Setup". This function can be used to display up-to-date information on the original home page and allow you to receive support service over the network. 2 Press a/b to select "Internet Setup", and then press ENTER. 3 Press a/b to select "Interactive Service". 4 Press c/d to select "No", and then press ENTER. • If you want to allow Internet connection, select "Yes", and then press ENTER. 5 Press MENU to exit. 51
-
 1
1 -
2
-
3
-
4
-
5
-
6
-
7
-
8
-
9
-
10
-
11
-
12
-
13
-
14
-
15
-
16
-
17
-
18
-
19
-
20
-
21
-
22
-
23
-
24
-
25
-
26
-
27
-
28
-
29
-
30
-
31
-
32
-
33
-
34
-
35
-
36
-
37
-
38
-
39
-
40
-
41
-
42
-
43
-
44
-
45
-
 46
46 -
 47
47 -
 48
48 -
 49
49 -
 50
50 -
 51
51 -
 52
52 -
 53
53 -
 54
54 -
 55
55 -
 56
56 -
57
-
58
-
59
-
60
-
61
-
62
-
63
 |
 |
