Sharp PG-D120U PG-D120U Operation Manual
Sharp PG-D120U - Pro - LCD Projector Manual
 |
UPC - 074000347502
View all Sharp PG-D120U manuals
Add to My Manuals
Save this manual to your list of manuals |
Sharp PG-D120U manual content summary:
- Sharp PG-D120U | PG-D120U Operation Manual - Page 1
PG-D100U Serial No.: Important Information There are two important reasons for prompt warranty registration of your new SHARP LCD Projector, using the REGISTRATION CARD packed with the projector. 1) WARRANTY This is to assure that you immediately receive the full benefit of the parts, service and - Sharp PG-D120U | PG-D120U Operation Manual - Page 2
digital device, pursuant to Part instruction manual servicing. For your own protection and reliable usage of your LCD Projector, please be sure to read these "Important Safeguards" carefully before use. 1) Read Instructions - All the safety and operating instructions electrician to replace your - Sharp PG-D120U | PG-D120U Operation Manual - Page 3
be sure the service technician has used replacement parts specified by the manufacturer or with the same characteristics as the original part. Unauthorized substitutions may result in fire, electric shock, or other hazards. 20) Safety Check - Upon completion of any service or repairs to this product - Sharp PG-D120U | PG-D120U Operation Manual - Page 4
. HIGH PICTURE QUALITY The three LCD panels contain 519,168 × RGB pixels to achieve exceptionally bright, high quality video images with up to 580 doubled TV lines of resolution. VERSATILE REMOTE CONTROL • Built-in wireless mouse allows simultaneous operation of projector and computer. • Built-in - Sharp PG-D120U | PG-D120U Operation Manual - Page 5
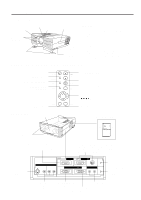
controlling the projector from your personal computer. MOUSE TERMINAL Use when operating your personal computer with the wireless mouse remote control. Left Terminal: D-sub 9-pin (for IBM/Mac) Right Terminal: 9-pin mini DIN (for NEC) S-VIDEO INPUT (4-pin mini DIN) VIDEO IN S-VIDEO VIDEO AUDIO - Sharp PG-D120U | PG-D120U Operation Manual - Page 6
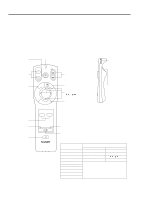
seconds. The back-light colors are explained in the table to the right. R-CLICK/ENTER INPUT SELECT VIDEO DATA MOUSE ADJ. LIGHT LCD PROJECTOR E-6 RIGHT-CLICK/ENTER button Remote control handling precautions ADJ. label • The laser beam used in this product is harmless when directed onto the - Sharp PG-D120U | PG-D120U Operation Manual - Page 7
TEL : 1-800-BE-SHARP U.S.A. ONLY REMOTE CONTROL MODEL NO. : RRMCG1327CESA DC6V (1.5VX4PCS.) MADE IN JAPAN FABRIQUÉ AU JAPON Using the optional cable with the remote control • When the remote control cannot be used due to the range or positioning of the projector (rear projection, etc.), connect - Sharp PG-D120U | PG-D120U Operation Manual - Page 8
VIDEO DATA MOUSE ADJ. LIGHT LCD PROJECTOR LASER POINTER button MOUSE button RIGHT-CLICK button R/C OFF ON Main power switch of REMOTE CONTROL SUBCHAPTER J" SHARP ELECTRONICS CORPORATION SHARP PLAZA, MAHWAH, NEW JERSEY 07430 TEL : 1-800-BE-SHARP U.S.A. ONLY REMOTE CONTROL MODEL NO. : - Sharp PG-D120U | PG-D120U Operation Manual - Page 9
Turn on the main power switch. 2 2. Turn on the POWER POWER POWER indicator Press the POWER ON/OFF button on the projector or remote control to turn on the power. LAMP TEMP. 3 3. Adjusting the Focus Rotate the focus knob until the top portion of the screen is in focus. 4 4. Adjusting the - Sharp PG-D120U | PG-D120U Operation Manual - Page 10
Above is an illustration of maximum and minimum projection distances for the PG-D100U with a picture size of 100 inches. Move the projector forward or back if the edges of the image are distorted. Height of projector s Adjust to match the setup configuration. Screen Lens center H Rack/ stand Lower - Sharp PG-D120U | PG-D120U Operation Manual - Page 11
expose to extreme heat or cold. Operating temperature: 41°F to 104°F (5°C to 40°C) Storage temperature: -4°F to 132°F (-20°C to 60°C) • Do not tilt the projector more than 5°. s Position the screen so that it is not in direct sunlight or room light. Light falling directly onto the screen washes out - Sharp PG-D120U | PG-D120U Operation Manual - Page 12
the picture will be distorted, making viewing difficult. Example of a ceiling-mount setup Before mounting the projector, be sure to contact your nearest Authorized Sharp Industrial LCD Products Dealer to obtain the manufacturer recommended ceiling mount bracket (sold separately). (AN-XGCM10 Ceiling - Sharp PG-D120U | PG-D120U Operation Manual - Page 13
to approximately 5° from the horizontal. • When adjustments are made with the adjusters, the picture may become distorted, depending on the relative positions of the projector and the screen. • After adjusting, in some cases, all of the adjusters' feet may not be resting on the table. To prevent the - Sharp PG-D120U | PG-D120U Operation Manual - Page 14
amplifier. Always turn off the LCD Projector while connecting to video equipment, in order to protect both the projector and the equipment being connected has an S-VIDEO output terminal. VIDEO IN S-VIDEO VIDEO AUDIO IN L R PC CONTROL IN COMPUTER RGB MOUSE FOR PC98 WIRED REMOTE OUT AUDIO OUT - Sharp PG-D120U | PG-D120U Operation Manual - Page 15
6-pin DIN VIDEO IN S-VIDEO VIDEO AUDIO IN L R 9-pin D-Sub PC CONTROL MOUSE 15-pin D-Sub FOR PC98 WIRED REMOTE IN COMPUTER connecting the projector mouse terminal to your personal computer's mouse terminal, using the supplied mouse control cables, you can use the remote control in place - Sharp PG-D120U | PG-D120U Operation Manual - Page 16
for easy projection of full-color computer images, and an external monitor for simultaneous viewing. 1 Side view of the projector 1. Connecting to an IBM-PC (VGA, SVGA, XGA) Series computer - 1,024 × 768 IN COMPUTER RGB OUT RGB Signal Input Socket maximum resolution Plug the RGB signal - Sharp PG-D120U | PG-D120U Operation Manual - Page 17
that they match the specifications of the projector's interface. The external monitor output will only display an analog computer input signal. It will not display a digital or video input signal. To split the composite video signal, use a video distribution amplifier. This is available from your - Sharp PG-D120U | PG-D120U Operation Manual - Page 18
T TL - 3 39 480 525 15.00 66.67 T TL - 3 39 624 667 13.423 74.502 T TL - Notes: • When connecting a notebook computer to the data-projector for display on a (800 × 600) LCD screen, the screen may not show a full picture image. See page 24, "Computer Mode Memory Adjustments" for details. • This - Sharp PG-D120U | PG-D120U Operation Manual - Page 19
Controls When displaying computer patterns which repeat every other dot (tiling, vertical stripes, etc.), interference may occur between the LCD ON or OFF to select the projector's resolution mode to match the computer • When connecting to third party video cards and other Macintosh computers, set - Sharp PG-D120U | PG-D120U Operation Manual - Page 20
enters STANDBY mode. 3 Projector Remote control ON/OFF ON/OFF ON OFF POWER LAMP TEMP. When the power is on, the LAMP REPLACEMENT indicator flashes to show the operating condition of the lamp. Green: Lamp is ready Flashing green: Warming up Red: Change bulb 3. Turn on the POWER - Sharp PG-D120U | PG-D120U Operation Manual - Page 21
mode is set to AUTO at the factory. If you connect a video device with a video signal supported by the projector and the video image appears with no colors, or other such problem occurs, set the video input system mode manually by following the procedure below. 1) Press the MENU button. The menu - Sharp PG-D120U | PG-D120U Operation Manual - Page 22
For viewing the picture from a video source connected to: VIDEO INPUT or S-VIDEO INPUT COMPUTER RGB RGB 832ʷ624 projector will return to STANDBY mode. The power can be turned on again either from the projector or remote control. When the power is turned on, the POWER indicator and LAMP REPLACEMENT - Sharp PG-D120U | PG-D120U Operation Manual - Page 23
preferences with the ADJUSTMENT buttons on the projector and the remote control. • The adjustments can be memorized in RGB or VIDEO separately. • Four picture modes can Skin tones become greenish SHARPNESS For less sharpness For more sharpness RESET All RGB Video Adjustment items are returned - Sharp PG-D120U | PG-D120U Operation Manual - Page 24
CLOCK 0- + PHASE 0- + H-POS 0 - + V-POS 0 - + RESET :SEL. :ADJ. MENU : E N D Computer Mode Memory Adjustments • The projector has been preset with different modes for use with SVGA and other compatible computers. However, 7 memory positions are provided to store mode adjustments - Sharp PG-D120U | PG-D120U Operation Manual - Page 25
is factory preset to the standard setting. However, you can adjust it to suit your own preference with the ADJUSTMENT buttons on the projector or the remote control. • You can adjust the BALANCE, TREBLE and BASS, and also select the SRS 3-D SOUND mode. • To return to the factory preset mode, press - Sharp PG-D120U | PG-D120U Operation Manual - Page 26
buttons to select ON. When the VGA (640 × 480 dot) is input, the projector will enter E-ZOOM mode. E-ZOOM (ON): The screen image will be enlarged to ZOOM button on the remote control. The E-ZOOM button on the remote control can be used to select E-ZOOM and NO E-ZOOM modes. Note: • In SVGA (800 × 600 - Sharp PG-D120U | PG-D120U Operation Manual - Page 27
Note: In the video screen, the resolution and frequency settings will not be displayed. SYSTEM SETUP RESOLUTION HOR FREQ VERT FREQ REMOTE MOUSE 800×600 Lamp Usage Time The lamp usage time can be checked at the On-Screen Display. 1 Press the INPUT SELECT button on the projector or remote control - Sharp PG-D120U | PG-D120U Operation Manual - Page 28
IMAGE ADJ. BLACK SCREEN INPUT DISPLAY E-ZOOM REVERSE INVERT [ON] [OFF] [OFF] [OFF] [OFF] :SEL. :ADJ. MENU : E N D LCD Projector Using the Black Screen Function This projector is equipped with a Black Screen Function. This function can be used to black out the presentation image. • Press the - Sharp PG-D120U | PG-D120U Operation Manual - Page 29
OFF] [OFF] :SEL. :ADJ. MENU : E N D Using the Blue Screen Function This projector is equipped with a Blue Screen function that will turn the screen blue when the video input terminal is not connected to anything, or the video component is turned off. • Press the MENU button. While the MENU screen - Sharp PG-D120U | PG-D120U Operation Manual - Page 30
should be cleaned every 100 hours of use. Clean the filter more often when the projector is used in a dusty or smoky location. s Have your nearest Authorized Sharp Industrial LCD Products Dealer or Service Center replace the filter (PFILD 0051CEZZ) when it is no longer possible to clean it. AIR - Sharp PG-D120U | PG-D120U Operation Manual - Page 31
-out lamp. • Lamp circuit failure. • The lamp has been used for over 1900 hours. • Carefully replace the lamp. • Take the projector to your nearest Autho- rized Sharp Industrial LCD Products Dealer or Service Center for repair. Notes: • If the TEMPERATURE indicator comes on, solve the problem and - Sharp PG-D120U | PG-D120U Operation Manual - Page 32
TO U.S. CUSTOMERS: The lamp included with this projector is backed by a 90-day parts and labor limited warranty. All service of this projector under warranty, including lamp replacement, must be obtained through an Authorized Sharp Industrial LCD Products Dealer or Service Center. For the name - Sharp PG-D120U | PG-D120U Operation Manual - Page 33
on button on the remote control to turn on the power. After the unit projector turns on, "LAMP 0000H" will be displayed to signify that the lamp timer is reset. Notes: • After replacing lamp, be sure to reset the lamp timer. If you do not, the LAMP REPLACEMENT indicator and "LAMP" display will not - Sharp PG-D120U | PG-D120U Operation Manual - Page 34
Assignments Analog RGB Signal Input and Output Terminal : 15-pin mini D-sub female connector Computer Input Analog 1. Video input (red) 8. Earth (blue) 5 2. Video input (green) 1 3. Video input (blue) 9. GND 10. GND 10 6 4. Reserve input 1 11. GND 15 11 5. Composite sync (Mac only - Sharp PG-D120U | PG-D120U Operation Manual - Page 35
4-digits O K Return code (0DH) Problem response (communication error or incorrect command) E R R Return code (0DH) When more than one code is being sent, send each command only after the OK response code for the previous command from the unit is verified. Note: Using the computer control - Sharp PG-D120U | PG-D120U Operation Manual - Page 36
INVERT OFF INVERT ON DISPLAY REMOTE MOUSE AT REMOTE MOUSE 98 MEMORY RELEASE MEMORY SELECTION (1 ~ 7) Note: Power ON/OFF cannot be controlled from the RS-232C terminal. Use the wired remote control input to control power ON/OFF. Examples: For the RGB/VIDEO setting, select video and set the PAL mode - Sharp PG-D120U | PG-D120U Operation Manual - Page 37
Type Model Video system Display method LCD panel Lens Projection lamp Contrast ratio Video input signal S-video input signal Video output Pointer of Remote Control Dimensions (W × D × H) Weight Supplied accessories Replacement parts LCD Projector PG-D100U PAL/SECAM/NTSC 3.58 LCD panel × - Sharp PG-D120U | PG-D120U Operation Manual - Page 38
Dimensions Top View 11 29/64 (291) 15 9/32 (388) 21/64 (51) Side View 10 25/64 (264) 25/64 (10) ø2 43/64 (ø68) 149/64 (45) 8 /27 64 (214) 2 29/32 (74) 4 23/32 (120) Front View Bottom View [Units: inches (mm)] E-38
-
 1
1 -
 2
2 -
 3
3 -
 4
4 -
 5
5 -
 6
6 -
 7
7 -
8
-
9
-
10
-
11
-
12
-
13
-
14
-
15
-
16
-
17
-
18
-
19
-
20
-
21
-
22
-
23
-
24
-
25
-
26
-
27
-
28
-
29
-
30
-
31
-
32
-
33
-
34
-
35
-
36
-
37
-
38
 |
 |

E-1
Dear SHARP Customer
Welcome to the SHARP Family. We are pleased that you are now the owner of a SHARP Color
LCD Projector built for outstanding quality, reliability and performance.
Every SHARP Color LCD Projector is adjusted for a proper picture and has passed through the
most stringent quality control tests at the factory. We have prepared this OPERATION MANUAL
so that you have the ability to adjust the picture and color to your personal viewing preference.
We sincerely hope that you will be satisfied with the quality and performance of your Color LCD
Projector for many years to come.
Please read the instructions carefully, and keep them handy for future reference.
IMPORTANT
For your assistance in reporting the loss or
theft of your Color LCD Projector, please
record the Serial Number located on the rear
of the projector and retain this information.
Important Information
There are two important reasons for prompt warranty registration of your new SHARP LCD
Projector, using the REGISTRATION CARD packed with the projector.
1) WARRANTY
This is to assure that you immediately receive the full benefit of the parts, service and labor
warranty applicable to your purchase.
2) CONSUMER PRODUCT SAFETY ACT
To ensure that you will promptly receive any safety notification of inspection, modification, or
recall that SHARP may be required to give under the 1972 Consumer Product Safety Act,
PLEASE READ CAREFULLY THE IMPORTANT “LIMITED WARRANTY” CLAUSE.
U.S.A. ONLY
WARNING:
High brightness light source, do not stare into the beam of light, or view directly.
Be especially careful that children do not stare directly into the beam of light.
WARNING:
TO REDUCE THE RISK OF FIRE OR ELECTRIC SHOCK, DO NOT EXPOSE
THIS PRODUCT TO RAIN OR MOISTURE.
Model No.: PG-D100U
Serial No.:
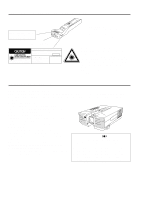
RISK OF ELECTRIC SHOCK.
DO NOT REMOVE SCREWS
EXCEPT SPECIFIED USER
SERVICE SCREW.
CAUTION: TO REDUCE THE RISK OF ELECTRIC SHOCK,
DO NOT REMOVE COVER.
NO USER-SERVICEABLE PARTS EXCEPT LAMP UNIT.
REFER SERVICING TO QUALIFIED SERVICE
PERSONNEL.
The lightning flash with arrowhead symbol,
within an equilateral triangle, is intended to
alert the user to the presence of uninsulated
“dangerous voltage” within the product’s
enclosure that may be of sufficient
magnitude to constitute a risk or electric
shock to persons.
The exclamation point within a triangle is
intended to alert the user to the presence of
important operating and maintenance
(servicing) instructions in the literature
accompanying the product.
CAUTION
ENGLISH