Sharp PG-D120U PG-D120U Operation Manual - Page 8
Wireless Mouse Functions - lcd projector manual
 |
UPC - 074000347502
View all Sharp PG-D120U manuals
Add to My Manuals
Save this manual to your list of manuals |
Page 8 highlights
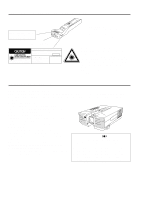
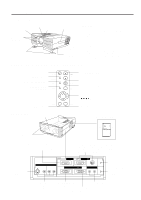
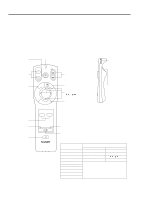
Wireless Mouse Functions By attaching the provided mouse cable to both the mouse terminal on your projector and the mouse terminal on your personal computer, you can use the wireless mouse built into the remote control, instead of the mouse equipped with your personal computer, to operate your personal computer. The wireless mouse functions will work with personal computers compatible with IBM PS/2, serial (RS-232C) or Apple ADB type mouse systems. Connection Example Projector Personal computer VIDEO IN S-VIDEO VIDEO AUDIO IN L R PC CONTROL MOUSE FOR PC98 WIRED REMOTE OFF IN COMPUTER RGB OUT AUDIO OUT COMPUTER L R AUDIO IN ON To mouse terminal Provided mouse cable (for IBM PS/2, serial and Apple ADB type mouse) Functions and Operations POWER ON/OFF button MOUSE/ADJUSTMENT sliding switch ON VOL MUTE OFF E-ZOOM E-Z LASER/ MENU MN R-CLICK/ENTER INPUT SELECT VIDEO DATA MOUSE ADJ. LIGHT LCD PROJECTOR LASER POINTER button MOUSE button RIGHT-CLICK button R/C OFF ON Main power switch of REMOTE CONTROL LEFT-CLICK button • First, connect the units as shown above, and turn the projector power on. • Second, turn the computer power on. • Next, slide the main power switch on the side of the remote control. • When using the remote control as a wireless mouse, move the MOUSE/ADJUSTMENT sliding switch to the MOUSE position. Notes: • In some situations the wireless mouse may be inoperable if your computer port is not correctly set-up. Please refer to your computer owners manual for details on setting-up/installing the correct Mouse Driver. • Do not connect or remove the mouse control cable to/from your computer while it is on. This may damage your computer. • Do not connect the mouse input terminal for IBM/MAC and the mouse input terminal for PC98 simultaneously. MOUSE buttons By lightly pressing the up/down and right/left arrow buttons located on the front of the remote control, you can move the mouse cursor on your monitor screen. Note: Mouse cursor The amount of presssure applied to the mouse button determines the speed the mouse cursor travels. Pressing lightly on the periphery of the mouse button makes the mouse cursor move slowly. Pressing hard makes it move quickly. LEFT-CLICK button RIGHT-CLICK button LASER POINTER button The LEFT-CLICK button on the back of the remote control corresponds to the left button of the mouse on two-button mouse systems. The RIGHT-CLICK button on the front of the remote control corresponds to the right button on two-button mouse systems. Note: For one-button mouse systems use either the LEFT-CLICK or RIGHT-CLICK button. Press the LASER POINTER button to activate the laser pointer. When the button is pressed, the light stays on; when the button is released, the light goes off. However, even when the button is pressed continuously, the light automatically goes off 1 minute after it goes on. To turn it on again press the laser pointer button one more time. CAUTION LASER RADIATIONDO NOT STARE INTO BEAM WAVE LENGTH : 670nm MAX. OUTPUT : 1mW CLASS II LASER PRODUCT "COMPLIES WITH 21 CFR SUBCHAPTER J" SHARP ELECTRONICS CORPORATION SHARP PLAZA, MAHWAH, NEW JERSEY 07430 TEL : 1-800-BE-SHARP U.S.A. ONLY REMOTE CONTROL MODEL NO. : RRMCG1327CESA DC6V (1.5VX4PCS.) MADE IN JAPAN FABRIQUÉ AU JAPON E-8 The laser pointer on the remote control emits a laser beam from the laser light window. The laser emitted is a class II laser; therefore, do not look into the laser window or shine the laser beam on yourself or other people. The two marks to the left are the caution labels for the laser beam. Always use the laser pointer at temperatures between 41°F to 104°F (5°C to 40°C).
-
 1
1 -
2
-
 3
3 -
 4
4 -
 5
5 -
 6
6 -
 7
7 -
 8
8 -
 9
9 -
 10
10 -
 11
11 -
 12
12 -
 13
13 -
14
-
15
-
16
-
17
-
18
-
19
-
20
-
21
-
22
-
23
-
24
-
25
-
26
-
27
-
28
-
29
-
30
-
31
-
32
-
33
-
34
-
35
-
36
-
37
-
38
 |
 |
