Sharp PRO-60X5FD User Manual - Page 67
Timer Recording, Check Booking, Listening with the Audio System, HDMI Device Selection
 |
View all Sharp PRO-60X5FD manuals
Add to My Manuals
Save this manual to your list of manuals |
Page 67 highlights
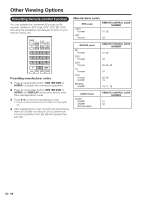
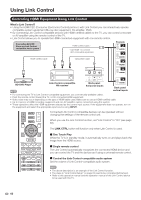
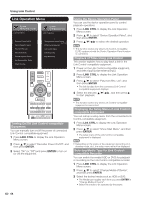
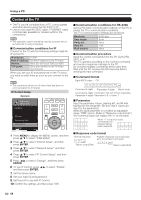
Using Link Control Timer Recording You can call up the Link Control-compatible recorder's EPG and preset timer recordings using the TV's remote control. 1 Press LINK CTRL to display the Link Operation Menu screen. 2 Press a/b to select "Link Booking (Rec. Book)", and then press ENTER. • The recorder's EPG is displayed. 3 Select the program to record. • You can use a/b/c/d, ENTER, RETURN, EXIT and the colored buttons. • This function works only when a Link Control-compatible recorder is connected. • Refer to the operation manual of the recorder for details. Check Booking You can call up a list of the booked recordings from the connected Link Control-compatible recorder. 1 Press LINK CTRL to display the Link Operation Menu screen. 2 Press a/b to select "Check Booking", and then press ENTER. • The list of the booked recordings is displayed. • This function works only when a Link Control-compatible recorder is connected. • Refer to the operation manual of the recorder for details. Listening with the Audio System You can select to listen to the TV sound only from the Link Control-compatible audio system and manually change its sound mode. 1 Press LINK CTRL to display the Link Operation Menu screen. 2 Press a/b to select "Change Audio Output Device", and then press ENTER. 3 Press a/b to select "By Audio SP", and then press ENTER. • The sound from the TV speaker is muted and only the sound from the Link Control-compatible audio system is audible. • You can use VOLk/l and MUTE. Select "By TV SP", and then press ENTER to listen to the TV sound. HDMI Device Selection If multiple HDMI devices are connected in a daisy chain, you can specify which device to control here. 1 Press LINK CTRL to display the Link Operation Menu screen. 2 Press a/b to select "HDMI Device Selection", and then press ENTER. • A list of connected HDMI devices is displayed. 3 Press a/b to select the desired device, and then press ENTER. Displaying the Link Operation Menu 1 Press LINK CTRL to display the Link Operation Menu screen. 2 Press a/b to select "Link Control Setup", and then press ENTER. • The Link Control Setup menu screen is displayed. Start/Stop Recording The program you are watching can be recorded onto the connected Link Control-compatible equipment. Prepare the connected Link Control-compatible recorder for recording. Make sure: • The antenna cable is connected. • There is sufficient available space on the recording media (HDD, DVD, etc.). • On the TV, "Link Control Setup" and "Selecting Recorder" are used to select the equipment for recording. • By default, the recorder connected to HDMI 1 is selected for recording. 1 Press LINK CTRL to display the Link Operation Menu screen. 2 Select "Start Recording", and then press ENTER to start recording. • When you are viewing a broadcast received with the Link Control-compatible recorder selected in "Selecting Recorder", recording to the BD-DVD recorder of the broadcast being viewed starts. • In the following case, even if you have selected "Start Recording", recording does not start. - You are viewing a broadcast received with equipment other than the Link Control-compatible recorder selected in "Selecting Recorder" or other external input equipment. 3 Select "Stop Recording", and then press ENTER to stop recording. 65
-
 1
1 -
2
-
3
-
4
-
5
-
6
-
7
-
8
-
9
-
10
-
11
-
12
-
13
-
14
-
15
-
16
-
17
-
18
-
19
-
20
-
21
-
22
-
23
-
24
-
25
-
26
-
27
-
28
-
29
-
30
-
31
-
32
-
33
-
34
-
35
-
36
-
37
-
38
-
39
-
40
-
41
-
42
-
43
-
44
-
45
-
46
-
47
-
48
-
49
-
50
-
51
-
52
-
53
-
54
-
55
-
56
-
57
-
58
-
59
-
60
-
61
-
 62
62 -
 63
63 -
 64
64 -
 65
65 -
 66
66 -
 67
67 -
 68
68 -
 69
69 -
 70
70 -
 71
71 -
 72
72 -
73
-
74
-
75
-
76
-
77
-
78
-
79
-
80
-
81
-
82
-
83
-
84
-
85
-
86
-
87
-
88
-
89
-
90
-
91
-
92
-
93
-
94
-
95
-
96
 |
 |