Singer 1 One Instruction Manual 26 - Page 9
Handy Reference Chart
 |
View all Singer 1 One manuals
Add to My Manuals
Save this manual to your list of manuals |
Page 9 highlights
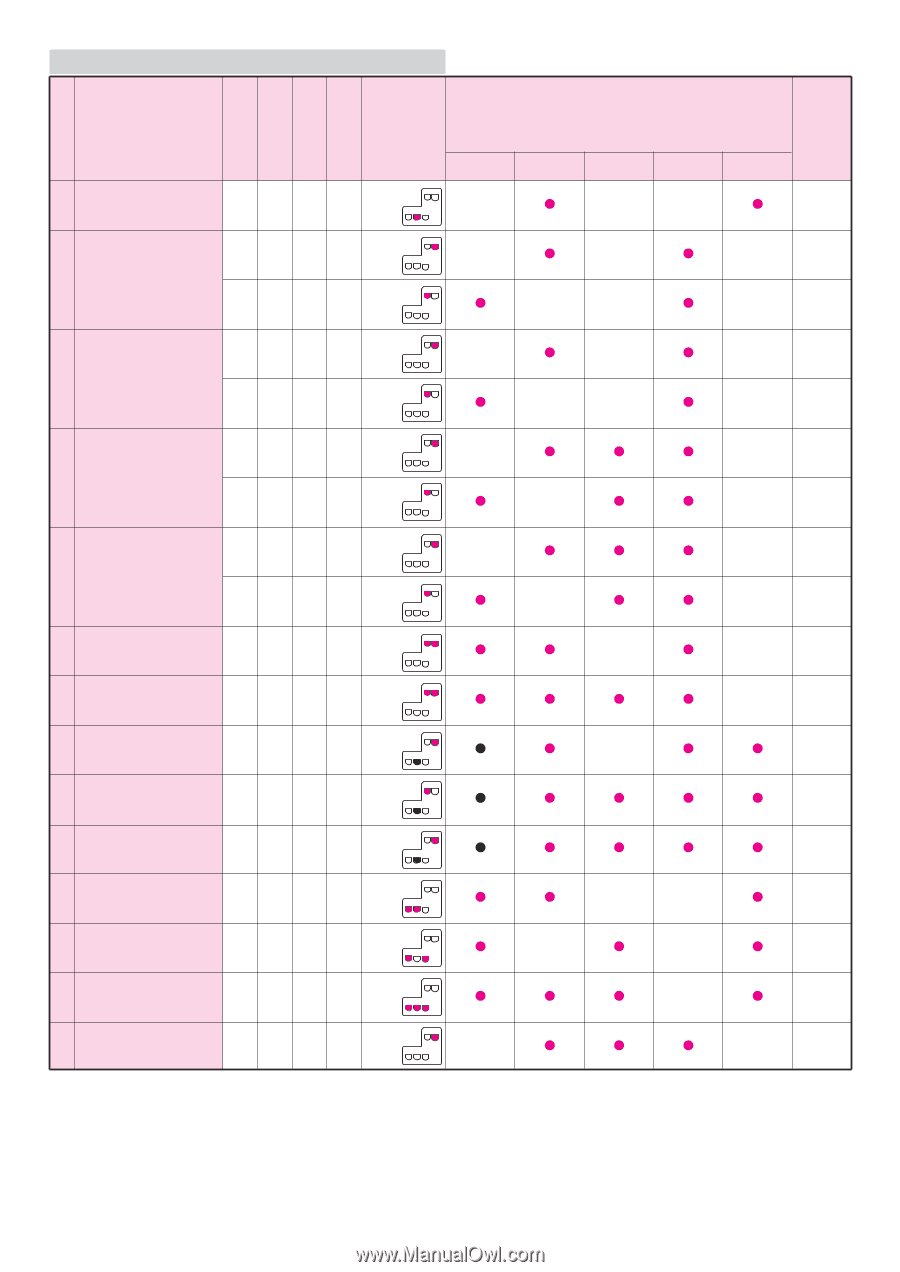
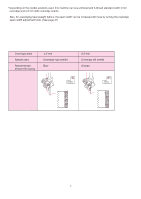
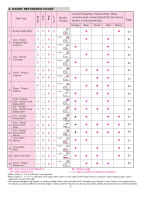
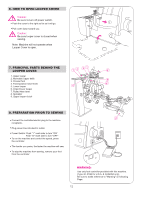
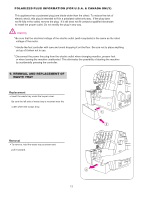
2. HANDY REFERENCE CHART Stitch Type ASDL TLF / D C Needle Position Correct Threading / Tension Path: When using the Auto Tension Dial (ATD), the correct tension is set automatically. Orange Blue Green Red Brown Page 1 Double Chain Stitch D N N C 39 4.0mm Two - Thread D2 NL 41 2 Wrapped Edge Overlock 6.0mm G2 NL 41 4.0mm E2 NL 42 3 Two - Thread Overedge 6.0mm E2 NL 42 4.0mm ANNL 43 4 Three - Thread Overlock 6.0mm BNNL 43 4.0mm F 2 NL 44 Three - Thread 5 Flatlock 6.0mm F 2 NL 44 Three - Thread 6 Ultra - Stretch mock G 2 N L 45 Safety Stitch four - Thread 7 Ultra - Stretch mock A N N L 46 Safety Stitch 8 Four - Thread I NNL 47 Safety Stitch Five - Thread 9 Safety Stitch BNNL 48 Wide Five - Thread 10 Safety Stitch ANNL 48 Narrow Cover stitch 2.8mm 11 Narrow KNNC 51 12 Cover stitch Wide 5.6mm HNNC 51 5.6mm 13 Triple Cover stitch J NNC 52 4.0mm 14 Three - Thread C1 NL 55 Rolled Hem ATD: Auto Tension Dial Selection SL: Stitch Length DF: Differential Feed L / C: Upper Looper driving clutch position *When option 2, 3, 6, 8 selected, use spreader. *When option 1, 11, 12, 13 selected, turn upper knife down, move seam width finger knob to setting R, and change looper cover attached cover (A) into (B). *Auto tension settings are based on medium weight fabric and standard # 60 polyester spun thread. It can satisfy most requirements for sewing. If using a different thread weight or fabric and the result is not as you expected, please adjust tension in small increments. 8
-
 1
1 -
2
-
3
-
 4
4 -
 5
5 -
 6
6 -
 7
7 -
 8
8 -
 9
9 -
 10
10 -
 11
11 -
 12
12 -
 13
13 -
 14
14 -
15
-
16
-
17
-
18
-
19
-
20
-
21
-
22
-
23
-
24
-
25
-
26
-
27
-
28
-
29
-
30
-
31
-
32
-
33
-
34
-
35
-
36
-
37
-
38
-
39
-
40
-
41
-
42
-
43
-
44
-
45
-
46
-
47
-
48
-
49
-
50
-
51
-
52
-
53
-
54
-
55
-
56
-
57
-
58
-
59
-
60
-
61
-
62
-
63
-
64
-
65
-
66
-
67
-
68
-
69
-
70
-
71
-
72
 |
 |