Singer 3232 Simple Instruction Manual - Page 44
Sewing on Buttons Model 3221
 |
View all Singer 3232 Simple manuals
Add to My Manuals
Save this manual to your list of manuals |
Page 44 highlights
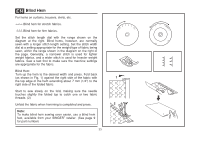
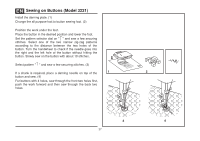
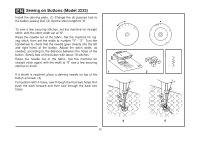
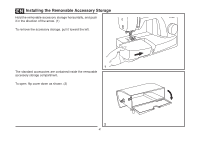
EN Sewing on Buttons (Model 3221) Install the darning plate. (1) Change the all purpose foot to button sewing foot. (2) Position the work under the foot. Place the button in the desired position and lower the foot. Set the pattern selector dial on " " and sew a few securing stitches. Select one of the two narrow zig-zag patterns according to the distance between the two holes of the button. Turn the handwheel to check if the needle goes into the right and the left hole of the button without hitting the button. Slowly sew on the button with about 10 stitches. Select pattern " " and sew a few securing stitches. (3) If a shank is required, place a darning needle on top of the 1 2 button and sew. (4) For buttons with 4 holes, sew through the front two holes first, push the work forward and then sew through the back two holes. 3 4 37
-
 1
1 -
2
-
3
-
4
-
5
-
6
-
7
-
8
-
9
-
10
-
11
-
12
-
13
-
14
-
15
-
16
-
17
-
18
-
19
-
20
-
21
-
22
-
23
-
24
-
25
-
26
-
27
-
28
-
29
-
30
-
31
-
32
-
33
-
34
-
35
-
36
-
37
-
38
-
 39
39 -
 40
40 -
 41
41 -
 42
42 -
 43
43 -
 44
44 -
 45
45 -
 46
46 -
 47
47 -
 48
48 -
 49
49 -
50
-
51
-
52
-
53
-
54
-
55
-
56
-
57
-
58
-
59
-
60
-
61
-
62
-
63
-
64
 |
 |
