Singer 3232 Simple Instruction Manual - Page 50
Attaching the Presser Foot Shank
 |
View all Singer 3232 Simple manuals
Add to My Manuals
Save this manual to your list of manuals |
Page 50 highlights
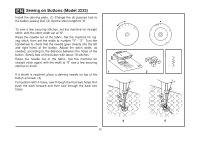
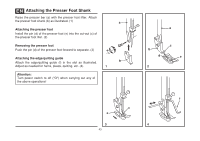
EN Attaching the Presser Foot Shank Raise the presser bar (a) with the presser foot lifter. Attach the presser foot shank (b) as illustrated. (1) a Attaching the presser foot Install the pin (d) of the presser foot (e) into the cut-out (c) of the presser foot lifer. (2) Removing the presser foot Push the pin (d) of the presser foot forward to separate. (3) Attaching the edge/quilting guide Attach the edge/quilting guide (f) in the slot as illustrated. b Adjust as needed for hems, pleats, quilting, etc. (4) 1 Attention: Turn power switch to off ("O") when carrying out any of the above operations! c e 3 43 a b d 2 c e f 4
-
 1
1 -
2
-
3
-
4
-
5
-
6
-
7
-
8
-
9
-
10
-
11
-
12
-
13
-
14
-
15
-
16
-
17
-
18
-
19
-
20
-
21
-
22
-
23
-
24
-
25
-
26
-
27
-
28
-
29
-
30
-
31
-
32
-
33
-
34
-
35
-
36
-
37
-
38
-
39
-
40
-
41
-
42
-
43
-
44
-
 45
45 -
 46
46 -
 47
47 -
 48
48 -
 49
49 -
 50
50 -
 51
51 -
 52
52 -
 53
53 -
 54
54 -
 55
55 -
56
-
57
-
58
-
59
-
60
-
61
-
62
-
63
-
64
 |
 |

43
Attaching the Presser Foot Shank
1
3
2
Raise the presser bar (a) with the presser foot lifter. Attach
the presser foot shank (b) as illustrated. (1)
Install the pin (d) of the presser foot (e) into the cut-out (c) of
the presser foot lifer. (2)
Push the pin (d) of the presser foot forward to separate. (3)
Attach the edge/quilting guide (f) in the slot as illustrated.
Adjust as needed for hems, pleats, quilting, etc. (4)
Turn power switch to off ("O") when carrying out any of
the above operations!
Attaching the presser foot
Removing the presser foot
Attaching the edge/quilting guide
Attention:
EN
4
e
c
f
a
b
a
c
d
e
b