Singer Confidence 7363 Instruction Manual - Page 24
Needle, Thread And Fabric Chart
 |
View all Singer Confidence 7363 manuals
Add to My Manuals
Save this manual to your list of manuals |
Page 24 highlights
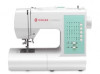
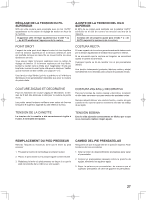
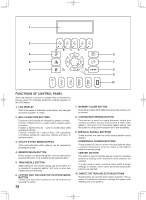
NEEDLE, THREAD AND FABRIC CHART Your fabric will determine the choice of a needle and thread. The following table is a practical guide to needle and thread selection. Always refer to it before a new sewing project. Be sure to use the same size and type of thread in the bobbin as in the top thread supply. FABRICS The fabrics below can be of any fiber: cotton, linen, silk, wool, synthetic, rayon, blends. They are listed as examples of weight. THREAD LightWeight Batiste Chiffon Crepe Medium- Corduroy Weight Flannel Gabardine Gingham Linen Muslin Wool Crepe Cotton-wrapped Polyester 100% Polyester * Mercerized Size 60 Cotton-wrapped Polyester 100% Polyester * Mercerized Size 50 Nylon Medium- Bonded Wovens Heavy Canvas Coating Denim Duck Sailcloth Cotton-wrapped Polyester 100% Polyester * Mercerized Size 40 * "Heavy Duty" Knits Bonded Knits Double Knit Jersey Tricot Cotton-wrapped Polyester Polyester Nylon NEEDLES TYPE 2020 red shank 2020 red shank SIZE 11/80 orange band 14/90 blue band 2020 red shank 2045 yellow shank 16/100 purple band 18/110 yellow band 11/80 orange band 14/90 blue band 16/100 purple band * Do not use on stretch fabrics. * For best sewing results, always use a Singer Branded Needle. Changing the needle 1. Raise the needle bar to its highest position by turning the hand wheel counter clockwise. 2. Loosen the needle clamp screw by turning it counter clockwise. 3. Remove the needle by pulling it downward. 4. Insert the new needle into the needle clamp with the flat side toward the back. 5. Push the needle up as far as it can go. 6. Tighten the needle clamp screw with the screw driver. NOTE: Tighten snugly, but do not over tighten. Helpful Hint: Placing a scrap of fabric under the presser foot and lowering the presser foot makes it easier to change the needle and will preclude dropping the needle into the needle plate slot. 24 Always disconnect the machine from power supply by removing the plug from the wall-outlet. Flat side Côté plat Lado plano Pin Butée Pasador Needle Aiguille Aguja Flat side toward the back Côté plat orienté vers l'arrière Lado plano hacia fuera de Vd.
-
 1
1 -
2
-
3
-
4
-
5
-
6
-
7
-
8
-
9
-
10
-
11
-
12
-
13
-
14
-
15
-
16
-
17
-
18
-
 19
19 -
 20
20 -
 21
21 -
 22
22 -
 23
23 -
 24
24 -
 25
25 -
 26
26 -
 27
27 -
 28
28 -
 29
29 -
30
-
31
-
32
-
33
-
34
-
35
-
36
-
37
-
38
-
39
-
40
-
41
-
42
-
43
-
44
-
45
-
46
-
47
-
48
-
49
-
50
-
51
-
52
-
53
-
54
-
55
-
56
-
57
-
58
-
59
-
60
-
61
-
62
-
63
-
64
-
65
-
66
-
67
-
68
-
69
-
70
-
71
-
72
-
73
-
74
-
75
-
76
-
77
-
78
-
79
-
80
-
81
-
82
-
83
-
84
-
85
-
86
-
87
-
88
-
89
-
90
-
91
-
92
-
93
-
94
-
95
 |
 |
