Singer Heavy Duty 6600C HD 6600C Stitch Applications Guide - Page 10
An Edge Joining Foot additional accessory
 |
View all Singer Heavy Duty 6600C manuals
Add to My Manuals
Save this manual to your list of manuals |
Page 10 highlights
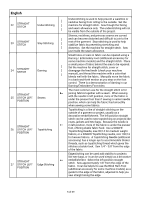
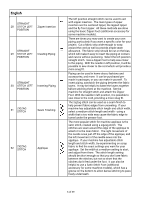
English 45 ZIGZAG STITCH Attaching Lace 46 ZIGZAG STITCH Edge Joining MULTI-STEP 47 ZIGZAG STITCH Mending Heirloom sewing incorporates several different techniques, and one is to attach lace using a zigzag stitch. This works on fine, lightweight fabrics like batiste and lace that has a flat edge on one side. Thread the machine with lightweight thread. A size 9/70 or 11/80 needle (additional accessory for some machine models) is recommended. Set the machine for zigzag stitch. For machines with adjustable stitch length and stitch width, select a width setting of at least 5.0mm and a length setting of approximately 2.0mm. Use an Open Toe Foot (additional accessory for some machine modeles) so that the area in front of the needle is unobstructed. Position the lace on top of the fabric about 1/8" to the left of the fabric edge, then position this so the right movement of the zigzag goes off the edge of the fabric and the left movement catches the flat edge of the lace. As the stitch then moves to the left, it "rolls" the fabric over, stitching it to the lace. Two fabrics can be joined together using a zigzag stitch. First, turn under and press the edge of both fabrics. An Edge Joining Foot (additional accessory for some machine models) can be used a a guide for the fabrics. Place the folded edges next to each other, one on each side of the foot's center guide, and place a piece of lightweight stabilizer underneath the area where they join. Select the zigzag stitch. For machines with adjustable stitch length and stitch width, select the length and width setting you want for your project. Sew across the area where the fabrics join, so the left movement of the needle sews on the left fabric, and the right movement of the needle sews on the right fabric. Remove the stabilizer when finished. Try using a topstitching thread and Topstitching Needle (additional accessory for some machine models) for a bolder appearance to the stitches. Holes, rips or tears in fabric can be repaired easily with the multi-step zigzag stitch. This stitch sews 3 small stitches each time it moves left to right and right to left. For machines with adjustable stitch length and stitch width, set the machine for a wide stitch width and shorter stitch length setting. Place a small piece of fabric (that blends well with the main fabric) underneath the hole or tear. Sew the stitch arcoss the tear. Repeat until the hole or tear is sufficiently covered with stitches. 10 of 49
-
 1
1 -
2
-
3
-
4
-
 5
5 -
 6
6 -
 7
7 -
 8
8 -
 9
9 -
 10
10 -
 11
11 -
 12
12 -
 13
13 -
 14
14 -
 15
15 -
16
-
17
-
18
-
19
-
20
-
21
-
22
-
23
-
24
-
25
-
26
-
27
-
28
-
29
-
30
-
31
-
32
-
33
-
34
-
35
-
36
-
37
-
38
-
39
-
40
-
41
-
42
-
43
-
44
-
45
-
46
-
47
-
48
-
49
 |
 |
