Singer One Instruction Manual 11 - Page 20
Inserting the Bobbin - direction
 |
View all Singer One manuals
Add to My Manuals
Save this manual to your list of manuals |
Page 20 highlights
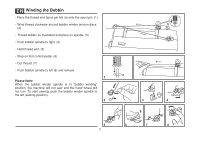
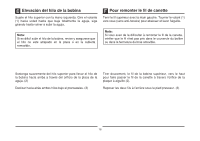
EN Inserting the Bobbin When inserting or removing the bobbin, the needle must be fully raised. 1. Open the hinged cover. 2. Pull the bobbin case tab (a) and remove the bobbin case. 3. Hold the bobbin case with one hand. Insert the bobbin so that the thread runs in a clockwise direction (arrow). 4. Pull the thread through the slit and under the finger. Leave a 6 inch tail of thread. 5. Hold the bobbin case by the hinged latch. 6. Insert it into the shuttle. Attention: Turn power switch to off ("O") before inserting or removing the bobbin. 13
-
 1
1 -
2
-
3
-
4
-
5
-
6
-
7
-
8
-
9
-
10
-
11
-
12
-
13
-
14
-
 15
15 -
 16
16 -
 17
17 -
 18
18 -
 19
19 -
 20
20 -
 21
21 -
 22
22 -
 23
23 -
 24
24 -
 25
25 -
26
-
27
-
28
-
29
-
30
-
31
-
32
-
33
-
34
-
35
-
36
-
37
-
38
-
39
-
40
-
41
-
42
-
43
-
44
-
45
-
46
-
47
-
48
-
49
-
50
-
51
-
52
-
53
-
54
-
55
-
56
-
57
-
58
-
59
-
60
-
61
-
62
 |
 |

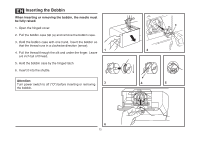
Inserting the Bobbin
When inserting or removing the bobbin, the needle must
be fully raised.
Attention:
1.
Open the hinged cover.
2.
Pull the bobbin case tab (a) and remove the bobbin case.
3. Hold the bobbin case with one hand. Insert the bobbin so
that the thread runs in a clockwise direction (arrow).
4. Pull the thread through the slit and under the finger. Leave
a 6 inch tail of thread.
5.
Hold the bobbin case by the hinged latch.
6.
Insert it into the shuttle.
Turn power switch to off ("O") before inserting or removing
the bobbin.
EN
13