Singer S18 I STUDIO Instruction Manual
Singer S18 I STUDIO Manual
 |
View all Singer S18 I STUDIO manuals
Add to My Manuals
Save this manual to your list of manuals |
Singer S18 I STUDIO manual content summary:
- Singer S18 I STUDIO | Instruction Manual - Page 1
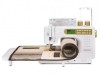
INSTRUCTION MANUAL S18 SINGER and STUDIO are trademarks of The SINGER Company Limited S.à.r.l. or its Affiliates. ©2014 The SINGER Company Limited S.à.r.l. or its Affiliates. All rights reserved. - Singer S18 I STUDIO | Instruction Manual - Page 2
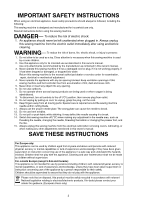
the presser foot, and the like. 15. Always unplug this sewing machine from the electrical outlet when removing covers, lubricating, or when making any other adjustments mentioned in this owner's manual. SAVE THESE INSTRUCTIONS For Europe only: This appliance can be used by children aged - Singer S18 I STUDIO | Instruction Manual - Page 3
Removing the bobbin 14 Preparing thread spool for sewing 14 Winding the bobbin 15 Inserting the bobbin 16 Threading the Machine 17-18 Automatic Needle Threader 19 Drawing Up 40 Quilting Options 41 Edge guide / quilting bar 41. Free-motion quilting 41 Clasp stitch quilting 42 Appliqu 42 3 - Singer S18 I STUDIO | Instruction Manual - Page 4
Hem 56-57 Shell Tucking 58 Scallop Stitch 58 Cording 58 Twin Needle Sewing 59-60 MONOGRAMMING (Mode 4 67 Selecting a Letter Style 67 Programming Area.... 71 Replacing the Light Bulb 72 Problems and Warning Signals 73-74 Troubleshooting 75 PROGRAMMING STITCH PATTERNS AND BUTTON FUNCTIONS - Singer S18 I STUDIO | Instruction Manual - Page 5
. Needle clamp screw 31. Carrying handle 32. Presser foot lifter 33. Buttonhole lever 34. Spool pins 35. Machine sockets 36. Power switch 37. Handwheel 38. Thread guide 39. Pre-tension guide for bobbin 2 1 1 Attaching the quick reference board The quick reference board and setscrews are included in - Singer S18 I STUDIO | Instruction Manual - Page 6
foot A (comes attached to the machine) 2. Overedge foot C 3. Narrow sewing foot T 18. Cloth guide with screw 19. Lint brush 20. Seam ripper 21. Spool pin caps (Large) 22. Spool pin caps (Small) 23. Class 15 bobbins 24. Edge/quilting guide 25. Quilting bar for even feed/walking foot 26. Instruction - Singer S18 I STUDIO | Instruction Manual - Page 7
power switch and unplug from the power supply: - when leaving the machine unattended. - when attaching or removing parts. - when cleaning the machine. Do not place anything on the foot control when not in use. Operating Instructions: The symbol "O" of a switch indicates the "off" position of - Singer S18 I STUDIO | Instruction Manual - Page 8
SINGER® class 15 bobbins in your machine. Using improperly sized bobbins or prewound bobbins may cause stitching problems. Improper bobbins can damage your bobbin case and machine the end of a seam to sew locking stitches to secure the end of the seam. The machine will stop automatically after these - Singer S18 I STUDIO | Instruction Manual - Page 9
recalled when pressing this button on the initial screen of the selected mode. 4 Twin needle button: Press this button when sewing with a twin needle. The machine will limit width to protect a 2.0 width double needle from breakage. 5 Elongation button: Press this button to elongate satin stitch - Singer S18 I STUDIO | Instruction Manual - Page 10
13 14 15 16 17 15 16 Auto thread cutter button: Press this button after the last memorized stitch pattern and the machine will automatically trim the threads when sewing is finished. Clear button: When the clear button is pressed it will recall the stitch patterns that are programmed in the MODE - Singer S18 I STUDIO | Instruction Manual - Page 11
putting bulky fabrics under the presser foot. 1 Presser foot lifter 2 Presser foot 3 Up position 4 Extra lift NOTE If you start to sew with the presser foot up, the machine will beep and the LCD screen will advise you to lower the presser foot. 3 2 Attaching the Knee Lifter The knee lifter is - Singer S18 I STUDIO | Instruction Manual - Page 12
the right foot for the right sewing technique. See page 25 in the manual for further information. Remember that not all stitches can be sewn with all of the feet. Be careful because the incorrect foot can cause needle damage and harm to your machine - Singer S18 I STUDIO | Instruction Manual - Page 13
satin stitch foot for decorative stitching and appliqué. 7 Blind hem foot G: This foot is specially designed for blind hemming. The guide on the foot helps feed the fabric and sew a straight and nearly invisible blind-hem. 8 Cording foot: This foot is specially designed to hold one or three strands - Singer S18 I STUDIO | Instruction Manual - Page 14
SINGER® Class 15 bobbins in your machine. Using improper sized bobbins and pre-wound bobbins may cause stitching problems. Improper bobbins can damage your bobbin case and machine . 4 Small spool 5 Small spool cap NOTE When sewing with decorative threads wound on paper spool spools the automatic - Singer S18 I STUDIO | Instruction Manual - Page 15
Step 1 Pass the thread through the thread guide on the thread guide post from behind. 1 Thread guide bar Step 2 Pass the thread under the bobbin machine will stop automatically. Return the bobbin winder stopper to its original position and cut the thread. The SINGER® Studio™ S18 sewing machine - Singer S18 I STUDIO | Instruction Manual - Page 16
3 Inserting the Bobbin Step 1 Place the bobbin in the bobbin case with the thread coming off counter clockwise. 1 Thread 2 Bobbin case Step 2 Guide the thread into notch (A) on the front of the bobbin case. Step 3 Draw the thread to the left, sliding it between the tension spring blades - Singer S18 I STUDIO | Instruction Manual - Page 17
the needle to its highest position. Step 1 Pass the thread up through the guide on the thread guide bar from behind. 1 Thread guide bar Step 2 Pass the thread through the machine thread guide. 2 Machine thread guide 3 3 4 4 Step 3 Hold the upper thread with both hands as shown and slip it - Singer S18 I STUDIO | Instruction Manual - Page 18
Threading the Machine (continued) 6 8 9 5 5 7 6 Step 5 Draw the thread down and thread down through the lower thread guide from the right. 8 Lower thread guide Step 8 Slip the thread behind the needle bar thread guide on the left. 9 Needle bar thread guide Step 9 Thread the needle from - Singer S18 I STUDIO | Instruction Manual - Page 19
hook enters the needle eye from behind. 2 Needle threader lever 3 Hook Step 5 Draw the thread down around the threader guide and under the hook. 4 Threader guide 3 4 6 Step 6 Release the threader lever slowly while holding the thread end with your hand lightly. A loop of the thread - Singer S18 I STUDIO | Instruction Manual - Page 20
4" (10 cm) of both threads to the back under the presser foot. You can also pull the threads up to the thread cutter on the machines cover plate. See page 5 of manual for machine identification. 20 - Singer S18 I STUDIO | Instruction Manual - Page 21
machine is a package of 5 needles: A twin needle, a ballpoint needle, 2 regular point needles size 11, and a regular point needle size 14. When purchasing additional needles, refer to chart for recommended needle type and size. Weight Very Light Fabric Fine Lace, Net, Tulle Type of needle SINGER - Singer S18 I STUDIO | Instruction Manual - Page 22
4 Bobbin thread Different threads and fabric types may require slight adjustments in the tension. Before making adjustments determine first that the machine is threaded correctly and the proper needle is being used. Adjusting the tension Thread tension may need adjusted for many reasons: Thread - Singer S18 I STUDIO | Instruction Manual - Page 23
lowered a message will come up on the LCD screen when foot control is depressed. An alarm will beep when starting to sew with the feed dogs down, also. The machine will not sew unless the following stitch patterns are selected. MODE 1: 01, 02, 08 and 09 MODE 2: 25, 28, 53, 54, 55, 56 - Singer S18 I STUDIO | Instruction Manual - Page 24
67 1 2 3 45 Selecting the Sewing Mode On the LCD screen, the mode number and the following information are displayed: 1 Stitch pattern 2 Recommended thread tension 3 Recommended foot 4 Stitch width 5 Stitch length 6 - Singer S18 I STUDIO | Instruction Manual - Page 25
help button again. The narrow hemmer foot for narrow hemming will be shown. Step 3 Press the button one more time. The zipper foot for zipper sewing will be shown. NOTE The Help ? button only gives recommendations with the stitch pattern numbers in the following modes. Mode 1: 01, 08, 09, 10 Mode - Singer S18 I STUDIO | Instruction Manual - Page 26
preference. Turn the power switch on while pressing the memory 2 button and the LCD screen will show the machine setting window. 1 Memory button 2 Power switch 3 Machine setting window 1 2 3 1 2 3 1 2 3 Resumption setting The last stitch pattern sewn before turning the power off will be recalled - Singer S18 I STUDIO | Instruction Manual - Page 27
the bottom of the foot to the back of the machine. Lower the presser foot. Depress the foot control to start sewing. Gently guide the fabric along the seam guide line. Let the presser foot and feed dogs naturally pull the fabric while sewing. How to start stitching on the edge of thick fabrics - Singer S18 I STUDIO | Instruction Manual - Page 28
you want to pivot. Raise the presser foot. Pivot the fabric around the needle to change the sewing direction as desired. Lower the presser foot and start sewing in a new direction. Using the Cloth Guide Attach the cloth guide on the needle plate with the thumb screw. Adjust the position of the cloth - Singer S18 I STUDIO | Instruction Manual - Page 29
Adjusting the needle position The needle position can be altered by pressing the stitch width adjusting button. The multiple needle movements can give you great stitching control when seaming and topstitching. Press the right side of the button (+ sign) to move the needle bar to the right. Press the - Singer S18 I STUDIO | Instruction Manual - Page 30
a seam with backstitching. When you reach the end of the seam, press the reverse button once. The machine will sew four reverse stitches, four forward stitches, and then stop sewing automatically. Locking stitch pattern 04 This unique stitch is used where an invisible locking stitch is needed. Lower - Singer S18 I STUDIO | Instruction Manual - Page 31
. Tighten the thumbscrew firmly with the screwdriver. 1 1 Thumbscrew 2 Pin 3 Needle clamp screw To sew Hold both needle and bobbin thread under the foot and to the back. Depress the foot control. The machine will take one stitch and stop automatically. Release the foot control. Hold the fabric - Singer S18 I STUDIO | Instruction Manual - Page 32
Zigzag Stitch Pattern 08 Machine Setting Stitch pattern: Thread tension: Presser foot: Foot pressure: 08 (Mode 1) 3-7 General purpose foot A 3 The zigzag stitch pattern is used for various sewing techniques including overcasting. A dense zigzag stitch pattern is called a satin stitch, and is most - Singer S18 I STUDIO | Instruction Manual - Page 33
the edges of fabric to prevent fraying. The SINGER® Studio™ S18 sewing machine is equipped with overedge feet designed to create beautiful fabrics. 3 Place the fabric edge next to the guide of the foot and then sew. 2 1 Edge of fabrics 2 Guide 1 3 Wires on foot CAUTION When using the - Singer S18 I STUDIO | Instruction Manual - Page 34
will not unravel. Place the fabric edge next to the guide of the foot and then sew. CAUTION When using the overedge foot C, set the stitch needle may deflect if settings have been changed. Overlock stitch pattern 03 Machine Setting Stitch pattern: Thread tension: Presser foot: Foot pressure: 03 - Singer S18 I STUDIO | Instruction Manual - Page 35
Zipper Sewing Machine Setting Stitch pattern: Thread tension: Presser foot: Foot pressure: 01 (Mode 1) 2-6 Zipper foot E 3 3 1 2 How to attach zipper foot E 4 Remove presser foot from presser foot holder. Position the pin on the zipper foot under the groove of the presser foot holder. To sew - Singer S18 I STUDIO | Instruction Manual - Page 36
the upper fabric 6 Opening size 7 Fold 8 Seam with basting stitches Step 4 Set the stitch length and thread tension back to the original settings on the sewing machine. Attach zipper foot E with the pin on the right side. Lower the foot onto the fold on the left side. Start stitching at the end - Singer S18 I STUDIO | Instruction Manual - Page 37
the fabric and zipper tape together with foot A. Refer to Step 2 for machine baste set up. 11 Basting 12 Zipper tape under the seam allowance 11 at the bottom of the zipper. Check that the needle is positioned to sew just below the zipper stop. Start topstitching at the seam and stitch 3/8" - Singer S18 I STUDIO | Instruction Manual - Page 38
" (0.5 cm) 3 1/4" (0.8 cm) 4 Curl of the foot Place the fabric aligning the edge of hem with the guide on the foot. Lower the foot and sew to 1/2"-1" (1-2 cm) while pulling both thread to the back. Stop the machine and lower the needle into the fabric. Raise the foot and insert the folded portion of - Singer S18 I STUDIO | Instruction Manual - Page 39
angle on the needle plate. Lower the needle into the fabric and sew an exact 1/4" seam. 1 2 Locked Quarter Inch Seams Machine Setting Stitch pattern: 11 (Mode 2) Thread tension: 2-6 Presser foot: Quarter inch foot with guide O Foot pressure: 3 Stitch pattern 03 and auto lock stitch pattern 04 in - Singer S18 I STUDIO | Instruction Manual - Page 40
of stitches while quilting multiple layers of fabric. The even feed / walking foot with the quilting bar attached helps sew straight and evenly spaced rows on the quilt. Machine Setting Stitch pattern: 11 Mode 2 Thread tension: 2-6 Presser foot: Even feed/Walking foot and quilting bar Foot pressure - Singer S18 I STUDIO | Instruction Manual - Page 41
for the stitch pattern you want to sew. The bar can also be used as an edge guide for sewing deep hems. 1 2 3 Machine Setting Stitch pattern: 01 (Mode 1) are formed while moving the fabric manually. A common type of free-motion sewing is stipple quilting. Machine Setting Stitch pattern: 11 (Mode - Singer S18 I STUDIO | Instruction Manual - Page 42
button Select the lock stitch button Position foot where stitch pattern needs to go. Lower the presser foot and start sewing. The machine will automatically stop after sewing one clasp stitch. Raise the presser foot and move the fabric to the next position. Appliqué Quilts are often embellished - Singer S18 I STUDIO | Instruction Manual - Page 43
This is also a bartack buttonhole similar to the sensor buttonhole, but you can manually set and memorize the buttonhole size to sew buttonholes of the same size. This buttonhole is useful for bulky fabrics or when sewing on uneven layers. 13 Round End Buttonhole This buttonhole is used on fine to - Singer S18 I STUDIO | Instruction Manual - Page 44
stabilizer. Simply add a tear-a-way stabilizer on the back side of the fabric when sewing buttonholes. How to sew This buttonhole is widely used on medium to heavy weight fabrics. Machine Setting Stitch pattern: 11 (Mode 3) Thread tension: 1-5 Presser foot: Automatic buttonhole foot R Foot pressure - Singer S18 I STUDIO | Instruction Manual - Page 45
lever down as far as it will go. 1 Buttonhole lever 1 NOTE If you start sewing without pulling down the buttonhole lever, the LCD screen will display a message, the machine 2 will sound a warning and sewing will stop after a few stitches. Pull the buttonhole lever down and continue - Singer S18 I STUDIO | Instruction Manual - Page 46
it stitches back to the starting point with a straight stitch. Step 2: The machine will now sew the right row. Step 3: The machine will sew the back bartack, and the machine will stop automatically. To sew another buttonhole, press the thread cutter button and raise the presser foot. Reposition - Singer S18 I STUDIO | Instruction Manual - Page 47
the buttonhole foot first and lower the buttonhole lever second. Start the machine and sew the buttonhole over the filler cord. The machine stops automatically when finished. Step 6 Remove the fabric from the machine and cut the sewing threads. Step 7 Pull the left end of the filler cord to remove - Singer S18 I STUDIO | Instruction Manual - Page 48
stitch denser. 4 Stitch length adjusting button 5 Denser buttonhole 6 Less dense buttonhole To alter the buttonhole width and density while sewing a test buttonhole, stop the machine at the left or right row of the buttonhole. Adjust the stitch width and density to find the appropriate settings - Singer S18 I STUDIO | Instruction Manual - Page 49
similar to the sensor bartack buttonhole, but you can manually set and memorize the buttonhole size to sew buttonholes of the same size. This buttonhole is useful for bulky fabrics or when sewing on uneven layers. Machine Setting Stitch pattern: 12 (Mode 3) Thread tension: 1-5 Presser foot - Singer S18 I STUDIO | Instruction Manual - Page 50
opposite the starting point. Press the reverse button. 6 Starting point 7 Bartack and lock stitches Keep the foot control depressed. The machine will sew a bartack, lock the stitches and automatically stop when the buttonhole is completed. To repeat this size buttonhole, position the fabric and - Singer S18 I STUDIO | Instruction Manual - Page 51
in place. Step 5 Turn the handwheel to lower the needle into the right hole in the button. Adjust the stitch width if necessary. To sew in place Step 6 Re-thread the machine and sew about 8 stitches. Select the auto-lock button. The needle will stitch in place to lock the threads and the - Singer S18 I STUDIO | Instruction Manual - Page 52
. Lower the needle at the starting point then lower the foot. 1 Button holder 2 Starting point Step 2 Depress the foot control and the machine will sew a 3/4" (2cm) long group of small straight stitches and stop automatically. Step 3 Raise the presser foot and reposition fabric at a 90 degree angle - Singer S18 I STUDIO | Instruction Manual - Page 53
button to set the length of the stitching. 1 Required length 2 Reverse button Step 2 Continue sewing until the machine stops. To sew a darning shorter than 3/4" (2cm), first stop the machine after sewing the required length, then press the reverse button. The required length has been determined - Singer S18 I STUDIO | Instruction Manual - Page 54
seams and belt carriers where extra strength is needed. To sew Place fabric under the foot the program a tacking stitch. Depress the foot control and the machine will stitch in 1 reverse the standard pre-set tack length. The machine will then stitch back to the starting point, then zigzag - Singer S18 I STUDIO | Instruction Manual - Page 55
foot: Satin stitch foot F Foot pressure: 3 The eyelet is used for making holes for belts, crafts and cording. To sew Depress the foot control to sew. The machine will sew an eyelet and stop automatically when completed. Open the eyelet with an awl, hole punch or pointed scissors. Adjusting the shape - Singer S18 I STUDIO | Instruction Manual - Page 56
5 Blind Hem Machine Setting Stitch pattern: to fold the fabric for a blind hem when manual is not close. 4 5 Select the help ? how to fold the fabric for a blind hem when manual is not close. Set up to test blind hem fold comes to the left side of the guide on the foot. Lower the presser foot. - Singer S18 I STUDIO | Instruction Manual - Page 57
width adjusting button. The LCD screen shows the left needle position from the guide in millimeters. Press on "-" to move the needle to the right. Press press memory. 2 Select stitch 58 and press memory. The machine now will sew 2 more straight stitches in 1 between the blind hem stitch - Singer S18 I STUDIO | Instruction Manual - Page 58
for edges on hems, sashes, curtains and delicate heirloom projects. Machine Setting Stitch pattern: 08 (Mode 3) Thread tension: 3-6 Presser three strands parallel for even sewing and be sure to sew over the strands. Stitch slowly and smoothly, guiding the fabric as you sew. 1 Spring Single strand - Singer S18 I STUDIO | Instruction Manual - Page 59
width setting. Turn off the machine before changing and inserting double needle. NOTES When you sew patterns with the twin needle, press one of the threads in the needle bar thread guide on the left, and the other on the right. 1 Needle bar thread guide 1 Thread the needles from the front to back - Singer S18 I STUDIO | Instruction Manual - Page 60
pattern 23 sewn 4 times Remember to never use the automatic thread cutter with a twin needle in the machine. Twin needle sewing is not available in Mode 4. If the selected pattern is not suitable for twin needle sewing, a warning message will be displayed on the LCD screen. 4 Warning message 60 - Singer S18 I STUDIO | Instruction Manual - Page 61
after pressing the auto-lock button. Step 4 Depress the foot control to sew. The machine will lock the beginning of stitch pattern 23 and sew the pattern one time. At the end of the pattern the machine will sew locking stitches and stop automatically. 1 Locking stitch Programming Tip: Auto thread - Singer S18 I STUDIO | Instruction Manual - Page 62
button Programming Two Stitch Patterns and Auto Thread Cutting Follow programming steps above until Step 5. Press the programmable auto thread cutter button. The machine will sew one unit each of the stitch patterns 23 and 25 then stop automatically and trim the threads. 2 Auto thread cutting 62 - Singer S18 I STUDIO | Instruction Manual - Page 63
1 Select stitch pattern 24 in the Mode 3. Step 2 Press the memory button. Step 3 Press the turnover memory button. Step 4 Start to sew. The machine will sew the stitch pattern combination repeatedly. Programming Tip: If you press the Auto-lock button in the middle of a programmed stitch pattern the - Singer S18 I STUDIO | Instruction Manual - Page 64
beginning of the memorized sequence press the memory button. 1 Programmed pattern combination sewn 2 Stitching stopped 3 Press memory button. 4 Machine sews from the beginning of programmed stitch pattern. Returning to beginning of incomplete stitch pattern When stitching out a combination a thread - Singer S18 I STUDIO | Instruction Manual - Page 65
stitch patterns 36, 37 and 36 in Mode 3. See page 62 for programming instructions. Step 2 and 3 Press the stitch width adjusting button to edit the stitch Certain stitch patterns can only be altered by width. Step 4 Sew the programmed stitch patterns. The programmed stitch patterns have sewn in - Singer S18 I STUDIO | Instruction Manual - Page 66
. Storing and recalling stitch pattern combinations A stitch pattern combination will be kept in the memory for future use even after turning the machine off. The stored stitch pattern combination can be recalled by selecting the Mode where the combination was sewn. Then press the memory/recall - Singer S18 I STUDIO | Instruction Manual - Page 67
MONOGRAMMING (Mode 4) 1 Selecting a Letter Style There are two styles of letters to choose from. Select block or script letter styles. Letter 1 Block Style Button 2 Block international alphabet 3 Script 4 Script international alphabet 2 Press the letter style button to choose one of the - Singer S18 I STUDIO | Instruction Manual - Page 68
1 2 3 4 5 6 7 8 9 10 12 11 Programming Lettering Machine Settings Stitch Pattern: A (Mode 4) Thread tension: 2-4 Presser foot: Satin will appear after the text. To sew lettering Step 12 Depress the foot control to sew. The machine will sew the lettering, then stop automatically and trim the - Singer S18 I STUDIO | Instruction Manual - Page 69
that direction. Editing Lettering Inserting a letter (character) How to insert a space in "ABCD". Program ABCD into the memory. 1 See page 68 for instructions on programming. Step 1 Press the Edit button twice to shift the cursor under the letter "C". 2 Step 2 Select pattern 67 (blank space - Singer S18 I STUDIO | Instruction Manual - Page 70
that effect the feeding of the fabric under the presser foot. Always check that you are following the machine settings for the stitch pattern you are stitching. When test sewing stitch patterns be sure to have the identical stitching setup as on your project. Example: Thread, fabric, stabilizers - Singer S18 I STUDIO | Instruction Manual - Page 71
9 5 7 8 CARE AND MAINTENANCE Cleaning the Bobbin Case and Feed Dog WARNING Turn the power switch off and unplug the machine before cleaning. NOTE Do not dismantle the machine in any way other than what is explained on this page. Step 1 To disassemble bobbin case area, remove the needle and presser - Singer S18 I STUDIO | Instruction Manual - Page 72
1 2 3 4 Replacing the Light Bulb WARNING Turn the power off before replacing the light bulb. The bulb could be HOT, wait until it has cooled down before touching it. To remove: Remove the setscrew. Remove the faceplate. Swing the lamp socket to the left and pull out the bulb. To replace: Insert a - Singer S18 I STUDIO | Instruction Manual - Page 73
is sensing a problem. These symbols are explained below and what action needs to be taken. Warning Sign Cause Action The power is turned on without the foot control Connect the foot control and being connected. restart the machine. The foot control is disconnected while sewing. The power is - Singer S18 I STUDIO | Instruction Manual - Page 74
The machine is started when it halts due to overload. The feed dog is dropped while sewing. The machine is out of order due to a problem in the item indicated. (Example: "BM init error" means error in initialization of stepping motor.) Go to www.singerco.com for information on warranty and service - Singer S18 I STUDIO | Instruction Manual - Page 75
presser foot has not been lowered. Problems when 1. The stitch density is to dense for the fabric being sewn. sewing buttonholes. 2. No interfacing or stabilizer is being used with unstable fabric. 3. The buttonhole lever has not been lowered. The machine is noisy. Layers shift. 1. Thread has
-
 1
1 -
 2
2 -
 3
3 -
 4
4 -
 5
5 -
 6
6 -
 7
7 -
8
-
9
-
10
-
11
-
12
-
13
-
14
-
15
-
16
-
17
-
18
-
19
-
20
-
21
-
22
-
23
-
24
-
25
-
26
-
27
-
28
-
29
-
30
-
31
-
32
-
33
-
34
-
35
-
36
-
37
-
38
-
39
-
40
-
41
-
42
-
43
-
44
-
45
-
46
-
47
-
48
-
49
-
50
-
51
-
52
-
53
-
54
-
55
-
56
-
57
-
58
-
59
-
60
-
61
-
62
-
63
-
64
-
65
-
66
-
67
-
68
-
69
-
70
-
71
-
72
-
73
-
74
-
75
 |
 |

INSTRUCTION MANUAL
S18
SINGER and STUDIO are trademarks of The SINGER Company Limited S.à.r.l. or its Affiliates.
©2014 The SINGER Company Limited S.à.r.l. or its Affiliates. All rights reserved.