Singer SES2000 FUTURA Instruction Manual - Page 60
Buttonhole Making
 |
View all Singer SES2000 FUTURA manuals
Add to My Manuals
Save this manual to your list of manuals |
Page 60 highlights
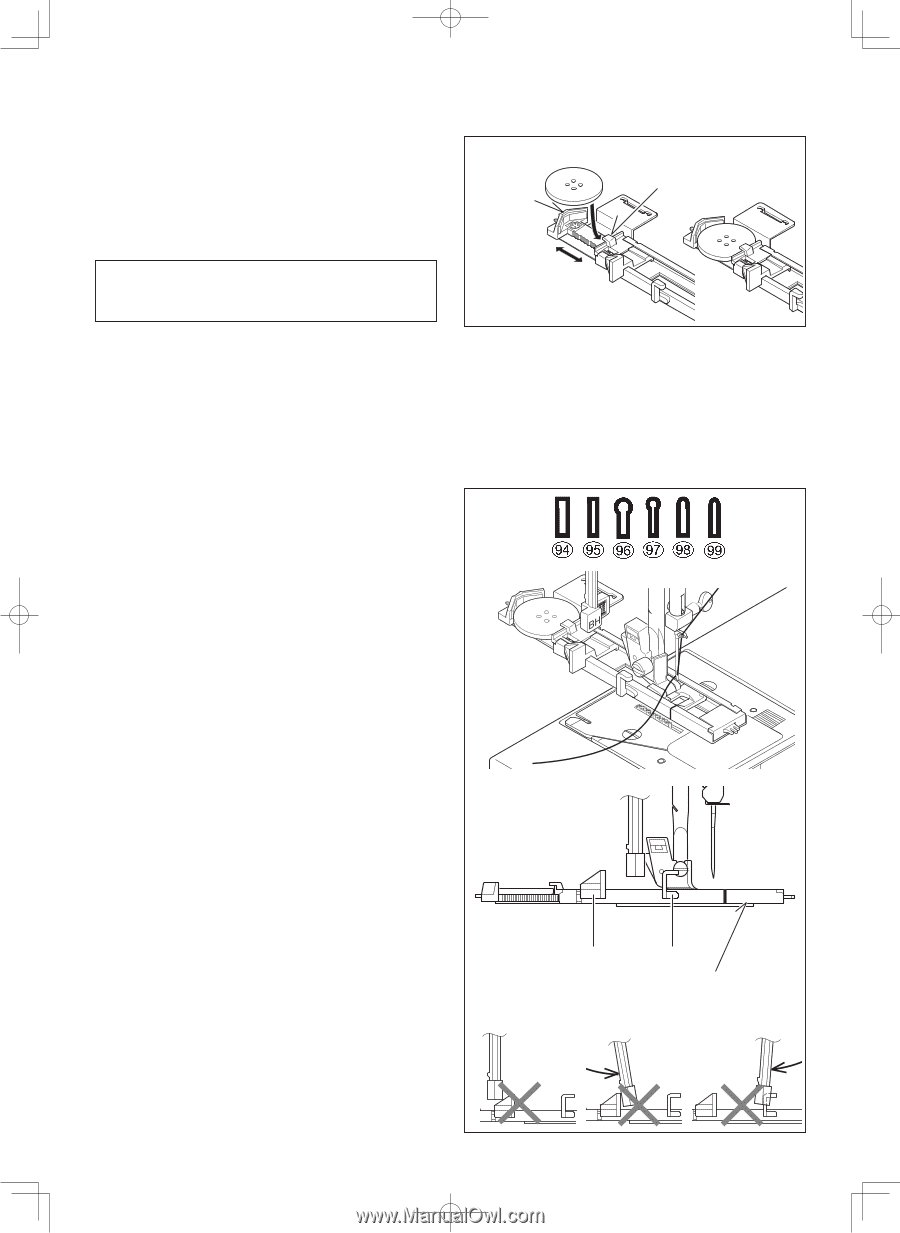
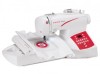
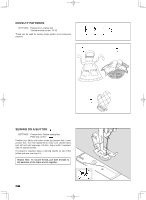
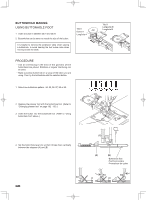
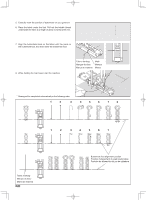
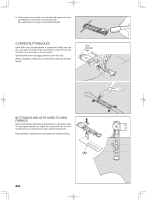
BUTTONHOLE MAKING USING BUTTONHOLE FOOT 1. Insert a button in between tab A and tab B. 2. Buttonholes can be sewn to match the size of the button. It is helpful to remove the extension table when sewing a buttonhole, to avoid hearing the foot make noise when moving across the table. tab A Butée A Lengüeta A PROCEDURE * Use an interfacing in the area of the garment where buttonholes are placed. Stabilizer or regular interfacing can be used. * Make a practice buttonhole on a scrap of the fabric you are using. Then try the buttonhole with the selected button. 1. Select one buttonhole pattern: 94, 95, 96, 97, 98 or 99. 2. Replace the presser foot with the buttonhole foot. (Refer to "Changing presser foot" on page 102 - 103.) 3. Insert the button into the buttonhole foot. (Refer to "Using buttonhole foot" above.) tab B Languette B Lengüeta B 4. Set the buttonhole lever (C) so that it drops down vertically between the stoppers (A) and (B). (C) 60 (C) (A) (B) Buttonhole foot Pied boutonnière Prensatelas de ojales (C) (C)
-
 1
1 -
2
-
3
-
4
-
5
-
6
-
7
-
8
-
9
-
10
-
11
-
12
-
13
-
14
-
15
-
16
-
17
-
18
-
19
-
20
-
21
-
22
-
23
-
24
-
25
-
26
-
27
-
28
-
29
-
30
-
31
-
32
-
33
-
34
-
35
-
36
-
37
-
38
-
39
-
40
-
41
-
42
-
43
-
44
-
45
-
46
-
47
-
48
-
49
-
50
-
51
-
52
-
53
-
54
-
 55
55 -
 56
56 -
 57
57 -
 58
58 -
 59
59 -
 60
60 -
 61
61 -
 62
62 -
 63
63 -
 64
64 -
 65
65 -
66
-
67
-
68
-
69
-
70
-
71
-
72
-
73
-
74
-
75
-
76
-
77
-
78
-
79
-
80
-
81
-
82
-
83
-
84
-
85
-
86
-
87
-
88
-
89
-
90
-
91
-
92
-
93
-
94
-
95
-
96
-
97
-
98
-
99
-
100
-
101
-
102
-
103
-
104
-
105
-
106
-
107
-
108
-
109
-
110
-
111
-
112
-
113
-
114
-
115
-
116
-
117
-
118
-
119
-
120
-
121
-
122
-
123
-
124
 |
 |