Sony BDV-N790W Speaker Installation Guide - Page 2
English, Français, Español, Deutsch, Italiano, Nederlands, Polski
 |
View all Sony BDV-N790W manuals
Add to My Manuals
Save this manual to your list of manuals |
Page 2 highlights
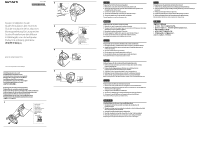
Hanging the speaker on the wall Accrochage de l'enceinte au mur Colocación del altavoz en la pared Montieren des Lautsprechers an der Wand Montaggio del diffusore a parete De luidspreker aan de muur hangen Wieszanie głośników na ścianie 1 4 mm (3/16 in / 3/16 po / 3/16 pulg) 30 mm (1 3/16 in / 1 3/16 po / 1 3/16 pulg) 5 mm (7/32 in / 7/32 po / 7/32 pulg) 10 mm (13/32 in / /13 32 po / /13 32 pulg) Hole on the back of the speaker Orifice situé au dos de l'enceinte Orificio de la parte posterior del altavoz Bohrung an der Rückseite des Lautsprechers Foro nella parte posteriore del diffusore Opening aan de achterkant van de luidspreker Otwór w tylnej części głośnika 2 For the center speaker Pour l'enceinte centrale Para el altavoz central Beim mittleren Lautsprecher Per il diffusore centrale Voor de middenluidspreker Dla głośnika środkowego 154 mm (6 1/8 in / 6 1/8 po / 6 1/8 pulg) 4 mm to 6 mm (3/16 in to 1/4 in) 4 mm à 6 mm (3/16 po à 1/4 po) de 4 mm a 6 mm (3/16 pulg a 1/4 pulg) 4 mm bis 6 mm da 4 mm a 6 mm 4 mm tot 6 mm 4 mm do 6 mm 4 mm至6 mm For the other speakers Pour les autres enceintes Para el resto de los altavoces Bei den übrigen Lautsprechern Per gli altri diffusori Voor de andere luidsprekers W przypadku pozostałych głośników 5 mm to 7 mm (7/32 in to 9/32 in) 5 mm à 7 mm (7/32 po à 9/32 po) de 5 mm a 7 mm (7/32 pulg a 9/32 pulg) 5 mm bis 7 mm da 5 mm a 7 mm 5 mm tot 7 mm 5 mm do 7 mm 5 mm至7 mm 40 mm (1 5/8 in / 1 5/8 po / 1 5/8 pulg) 3 English Caution Contact a screw shop or installer regarding the wall material or screws to be used. Use screws that are suitable for the wall material and strength. As a plaster board wall is especially fragile, attach the screws securely to a beam and fasten them to the wall. Install the speakers on a vertical and flat wall where reinforcement is applied. Sony is not responsible for accidents or damage caused by improper installation, insufficient wall strength or improper screw installation, natural calamity, etc. 1 Prepare screws (not supplied) that are suitable for the hole on the back of each speaker. 2 Fasten the screws to the wall. Leave a space between the wall and the head of the screw. For the center speaker: 4 mm to 6 mm For the other speakers: 5 mm to 7 mm Measure the distance between the screws before fastening the screws to the wall. For the center speaker: 154 mm For the other speakers: 40 mm 3 Hang the speaker on the screws. Français Avertissement Adressez-vous à un quincaillier ou à un installateur pour connaître le matériau du mur ou les vis à utiliser. Utilisez des vis adaptées au matériau et à la résistance du mur. Comme les plaques de plâtre sont particulièrement fragiles, fixez fermement les vis à une poutre et fixez-les au mur. Installez les enceintes sur une paroi verticale et plane à un endroit où se trouve un renforcement. Sony ne peut être tenu responsable de tout accident ou dégât entraîné par une installation incorrecte, une résistance insuffisante du mur, une mauvaise fixation des vis, une catastrophe naturelle, etc. 1 Préparez des vis (non fournies) adaptées à l'orifice situé au dos de chaque enceinte. 2 Fixez les vis au mur. Laissez un espace entre le mur et la tête de la vis. Pour l'enceinte centrale : 4 mm à 6 mm Pour les autres enceintes : 5 mm à 7 mm Mesurez la distance entre les vis avant de les fixer au mur. Pour l'enceinte centrale : 154 mm Pour les autres enceintes : 40 mm 3 Accrochez l'enceinte aux vis. Español Precaución Consulte con una tienda especializada en tornillos o con un instalador acerca del material de pared o de los tornillos que se deben utilizar. Utilice tornillos adecuados para el material y la resistencia de la pared. Dado que una pared de yeso es especialmente frágil, acople los tornillos firmemente a una viga y fíjelos en la pared. Instale los altavoces en una pared vertical y lisa que esté reforzada. Sony no se responsabiliza de ningún accidente o daño causado por una instalación inadecuada, una pared de poca resistencia, una instalación incorrecta de los tornillos, una catástrofe natural, etc. 1 Prepare unos tornillos (no suministrados) que sean adecuados para el orificio situado en la parte posterior de cada altavoz. 2 Fije los tornillos en la pared. Deje un espacio entre la pared y la cabeza del tornillo. Para el altavoz central: de 4 a 6 mm Para el resto de los altavoces: de 5 a 7 mm Mida la distancia entre los tornillos antes de fijarlos a la pared. Para el altavoz central: 154 mm Para el resto de los altavoces: 40 mm 3 Cuelgue el altavoz en los tornillos. Deutsch Vorsicht Wenden Sie sich bei Fragen bezüglich des Wandmaterials oder geeigneter Schrauben an einen Fachmann. Verwenden Sie Schrauben, die für das Material der Wand und die Wandstärke geeignet sind. Wände aus Gipskarton sind nicht sehr stabil. Drehen Sie die Schrauben zur Befestigung in einen Holzträger. Montieren Sie die Lautsprecher an einer senkrechten und ebenen Wand, die ausreichend verstärkt ist. Sony haftet nicht für Unfälle oder Schäden, die durch unsachgemäße Montage, unzureichende Wandstärke, schlechte Schraubenverankerung, Naturkatastrophen usw. entstehen. 1 Beschaffen Sie Schrauben (nicht mitgeliefert), die sich für die Bohrung an der Rückseite der einzelnen Lautsprecher eignen. 2 Drehen Sie die Schrauben in die Wand. Lassen Sie zwischen der Wand und dem Schraubenkopf etwas Platz. Beim mittleren Lautsprecher: 4 mm bis 6 mm Bei den übrigen Lautsprechern: 5 mm bis 7 mm Messen Sie den Abstand zwischen den Schrauben, bevor Sie die Schrauben in die Wand drehen. Beim mittleren Lautsprecher: 154 mm Bei den übrigen Lautsprechern: 40 mm 3 Hängen Sie den Lautsprecher an den Schrauben auf. Italiano Attenzione Rivolgersi a una ferramenta o a un installatore per informazioni sul tipo di materiale della parete e sul tipo di viti da utilizzare. Usare viti adatte al tipo di materiale della parete e alla sua robustezza. Nel caso di una parete di cartongesso, materiale particolarmente fragile, fissare saldamente le viti a una trave, quindi alla parete. Installare i diffusori su una parete verticale, piatta e rinforzata. Sony declina qualsiasi responsabilità per eventuali incidenti o danneggiamenti causati da installazioni non corrette, pareti non sufficientemente robuste o installazioni delle viti non corrette, calamità naturali, ecc. 1 Preparare delle viti (non in dotazione) adatte ai fori che si trovano nella parte posteriore di ciascun diffusore. 2 Fissare le viti alla parete. Lasciare uno spazio tra la parete e la testa della vite. Per il diffusore centrale: da 4 mm a 6 mm Per gli altri diffusori: da 5 mm a 7 mm Misurare la distanza tra le viti prima di avvitarle alla parete. Per il diffusore centrale: 154 mm Per gli altri diffusori: 40 mm 3 Appendere il diffusore alle viti. Nederlands Opgelet Contacteer een ijzerhandel of installateur voor meer informatie omtrent het muurmateriaal of de schroeven die u dient te gebruiken. Gebruik schroeven die geschikt zijn voor het materiaal en de stevigheid van de muur. Aangezien een muur in gipsplaat erg zwak is, draait u de schroeven het best in een balk om de luidsprekers te bevestigen. Bevestig de luidsprekers op een verticale, vlakke en verstevigde muur. Sony is niet aansprakelijk voor ongevallen noch schade ten gevolge van een ondeskundige montage, een onvoldoende sterke muur, verkeerd aangebrachte schroeven, natuurrampen enz. 1 Neem schroeven (niet bijgeleverd) die geschikt zijn voor de opening aan de achterkant van elke luidspreker. 2 Bevestig de schroeven in de muur. Laat wat ruimte tussen de muur en de kop van de schroef. Voor de middenluidspreker: 4 tot 6 mm Voor de andere luidsprekers: 5 tot 7 mm Meet de afstand tussen de schroeven voordat u de schroeven vastmaakt aan de muur. Voor de middenluidspreker: 154 mm Voor de andere luidsprekers: 40 mm 3 Hang de luidspreker op aan de schroeven. Polski Ostrzeżenie Jeśli masz wątpliwości co do rodzaju wkrętów lub materiału, z którego wykonana jest ściana, skontaktuj się ze sprzedawcą wkrętów lub instalatorem. Używaj wkrętów odpowiednich do materiału i wytrzymałości ściany. Ponieważ ściana gipsowa jest wyjątkowo delikatna, najpierw przytwierdź wkręty do deski, a następnie do ściany. Głośniki należy instalować na płaskich, pionowych i zbrojonych ścianach. Firma Sony nie ponosi odpowiedzialności za wypadki lub uszkodzenia spowodowane niewłaściwą instalacją, niewystarczającą wytrzymałością ścian lub nieprawidłowym wkręceniem wkrętów, klęskami żywiołowymi itd. 1 Przygotuj wkręty (nie wchodzą w skład zestawu) odpowiadające średnicą otworom w tylnej części każdego z głośników. 2 Zamocuj wkręty w ścianie. Pamiętaj, aby pozostawić przestrzeń między ścianą i główką wkrętu. Przy głośniku środkowym: 4-6 mm W przypadku pozostałych głośników: 5-7 mm Przed przymocowaniem wkrętów do ściany, zmierz odległość między nimi. Przy głośniku środkowym: 154 mm W przypadku pozostałych głośników: 40 mm 3 Powieś głośnik na wkrętach. 繁體中文 注意 Sony 1 2 4 mm至6 mm 5 mm至7 mm 154 mm 40 mm 3
-
 1
1 -
 2
2
 |
 |
