Sony CCD-TRV308 Operating Instructions - Page 47
Replacing the bulb, Using the built-in light, Notes, Be sure to align the, tab with the groove
 |
UPC - 027242600508
View all Sony CCD-TRV308 manuals
Add to My Manuals
Save this manual to your list of manuals |
Page 47 highlights
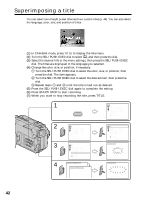
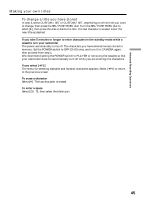
Advanced Recording Operations Using the built-in light Notes •The built-in light turns off automatically in the following cases: - When it stays on in the AUTO mode ( ) for more than 5 minutes. - When you leave it on for more than 5 minutes with no cassette inserted or after the tape has run out. To turn the built-in light on again, press LIGHT again. •The battery pack discharges quickly while the built-in light is turned on. Turn it off when not in use. •When you do not use your camcorder, turn the built-in light off and remove the battery pack to avoid turning on the built-in light accidentally. •When flickering occurs while shooting in the AUTO mode ( ), press LIGHT until the indicator appears. •The built-in light may turn on/off when you use the PROGRAM AE or backlight function while shooting in the AUTO mode ( ). •The built-in light may turn off when inserting or ejecting a cassette. •While the end search function is working, the built-in light is turned off. •When you use the conversion lens (optional), the built-in light is blocked and may not illuminate the subject properly. Replacing the bulb Use the Sony XB-3D halogen lamp (optional). The supplied halogen lamp is not commercially available. Purchase the Sony XB-3D halogen lamp. Remove the power source before replacing the bulb. (1) Remove the built-in light unit while pushing the hole under the built-in light unit using a wire. (2) Turn the bulb housing counterclockwise and detach from the built-in light unit. (3) Replace the bulb using a dry cloth. (4) Attach the bulb housing by turning it clockwise, then replace the built-in light unit. 1 2 3 4 Note Be sure to align the tab with the groove when inserting. 47
-
 1
1 -
2
-
3
-
4
-
5
-
6
-
7
-
8
-
9
-
10
-
11
-
12
-
13
-
14
-
15
-
16
-
17
-
18
-
19
-
20
-
21
-
22
-
23
-
24
-
25
-
26
-
27
-
28
-
29
-
30
-
31
-
32
-
33
-
34
-
35
-
36
-
37
-
38
-
39
-
40
-
41
-
 42
42 -
 43
43 -
 44
44 -
 45
45 -
 46
46 -
 47
47 -
 48
48 -
 49
49 -
 50
50 -
 51
51 -
 52
52 -
53
-
54
-
55
-
56
-
57
-
58
-
59
-
60
-
61
-
62
-
63
-
64
-
65
-
66
-
67
-
68
-
69
-
70
-
71
-
72
-
73
-
74
-
75
-
76
-
77
-
78
-
79
-
80
-
81
-
82
-
83
-
84
-
85
-
86
-
87
-
88
-
89
-
90
-
91
-
92
-
93
-
94
-
95
-
96
-
97
-
98
-
99
-
100
 |
 |