Sony CPD-100ES Service Manual - Page 8
Picture Tube Removal, How To Handle An Anode-cap
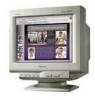 |
UPC - 027242533660
View all Sony CPD-100ES manuals
Add to My Manuals
Save this manual to your list of manuals |
Page 8 highlights
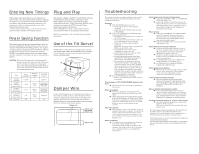
CPD-100ES 2-4. PICTURE TUBE REMOVAL 9 Demagnetization coil 10 Tension spring 2 A board 5 Neck assy 6 Deflection yoke 8 Picture tube 7 Four screws (Tapping screw 5) 1 Anode cap 3 Two screws (BVTP 4 x 16) 12 TTowwo ddeeggaussing ccooiill hhoollddeerrss 4 Stand assy (D board) 11 TTowwo ddeeggaauussssiinngg coil holders • REMOVAL OF THE ANODE-CAP Cushion NOTE: Short circuit the anode of the picture tube and the anode cap to the metal chassis, CRT shield or carbon painted on the CRT, after removing the anode. • REMOVAL PROCEDURES Turn up one side of the rubber cap in the direction indicated by arrow . Use your thumb to pull the rubber cap firmly in the direction indicated by arrow . • HOW TO HANDLE AN ANODE-CAP Do not use sharp objects which may cause damage to the surface of the anode-cap. Do not squeeze the rubber covering too hard to avoid damaging the anode-cap. A material fitting called a shatter-hook terminal is built into the rubber. Do not force turn the foot of the rubber cover. This may cause the shatter-hook terminal to protrude and damage the rubber. - 8 - When one side of the rubber cap separates from the anode button, the anodecap can be removed by turning the rubber cap and pulling it in the direction of arrow .
-
 1
1 -
2
-
 3
3 -
 4
4 -
 5
5 -
 6
6 -
 7
7 -
 8
8 -
 9
9 -
 10
10 -
 11
11 -
 12
12 -
 13
13 -
14
-
15
-
16
-
17
-
18
-
19
-
20
-
21
-
22
-
23
-
24
-
25
-
26
-
27
 |
 |
