Sony CPF-NW001P Quick Setup Guide - Page 2
Troubleshooting - cpf ix001
 |
View all Sony CPF-NW001P manuals
Add to My Manuals
Save this manual to your list of manuals |
Page 2 highlights
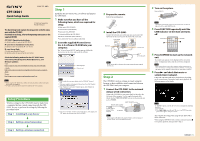
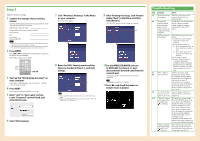
Step 3 Make the wireless settings. 1 Confirm the settings of your wireless system. Check the following items of your wireless LAN router to set the same information for the CPF-IX001. SSID (Wireless Network Name): If your wireless LAN router security is enabled, Security mode: Key: Key Number (when using WEP): Tips For details on how to check the wireless LAN router settings, refer to the operation manual of your wireless LAN router. Check that your wireless LAN router uses the latest firmware version. For details, refer to the operation manual of your wireless LAN router. 2 Press MENU. Press or repeatedly until "WLAN SETUP?" appears in the display, then press ENTER. The IP address appears in the display. MENU ENTER 3 Start up the "WLAN Setup Assistant" on your computer. Select [Start] - [All Programs] - [M-crew Server] - [TOOLS] - [WLAN Setup Assistant]. 4 Press NEXT. Wait a moment for Internet Explorer to start up. 5 Enter "root" to "User name" section. Leave "Password" section blank, and click [OK] to login. 7 Click "Wireless LAN Setup" in the Menu on your computer. The Setup screen appears. 8 Enter the SSID, Security mode and Key that you checked in Step 3-1, and click [Setup]. Tips When using WEP, check that the router Key No. and the above setting match. In most cases only one WEP Key No. is required, in which case enter the WEP Key No. to "WEP Key No. 1." 9 After finishing the setup, click "Restart Audio Client" in the Menu, and then click [Restart]. The CPF-IX001 restarts, and the settings are complete. 10Set the WIRELESS/WIRED selector to WIRELESS (see Step 2-1), and disconnect the network cable from the network unit. "Configuring" flashes in the display and the network is configured. Tip "Configuring" may flash for several minutes. 11Press and check that music or sample music is played. 6 Select the language. Troubleshooting Step 1-2 2-4 3-1, 3-8 3-3 3-11 Symptom Action The firewall settings screen appear. Follow the instructions on the screen to allow the M-crew communication. "Configuring" continues to flash in the display for longer than five minutes without the configuration being completed. If an IP address has been specified in your computer's network settings, change the setting to automatically acquire the IP address. "No Server" appears in the display. Follow the procedures below one by one. 1 Confirm the security software (Firewall) setting on your computer. 2 Restart the M-crew Server. 2-1 Select "Stop music server" on the M-crew Server task tray icon. 2-2 Select "Start music server" on the M-crew Server task tray icon. 3 Reboot your computer. 4 Execute "DatabaseClear.exe" to initialize the database (usually located in C:\Program Files\Mcrewserver). When the database is initialized the music links are deleted, so reset the links. What is "SSID" or "Security Mode"? "SSID" is the wireless LAN identifier and "Security Mode" is a communication encryption method. These may be included with your access point. If your wireless key is a string of 10 characters, select WEP (64-bit) for "Security Mode." For more details, check the settings of your access point. The "WLAN Setup If you are using a proxy server Assistant" does not with your browser, disconnect it appear on the screen. temporarily. "Check Net" appears in the display while the wireless icon ( ) is flashing. The signal is not strong enough. Move the CPF-IX001 closer to the access point. If the CPF-IX001 is already close to the access point, check the configuration of the access point to ensure that the access point is sending a signal. Once the changes have been made to the access point, toggle the WIRED/WIRELESS selector to reconfigure setting. Check the wireless channel of the wireless LAN router. Channels 1 to 11 can be used with the CPF-IX001. "No Server" appears in the display while the wireless icon ( ) lights up. The wireless key may have been entered incorrectly. Go back to a wired connection and perform the settings again from Step 3-2.
-
 1
1 -
 2
2
 |
 |
