Sony CRX100E Quick Start Guide - Page 3
General Use Instructions, source, select source, Build a Mac HFS. - software
 |
View all Sony CRX100E manuals
Add to My Manuals
Save this manual to your list of manuals |
Page 3 highlights
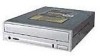
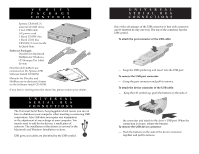
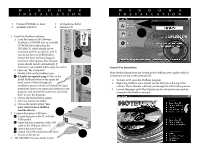
MACINTOSH I N S TA L L AT I O N System Requirements ¥ Apple iMacª or USB equipped G3 Computers ¥ Mac¨ OS 8.5 or higher Installation Instructions 1. Load the Spressa USB Software Installation CD-ROM into the built-in CD-ROM drive. a. The Sony Discribe Volume will appear and open up on your desktop. Double click on the installer and follow the steps to save the program. b. Quit the installer when the installation is complete. 2a 2b 2. Install the Spressa USB Drive: Steps 2a and 2b discuss opening the port cover of the iMac; G3 computers equipped with USB have a visible connector on the back of the unit, much like a PC. a. Open the cover to the iMac ports. b. Thread the cable through the opening in the cover. c. Locate the port with the USB symbol. 1 2 2c 1 2 2d 2e A510.C2-1A600M0Ha-xz2.40 V d. Insert the port connector of the USB cable to the USB port of the Macintosh. e. Attach the power cord. f. Attach the USB connector to the Spressa USB drive. g. Power on the device. h. Reboot the computer. 3. The Spressa USB is now ready to use! I/O L R 2f MACINTOSH I N S TA L L AT I O N General Use Instructions These steps will create a Macintosh volume on a CD. For more detail or for instructions to complete other functions, please see the Discribe manual which is in electronic format on the Software CD. 1. Open Discribe. 2. Click on the source button which will open the select source screen (this is the only time you use one of the buttons on the left). 3. Choose to create a NEW IMAGE. 4. Choose to Build a Mac HFS. 5. Choose EDIT FILE LIST from the right hand command bar. In this window you can add files, folders and can name the volume you are creating. When all is prepared click on done to get out of the Edit File List window. When you return to the main view you should see your volume in the SOURCE VOLUMES screen. 6. Click DONE. The software will now locate the Spressa USB. If the Spressa USB is not found, verify that the unit is attached properly and powered on. You should restart once all connectors are properly attached. 5 7. Write to the CD. You can either choose to ¥ WRITE SESSION, which means you can write more to the disc (given there is enough room left), or ¥ WRITE DISC, which means you will not be able to write more to the disc. 2 3 4 7
-
 1
1 -
 2
2 -
 3
3 -
 4
4
 |
 |
