Sony DCR-SX85 Handycam® Handbook - Page 66
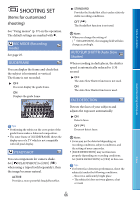
SHOOTING SET (Items for customized shooting), Items for customized, shooting - auto shutter
 |
UPC - 027242819931
View all Sony DCR-SX85 manuals
Add to My Manuals
Save this manual to your list of manuals |
Page 66 highlights
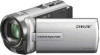
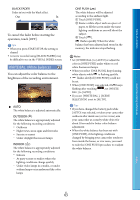
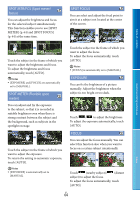
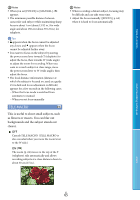
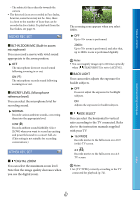
Table of contents Useful recording techniques SHOOTING SET (Items for customized shooting) See "Using menus" (p. 57) on the operation. The default settings are marked with . REC MODE (Recording mode) See page 25. GUIDEFRAME You can display the frame and check that the subject is horizontal or vertical. The frame is not recorded. OFF Does not display the guide frame. ON Displays the guide frame. Tips Positioning the subject at the cross point of the guide frame makes a balanced composition. The outer frame of [GUIDEFRAME] shows the display area of a TV which is not compatible with full pixel display. STEADYSHOT You can compensate for camera shake. Set [ STEADYSHOT] to [OFF] ( ) when using a tripod (sold separately), then the image becomes natural. ACTIVE Provides a more powerful SteadyShot effect. STANDARD Provides the SteadyShot effect under relatively stable recording conditions. OFF ( ) The SteadyShot function is not used. Notes When you change the setting of [ STEADYSHOT], the imaging field will also change accordingly. AUTO SLW SHUTTR (Auto Slow Shutter) When recording in dark places, the shutter speed is automatically reduced to 1/30 second. OFF The Auto Slow Shutter function is not used. ON The Auto Slow Shutter function is used. FACE DETECTION Detects the faces of your subjects and adjusts the exposure automatically. ON Detects faces. OFF ( ) Does not detect faces. Notes Faces may not be detected depending on recording conditions, subject conditions, and the setting of your camcorder. [FACE DETECTION] may not function properly depending on recording conditions. Set [FACE DETECTION] to [OFF] in this case. Tips For better face detection performance, shoot the subject(s) under the following conditions: Shoot in a sufficiently bright place The subject(s) does not wear glasses, a hat or mask Index US 66
-
 1
1 -
2
-
3
-
4
-
5
-
6
-
7
-
8
-
9
-
10
-
11
-
12
-
13
-
14
-
15
-
16
-
17
-
18
-
19
-
20
-
21
-
22
-
23
-
24
-
25
-
26
-
27
-
28
-
29
-
30
-
31
-
32
-
33
-
34
-
35
-
36
-
37
-
38
-
39
-
40
-
41
-
42
-
43
-
44
-
45
-
46
-
47
-
48
-
49
-
50
-
51
-
52
-
53
-
54
-
55
-
56
-
57
-
58
-
59
-
60
-
 61
61 -
 62
62 -
 63
63 -
 64
64 -
 65
65 -
 66
66 -
 67
67 -
 68
68 -
 69
69 -
 70
70 -
 71
71 -
72
-
73
-
74
-
75
-
76
-
77
-
78
-
79
-
80
-
81
-
82
-
83
-
84
-
85
-
86
-
87
-
88
-
89
-
90
-
91
-
92
-
93
-
94
-
95
-
96
-
97
-
98
 |
 |