Sony DCR-TRV17 Operating Instructions (primary manual) - Page 101
Icon/item, Rec Mode, Audio Mode, Remain, Clock Set, Auto Tv On, Tv Input, Ltr Size, Demo Mode,
 |
View all Sony DCR-TRV17 manuals
Add to My Manuals
Save this manual to your list of manuals |
Page 101 highlights
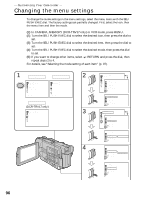
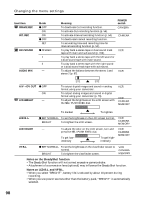
Changing the menu settings Customizing Your Camcorder Icon/item REC MODE Mode z SP LP AUDIO MODE z 12BIT 16BIT qREMAIN z AUTO ON CLOCK SET - AUTO TV ON z OFF ON TV INPUT LTR SIZE z VIDEO1 VIDEO2 VIDEO3 OFF z NORMAL 2× DEMO MODE z ON OFF Meaning To record in the SP (Standard Play) mode. To increase the recording time to 1.5 times the SP mode. To record in the 12-bit mode (two stereo sounds). To record in the 16-bit mode (the one stereo sound with high quality). To display the remaining tape bar: • for about 8 seconds after your camcorder is turned on and calculates the remaining amount of tape. • for about 8 seconds after a cassette is inserted and your camcorder calculates the remaining amount of tape. • for about 8 seconds after N is pressed in VCR mode. • for about 8 seconds after DISPLAY is pressed to display the screen indicators. • for the period of tape rewinding, forwarding or picture search in the VCR mode. To always display the remaining tape indicator. To set the date or time (p. 18). - To automatically turn on a Sony TV when using the laser link function (P. 37). To switch the video input on a Sony TV when using the laser function (P. 37). - To display selected menu items in normal size. To display selected menu items at twice the normal size. To make the demonstration appear. To cancel the demonstration mode. POWER switch VCR CAMERA VCR CAMERA VCR CAMERA CAMERA MEMORY VCR CAMERA MEMORY VCR CAMERA MEMORY VCR CAMERA MEMORY CAMERA Notes on the LP mode • When you record a tape in the LP mode on your camcorder, we recommend playing the tape on your camcorder. When you play back the tape on other camcorders or VCRs, noise may occur in pictures or sound. • When you record in the LP mode, we recommend using a Sony Excellence/Master cassette so that you can get the most out of your camcorder. • You cannot make audio dubbing on a tape recorded in the LP mode. Use the SP mode for the tape to be audio dubbed. • When you record in the SP and LP modes on one tape or you record some scenes in the LP mode, the playback picture may be distorted or the time code may not be written properly between scenes. Notes on AUDIO MODE • You cannot dub audio sound on a tape recorded in the 16-bit mode. • When playing back a tape recorded in the 16-bit mode, you cannot adjust the balance in AUDIO MIX. Notes on DEMO MODE • You cannot select DEMO MODE when a cassette is inserted in your camcorder. • DEMO MODE is set to STBY (Standby) at the factory and the demonstration starts about 10 minutes after you have set the POWER switch to CAMERA without a cassette inserted. Note that you cannot select STBY of DEMO MODE in the menu settings. • When NIGHTSHOT is set to ON, the "NIGHTSHOT" indicator appears on the LCD screen or in the viewfinder and you cannot select DEMO MODE in the menu settings. 101 (continued on following page)
-
 1
1 -
2
-
3
-
4
-
5
-
6
-
7
-
8
-
9
-
10
-
11
-
12
-
13
-
14
-
15
-
16
-
17
-
18
-
19
-
20
-
21
-
22
-
23
-
24
-
25
-
26
-
27
-
28
-
29
-
30
-
31
-
32
-
33
-
34
-
35
-
36
-
37
-
38
-
39
-
40
-
41
-
42
-
43
-
44
-
45
-
46
-
47
-
48
-
49
-
50
-
51
-
52
-
53
-
54
-
55
-
56
-
57
-
58
-
59
-
60
-
61
-
62
-
63
-
64
-
65
-
66
-
67
-
68
-
69
-
70
-
71
-
72
-
73
-
74
-
75
-
76
-
77
-
78
-
79
-
80
-
81
-
82
-
83
-
84
-
85
-
86
-
87
-
88
-
89
-
90
-
91
-
92
-
93
-
94
-
95
-
 96
96 -
 97
97 -
 98
98 -
 99
99 -
 100
100 -
 101
101 -
 102
102 -
 103
103 -
 104
104 -
 105
105 -
 106
106 -
107
-
108
-
109
-
110
-
111
-
112
-
113
-
114
-
115
-
116
-
117
-
118
-
119
-
120
-
121
-
122
-
123
-
124
-
125
-
126
-
127
-
128
-
129
-
130
-
131
-
132
-
133
-
134
-
135
-
136
-
137
-
138
-
139
-
140
-
141
-
142
-
143
-
144
-
145
-
146
-
147
-
148
-
149
-
150
-
151
-
152
-
153
-
154
-
155
-
156
-
157
-
158
-
159
-
160
-
161
-
162
-
163
-
164
-
165
-
166
-
167
-
168
-
169
-
170
-
171
-
172
-
173
-
174
-
175
-
176
-
177
-
178
-
179
-
180
 |
 |