Sony DPP-F700 Operating Instructions - Page 24
Setting the current date and time, About the operation area on this, Operations in an initial state
 |
UPC - 027242776197
View all Sony DPP-F700 manuals
Add to My Manuals
Save this manual to your list of manuals |
Page 24 highlights
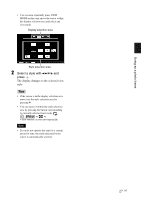
About descriptions in this manual The operations described in this manual are based on remote control operation. When an operation is performed differently, for example, with the remote control and the buttons on this unit, it will be explained in a tip. About the operation area on this unit The operation area on the right of the LCD screen lights up when touched. If the operation area is not touched for about 30 seconds, it turns off automatically. The PRINT button lights up when printing is enabled. Notes • The buttons on the operation area only work when lit up. Operations in an initial state When this unit is turned on without a memory card inserted, the initial display below appears on the screen. If this unit is not operated for 10 seconds, the demo mode is displayed. If any other button than the power button is pressed, the screen returns to the initial display. First, press MENU during the initial display, and then set the current date and time. (See next section) 24 GB Setting the current date and time 1 Press MENU. 2 Press B/b to select the (Settings) tab. Tips • You can only use the B/b buttons when the clock and calendar settings item (page 29) is not selected. 3 Press v/V to select [Date/time Settings] and then press . 4 Adjust the date. 1Press v/V to select [Date] and then press . 2Press B/b to select year, month, and day, and then press v/V to select a value, then press . 5 Adjust the time. 1Press v/V to select [Time] and then press . 2Press B/b to select hour, minute, and second, and then press v/V to select a value, then press . 6 Select the format of the date. 1Press v/V to select [Date Display Order] and then press .
-
 1
1 -
2
-
3
-
4
-
5
-
6
-
7
-
8
-
9
-
10
-
11
-
12
-
13
-
14
-
15
-
16
-
17
-
18
-
 19
19 -
 20
20 -
 21
21 -
 22
22 -
 23
23 -
 24
24 -
 25
25 -
 26
26 -
 27
27 -
 28
28 -
 29
29 -
30
-
31
-
32
-
33
-
34
-
35
-
36
-
37
-
38
-
39
-
40
-
41
-
42
-
43
-
44
-
45
-
46
-
47
-
48
-
49
-
50
-
51
-
52
-
53
-
54
-
55
-
56
-
57
-
58
-
59
-
60
-
61
-
62
-
63
-
64
-
65
-
66
-
67
-
68
-
69
-
70
-
71
-
72
-
73
-
74
-
75
-
76
-
77
-
78
-
79
-
80
-
81
-
82
-
83
-
84
-
85
-
86
-
87
-
88
-
89
-
90
-
91
-
92
-
93
-
94
-
95
-
96
-
97
-
98
-
99
-
100
-
101
-
102
-
103
-
104
-
105
-
106
-
107
-
108
-
109
 |
 |