Sony DPP-FP65 Operating Instructions - Page 7
Before you begin, Identifying the parts - fp75
 |
View all Sony DPP-FP65 manuals
Add to My Manuals
Save this manual to your list of manuals |
Page 7 highlights
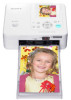
Before you begin Before you begin Identifying the parts For details, see the pages indicated in the parentheses. Illustrations are of the DPP-FP75. The button locations and names of the DPP-FP65 are identical, although the LCD screen size is different. Printer front panel A 1 (on/standby) button/(standby) indicator B CANCEL/ (Index View) button C MENU button D LCD screen 2.4 type DPP-FP65 3.5 type DPP-FP75 E ENTER button F Direction (g/G/f/F) buttons G (Red-eye Correction) button (.page 20) H PRINT button/indicator I Paper tray compartment (.page 10) J Paper tray compartment door K "Memory Stick PRO" (Standard/ Duo) slot (.pages16, 61) L xD-Picture Card slot (.pages16, 62) M SD Memory Card slot (.pages16, 62) N Ink ribbon eject lever (.page 9) O Ink ribbon (not supplied) (.page 9) P Ink ribbon compartment door (.page 9) Continued 7 GB
-
 1
1 -
 2
2 -
 3
3 -
 4
4 -
 5
5 -
 6
6 -
 7
7 -
 8
8 -
 9
9 -
 10
10 -
 11
11 -
 12
12 -
13
-
14
-
15
-
16
-
17
-
18
-
19
-
20
-
21
-
22
-
23
-
24
-
25
-
26
-
27
-
28
-
29
-
30
-
31
-
32
-
33
-
34
-
35
-
36
-
37
-
38
-
39
-
40
-
41
-
42
-
43
-
44
-
45
-
46
-
47
-
48
-
49
-
50
-
51
-
52
-
53
-
54
-
55
-
56
-
57
-
58
-
59
-
60
-
61
-
62
-
63
-
64
-
65
-
66
-
67
-
68
-
69
-
70
-
71
-
72
 |
 |
