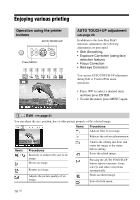
Sony DPP-FP95 Operating Instructions - Page 21
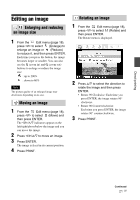
Editing an image, Enlarging and reducing an image size, Enlarging and reducing, an image size
 |
UPC - 027242735002
View all Sony DPP-FP95 manuals
Add to My Manuals
Save this manual to your list of manuals |
Page 21 highlights
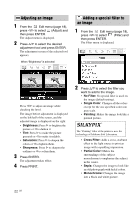
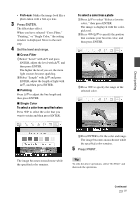
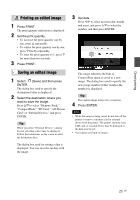
Direct printing Editing an image Enlarging and reducing an image size 1 From the Edit menu (page 18), press g/G to select (Enlarge) to enlarge an image or (Reduce) to reduce it, and then press ENTER. Each time you press the button, the image becomes larger or smaller. You can also use the (zoom in) and (zoom out) buttons to enlarge or reduce the image size: : up to 200% : down to 60% Note The picture quality of an enlarged image may deteriorate depending on its size. Moving an image 1 From the Edit menu (page 18), press g/G to select (Move) and then press ENTER. The g/G/f/F indicators appear on the left/right/above/below the image and you can move the image. 2 Press g/G/f/F to move an image. 3 Press ENTER. The image is fixed in its current position. 4 Press PRINT. Rotating an image 1 From the Edit menu (page 18), press g/G to select (Rotate) and then press ENTER. The Rotate menu is displayed. 2 Press f/F to select the direction to rotate the image and then press ENTER. • Rotate 90 Clockwise: Each time you press ENTER, the image rotates 90° clockwise. • Rotate 90 Counterclockwise: Each time you press ENTER, the image rotates 90° counterclockwise. 3 Press PRINT. Continued 21 GB
-
 1
1 -
2
-
3
-
4
-
5
-
6
-
7
-
8
-
9
-
10
-
11
-
12
-
13
-
14
-
15
-
 16
16 -
 17
17 -
 18
18 -
 19
19 -
 20
20 -
 21
21 -
 22
22 -
 23
23 -
 24
24 -
 25
25 -
 26
26 -
27
-
28
-
29
-
30
-
31
-
32
-
33
-
34
-
35
-
36
-
37
-
38
-
39
-
40
-
41
-
42
-
43
-
44
-
45
-
46
-
47
-
48
-
49
-
50
-
51
-
52
-
53
-
54
-
55
-
56
-
57
-
58
-
59
-
60
-
61
-
62
-
63
-
64
-
65
-
66
-
67
-
68
-
69
-
70
-
71
-
72
-
73
-
74
-
75
-
76
-
77
-
78
-
79
-
80
-
81
-
82
-
83
-
84
-
85
-
86
-
87
-
88
-
89
-
90
-
91
-
92
 |
 |