Sony DSC-T30/B User Guide - Page 67
Stage 2: Connecting the camera, and your computer, Stage 3-A: Copying images to a, computer - usb cable
 |
View all Sony DSC-T30/B manuals
Add to My Manuals
Save this manual to your list of manuals |
Page 67 highlights
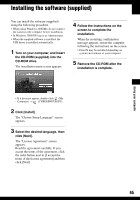
3 Set the mode switch to , then turn on the camera and the computer. 2 Set the switch on the cable for multi-use terminal to "CAMERA". CAMERA TV DISP SEL Using your computer Stage 2: Connecting the camera and your computer 1 Connect the camera to your computer. 2 To the multi connector 1 To a USB jack Cable for multiuse terminal • With Windows XP, the AutoPlay wizard appears on the desktop. "USB Mode Mass Storage" appears on the screen of the camera. USB Mode Mass Storage Memory Stick Switch on MENU Access indicators* When a USB connection is established for the first time, your computer automatically runs a program to recognize the camera. Wait for a while. * During communication, the access indicators turn red. Do not operate the computer until the indicators turn white. • If "USB Mode Mass Storage" does not appear, set [USB Connect] to [Mass Storage] (page 61). Stage 3-A: Copying images to a computer • For Windows 2000/Me, follow the procedure explained in "Stage 3-B: Copying images to a Computer" on page 69. • For Windows XP, when the wizard screen does not appear automatically, follow the procedure explained in "Stage 3-B: Copying images to a Computer" on page 69. This section describes an example of copying images to a "My Documents" folder. 67
-
 1
1 -
2
-
3
-
4
-
5
-
6
-
7
-
8
-
9
-
10
-
11
-
12
-
13
-
14
-
15
-
16
-
17
-
18
-
19
-
20
-
21
-
22
-
23
-
24
-
25
-
26
-
27
-
28
-
29
-
30
-
31
-
32
-
33
-
34
-
35
-
36
-
37
-
38
-
39
-
40
-
41
-
42
-
43
-
44
-
45
-
46
-
47
-
48
-
49
-
50
-
51
-
52
-
53
-
54
-
55
-
56
-
57
-
58
-
59
-
60
-
61
-
 62
62 -
 63
63 -
 64
64 -
 65
65 -
 66
66 -
 67
67 -
 68
68 -
 69
69 -
 70
70 -
 71
71 -
 72
72 -
73
-
74
-
75
-
76
-
77
-
78
-
79
-
80
-
81
-
82
-
83
-
84
-
85
-
86
-
87
-
88
-
89
-
90
-
91
-
92
-
93
-
94
-
95
-
96
-
97
-
98
-
99
-
100
-
101
-
102
-
103
-
104
-
105
-
106
-
107
-
108
-
109
-
110
-
111
-
112
-
113
-
114
-
115
-
116
-
117
-
118
-
119
 |
 |
