Sony DSLR-A700K Read This First
Sony DSLR-A700K - alpha; Digital Single Lens Reflex Camera Manual
 |
View all Sony DSLR-A700K manuals
Add to My Manuals
Save this manual to your list of manuals |
Sony DSLR-A700K manual content summary:
- Sony DSLR-A700K | Read This First - Page 1
Organic Compound)-free vegetableoil based ink. Printed in Japan Digital Single Lens Reflex Camera Read This First DSLR-A700 Operating Instructions Before operating the unit, please read this manual and "User's Guide/Troubleshooting" (separate volume) thoroughly, and retain them for future reference - Sony DSLR-A700K | Read This First - Page 2
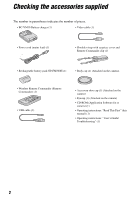
Commander) (1) • USB cable (1) • Accessory shoe cap (1) (Attached on the camera) • Eyecup (1) (Attached on the camera) • CD-ROM (Application Software for α camera) (1) • Operating instructions: "Read This First" (this manual) (1) • Operating instructions: "User's Guide/ Troubleshooting" (1) 2 - Sony DSLR-A700K | Read This First - Page 3
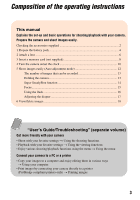
Composition of the operating instructions This manual Explains the set-up and basic operations for shooting/playback with your camera. Prepare the camera and shoot images easily. Checking the accessories supplied 2 1 Prepare the battery pack 4 2 Attach a lens ...6 3 Insert a memory card (not - Sony DSLR-A700K | Read This First - Page 4
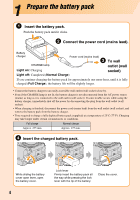
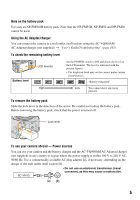
disconnected from the AC power source (mains) as long as it is connected to the wall outlet (wall socket). If some trouble occurs while using the battery charger, immediately shut off the power by disconnecting the plug from the wall outlet (wall socket). • When charging is finished, disconnect the - Sony DSLR-A700K | Read This First - Page 5
and NP-FM30 cannot be used. Using the AC Adaptor/charger You can connect the camera to a wall outlet (wall socket) using the AC-VQ900AM AC Adaptor/charger (not supplied). t "User's Guide/Troubleshooting" (page 165) To check the remaining battery level LCD monitor Battery level High Set the - Sony DSLR-A700K | Read This First - Page 6
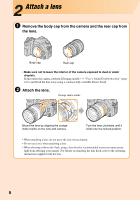
the rear cap from the lens. Body cap Rear cap • Make sure not to leave the interior of the camera exposed to dust or water droplets. If dust enters the camera, perform [Cleaning mode] (t "User's Guide/Troubleshooting" (page 125)) and brush the dust away using a commercially available blower brush - Sony DSLR-A700K | Read This First - Page 7
button all the way in and turn the lens counterclockwise until it stops. Lens release button • Replace the cap on the lens and attach the body cap (or another lens) to the camera after removing the lens. Keep dust from getting inside the camera when changing lenses! If dust or debris gets inside the - Sony DSLR-A700K | Read This First - Page 8
Stick Duo", CompactFlash card (CF card), or Microdrive as a memory card. • Before using a memory card, be sure to format it using this camera. Otherwise, satisfactory performance may not be obtained. t "User's Guide/Troubleshooting" (page 115) • For more information about the memory card t "User - Sony DSLR-A700K | Read This First - Page 9
below after turning on the camera. Multi-selector Setup menu. Follow the procedure MENU button 1 Press MENU. 2 Set up using the multi-selector. Move used. Be careful when you handle it. When the access lamp is lit Never remove the memory card or the battery Guide/ Troubleshooting" (page 162) 9 - Sony DSLR-A700K | Read This First - Page 10
Turn the camera on/set the clock 1 Set the POWER switch to ON by sliding it in the direction of the arrow. 2 Set the clock with the multi- - Sony DSLR-A700K | Read This First - Page 11
Save). To cancel the power save, operate the camera, for example, by pressing the shutter button halfway down. • You can change the time that must elapse to activate the function (the default settings are [5 sec]/[3 min]). t "User's Guide/Troubleshooting" (page 120) Changing the language setting You - Sony DSLR-A700K | Read This First - Page 12
the camera. However, you can change any of the settings. 1 Set the mode dial to AUTO. Grip 2 Hold the grip and look into the viewfinder. The subject at the intersection of (the 11 focus area sensors) comes into focus. 3 When using a zoom lens, turn the zoom ring, then decide on your shot. 4 Shoot - Sony DSLR-A700K | Read This First - Page 13
User's Guide/Troubleshooting" (page 24) • If "0" is flashing in yellow, the memory card is full. Replace the body. Leaning against a wall or putting your elbow on a table will also provide support. • When shooting in dark light without the flash, shooting in macro, or using a telephoto lens, camera - Sony DSLR-A700K | Read This First - Page 14
-shake calculated from the shutter speed and focal length. If the indicator flashes, reduce the camera-shake by setting the (Super SteadyShot) switch to ON or using the built-in flash or a tripod. • The Super SteadyShot function may not work optimally when the power has just been turned on, when - Sony DSLR-A700K | Read This First - Page 15
subject is closer than the minimum shooting distance of the attached lens, the focus cannot be confirmed. Make sure you put enough distance between the subject and the camera. • You can manually release the shutter even when the indicator is flashing. t "User's Guide/Troubleshooting" (page 102) 15 - Sony DSLR-A700K | Read This First - Page 16
using it. • Do not hold the camera by grabbing the flash emitter. • If you want to make sure the flash fires without fail, set the flash mode to Guide/Troubleshooting sensitivity t "User's Guide/Troubleshooting" (page 64) • The built-in flash is designed to be used with lenses with focal lengths of - Sony DSLR-A700K | Read This First - Page 17
toward + when you are far-sighted, toward - when you are near-sighted. The direction is indicated on the dial if you remove the eyecup. t "User's Guide/Troubleshooting" (page 44) • Training the camera on the light allows you to adjust the diopter easily. 17 - Sony DSLR-A700K | Read This First - Page 18
View/delete images To view images 1 Press (Playback). 2 Select an image with b/B on the multi-selector. Front control dial • You can easily view the next/previous image by turning the front or rear control dial. Rear control dial (Enlarge) button (Index) button DISP (Display) button (Delete) - Sony DSLR-A700K | Read This First - Page 19
display with the DISP (Display) button. • Viewing an image list on the index screen with the (Index) button. • Enlarging images with the (Enlarge) button. t "User's Guide/Troubleshooting" (pages 83, 84, 86) 19
-
 1
1 -
 2
2 -
 3
3 -
 4
4 -
 5
5 -
 6
6 -
 7
7 -
8
-
9
-
10
-
11
-
12
-
13
-
14
-
15
-
16
-
17
-
18
-
19
 |
 |
Printed in Japan
© 2007 Sony Corporation
3-216-919-
11
(1)
Printed on 70% or more recycled paper using VOC
(Volatile Organic Compound)-free vegetableoil based ink.
Additional information on this product and
answers to frequently asked questions can be
found at our Customer Support Website.
DSLR-A700
Digital Single Lens Reflex Camera
Read This First
Operating Instructions
Before operating the unit, please read this manual and
“User’s Guide/Troubleshooting”
(separate volume)
thoroughly, and retain them for future reference.