Sony DVD710 Operating Guide - Page 26
Changing the language setting, Step 4: Making adjustments before recording, Opening the lens cover
 |
UPC - 027242727694
View all Sony DVD710 manuals
Add to My Manuals
Save this manual to your list of manuals |
Page 26 highlights
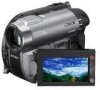
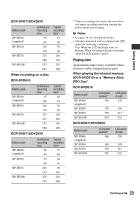
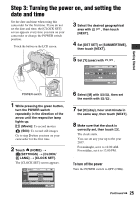
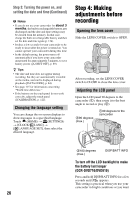
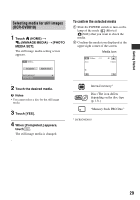
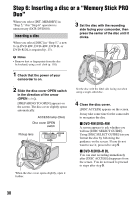
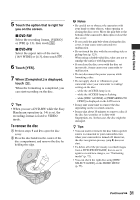
Step 3: Turning the power on, and setting the date and time (Continued) b Notes • If you do not use your camcorder for about 3 months, the built-in rechargeable battery gets discharged and the date and time settings may be cleared from the memory. In that case, charge the built-in rechargeable battery and then set the date and time again (p. 124). • It takes a few seconds for your camcorder to be ready to shoot after the power is turned on. You cannot operate your camcorder during this time. • In the default setting, the power turns off automatically if you leave your camcorder unoperated for approximately 5 minutes, to save battery power ([A.SHUT OFF], p. 89). z Tips • The date and time does not appear during recording, but they are automatically recorded on the media, and can be displayed during playback ([DATA CODE], p. 84). • See page 115 for information concerning "World time difference." • If the buttons on the touch panel do not work correctly, adjust the touch panel ([CALIBRATION], p. 122). Changing the language setting You can change the on-screen displays to show messages in a specified language. Touch (HOME) t (SETTINGS) t [CLOCK/ LANG] t [ LANGUAGE SET], then select the desired language. Step 4: Making adjustments before recording Opening the lens cover Slide the LENS COVER switch to OPEN. After recording, set the LENS COVER switch to CLOSE to close the lens cover. Adjusting the LCD panel Open the LCD panel 90 degrees to the camcorder (1), then rotate it to the best angle to record or play (2). 290 degrees (max.) 190 degrees to the camcorder 2180 degrees (max.) DISP/BATT INFO To turn off the LCD backlight to make the battery last longer (DCR-DVD710/DVD810) Press and hold DISP/BATT INFO for a few seconds until appears. This setting is practical when you use your camcorder in bright conditions or you want 26
-
 1
1 -
2
-
3
-
4
-
5
-
6
-
7
-
8
-
9
-
10
-
11
-
12
-
13
-
14
-
15
-
16
-
17
-
18
-
19
-
20
-
 21
21 -
 22
22 -
 23
23 -
 24
24 -
 25
25 -
 26
26 -
 27
27 -
 28
28 -
 29
29 -
 30
30 -
 31
31 -
32
-
33
-
34
-
35
-
36
-
37
-
38
-
39
-
40
-
41
-
42
-
43
-
44
-
45
-
46
-
47
-
48
-
49
-
50
-
51
-
52
-
53
-
54
-
55
-
56
-
57
-
58
-
59
-
60
-
61
-
62
-
63
-
64
-
65
-
66
-
67
-
68
-
69
-
70
-
71
-
72
-
73
-
74
-
75
-
76
-
77
-
78
-
79
-
80
-
81
-
82
-
83
-
84
-
85
-
86
-
87
-
88
-
89
-
90
-
91
-
92
-
93
-
94
-
95
-
96
-
97
-
98
-
99
-
100
-
101
-
102
-
103
-
104
-
105
-
106
-
107
-
108
-
109
-
110
-
111
-
112
-
113
-
114
-
115
-
116
-
117
-
118
-
119
-
120
-
121
-
122
-
123
-
124
-
125
-
126
-
127
-
128
-
129
-
130
-
131
-
132
-
133
-
134
-
135
-
136
-
137
-
138
-
139
-
140
-
141
-
142
-
143
-
144
-
145
-
146
-
147
-
148
-
149
-
150
-
151
-
152
-
153
-
154
-
155
-
156
-
157
-
158
-
159
 |
 |