Sony ECM-B1M Help Guide - Page 4
About the wind screen - analog
 |
View all Sony ECM-B1M manuals
Add to My Manuals
Save this manual to your list of manuals |
Page 4 highlights
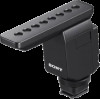
You can record the sounds coming across from the front while minimizing those coming from the back. : Omnidirectional Provides the same directivity to pick up the sounds coming from every direction. Select this directivity when you want to record environmental sounds in particular or include the voice of a photographer in the recording. 2. ATT switch Select the option suitable for the audio recording volume. To record loud sounds while minimizing distortion, select "20dB." To record quiet sounds while amplifying the sounds, select "0dB." It is recommended that you select an option while monitoring the volume level meter on the camera or the audio recording volume with headphones. 3. AUTO/MAN switch AUTO: The recording volume level is automatically adjusted. MAN: Adjust the recording volume with the AUDIO LEVEL dial. 4. AUDIO LEVEL dial Adjust the recording volume level when the AUTO/MAN switch is set to "MAN." It is recommended that you adjust the level while monitoring the volume level meter on the camera or the audio recording volume with headphones. 5. FILTER switch NC: Select this option to use the noise cut filter function. Unpleasant noises are effectively eliminated by digital signal processing. If the sound quality does not seem appropriate, select "OFF." LC: Select this option to use the low cut filter function. Unwanted noises, such as wind noise, air-conditioning noise, and vibration noise, are minimized. OFF: Select this option to disable either of the filter functions. Note Hand-held use of the attached camera in a quiet place may cause a soft vibrating sound to be recorded. If the recorded vibrating sound is disturbing, set the FILTER switch to "LC" and try all over again. 6. DIGITAL/ANALOG switch Select the digital or analog input type. If your camera is compatible with the digital audio interface of the Multi Interface Shoe, set the switch to "DIGITAL." This allows the unit and the attached camera to communicate with each other with digital signals and provide audio recording with minimum noise insertion. About the wind screen By fitting the wind screen over the microphone of the unit, you can minimize the noise caused by the wind or breath hitting the microphone to be included in the recording. Note If the wind screen is exposed to rain and wet, remove it from the unit and let it dry in the shade. Related Topic Supported camera models Attaching/removing to/from the camera About the pickup pattern and the frequency response 4
-
 1
1 -
 2
2 -
 3
3 -
 4
4 -
 5
5 -
 6
6 -
 7
7 -
 8
8 -
 9
9 -
 10
10 -
11
-
12
-
13
-
14
 |
 |
